Google Calendar API をアプリに統合する方法
目次
このガイドでは、Google Cloud プロジェクトの設定、必要なスコープ、注意点、そして実際の認可例を含め、Google Calendar API をアプリに統合する方法を詳しく説明します。
前提条件
このガイドでは、Google Cloud プロジェクトを設定する際に使用するメールアドレスと既存ドメイン、ある程度のコーディング経験、そして作りたいものの概要があることを前提としています。
Google Calendar API を扱ったことがなく、アプリに統合するためのすべての手順を把握したい方にも役立ちます。
Google Calendar API をアプリで利用・統合する手順
1. Google Developer Console に登録する
Google Developer Console アカウントをお持ちでない場合は、https://console.cloud.google.com/ で作成してください。
2. 既存の Google Cloud プロジェクトを選択または新規作成する
Google Cloud では、開発者や組織が複数のプロジェクトを持つことができます。以下の操作を行う前に、必ず正しいプロジェクトを選択してください。
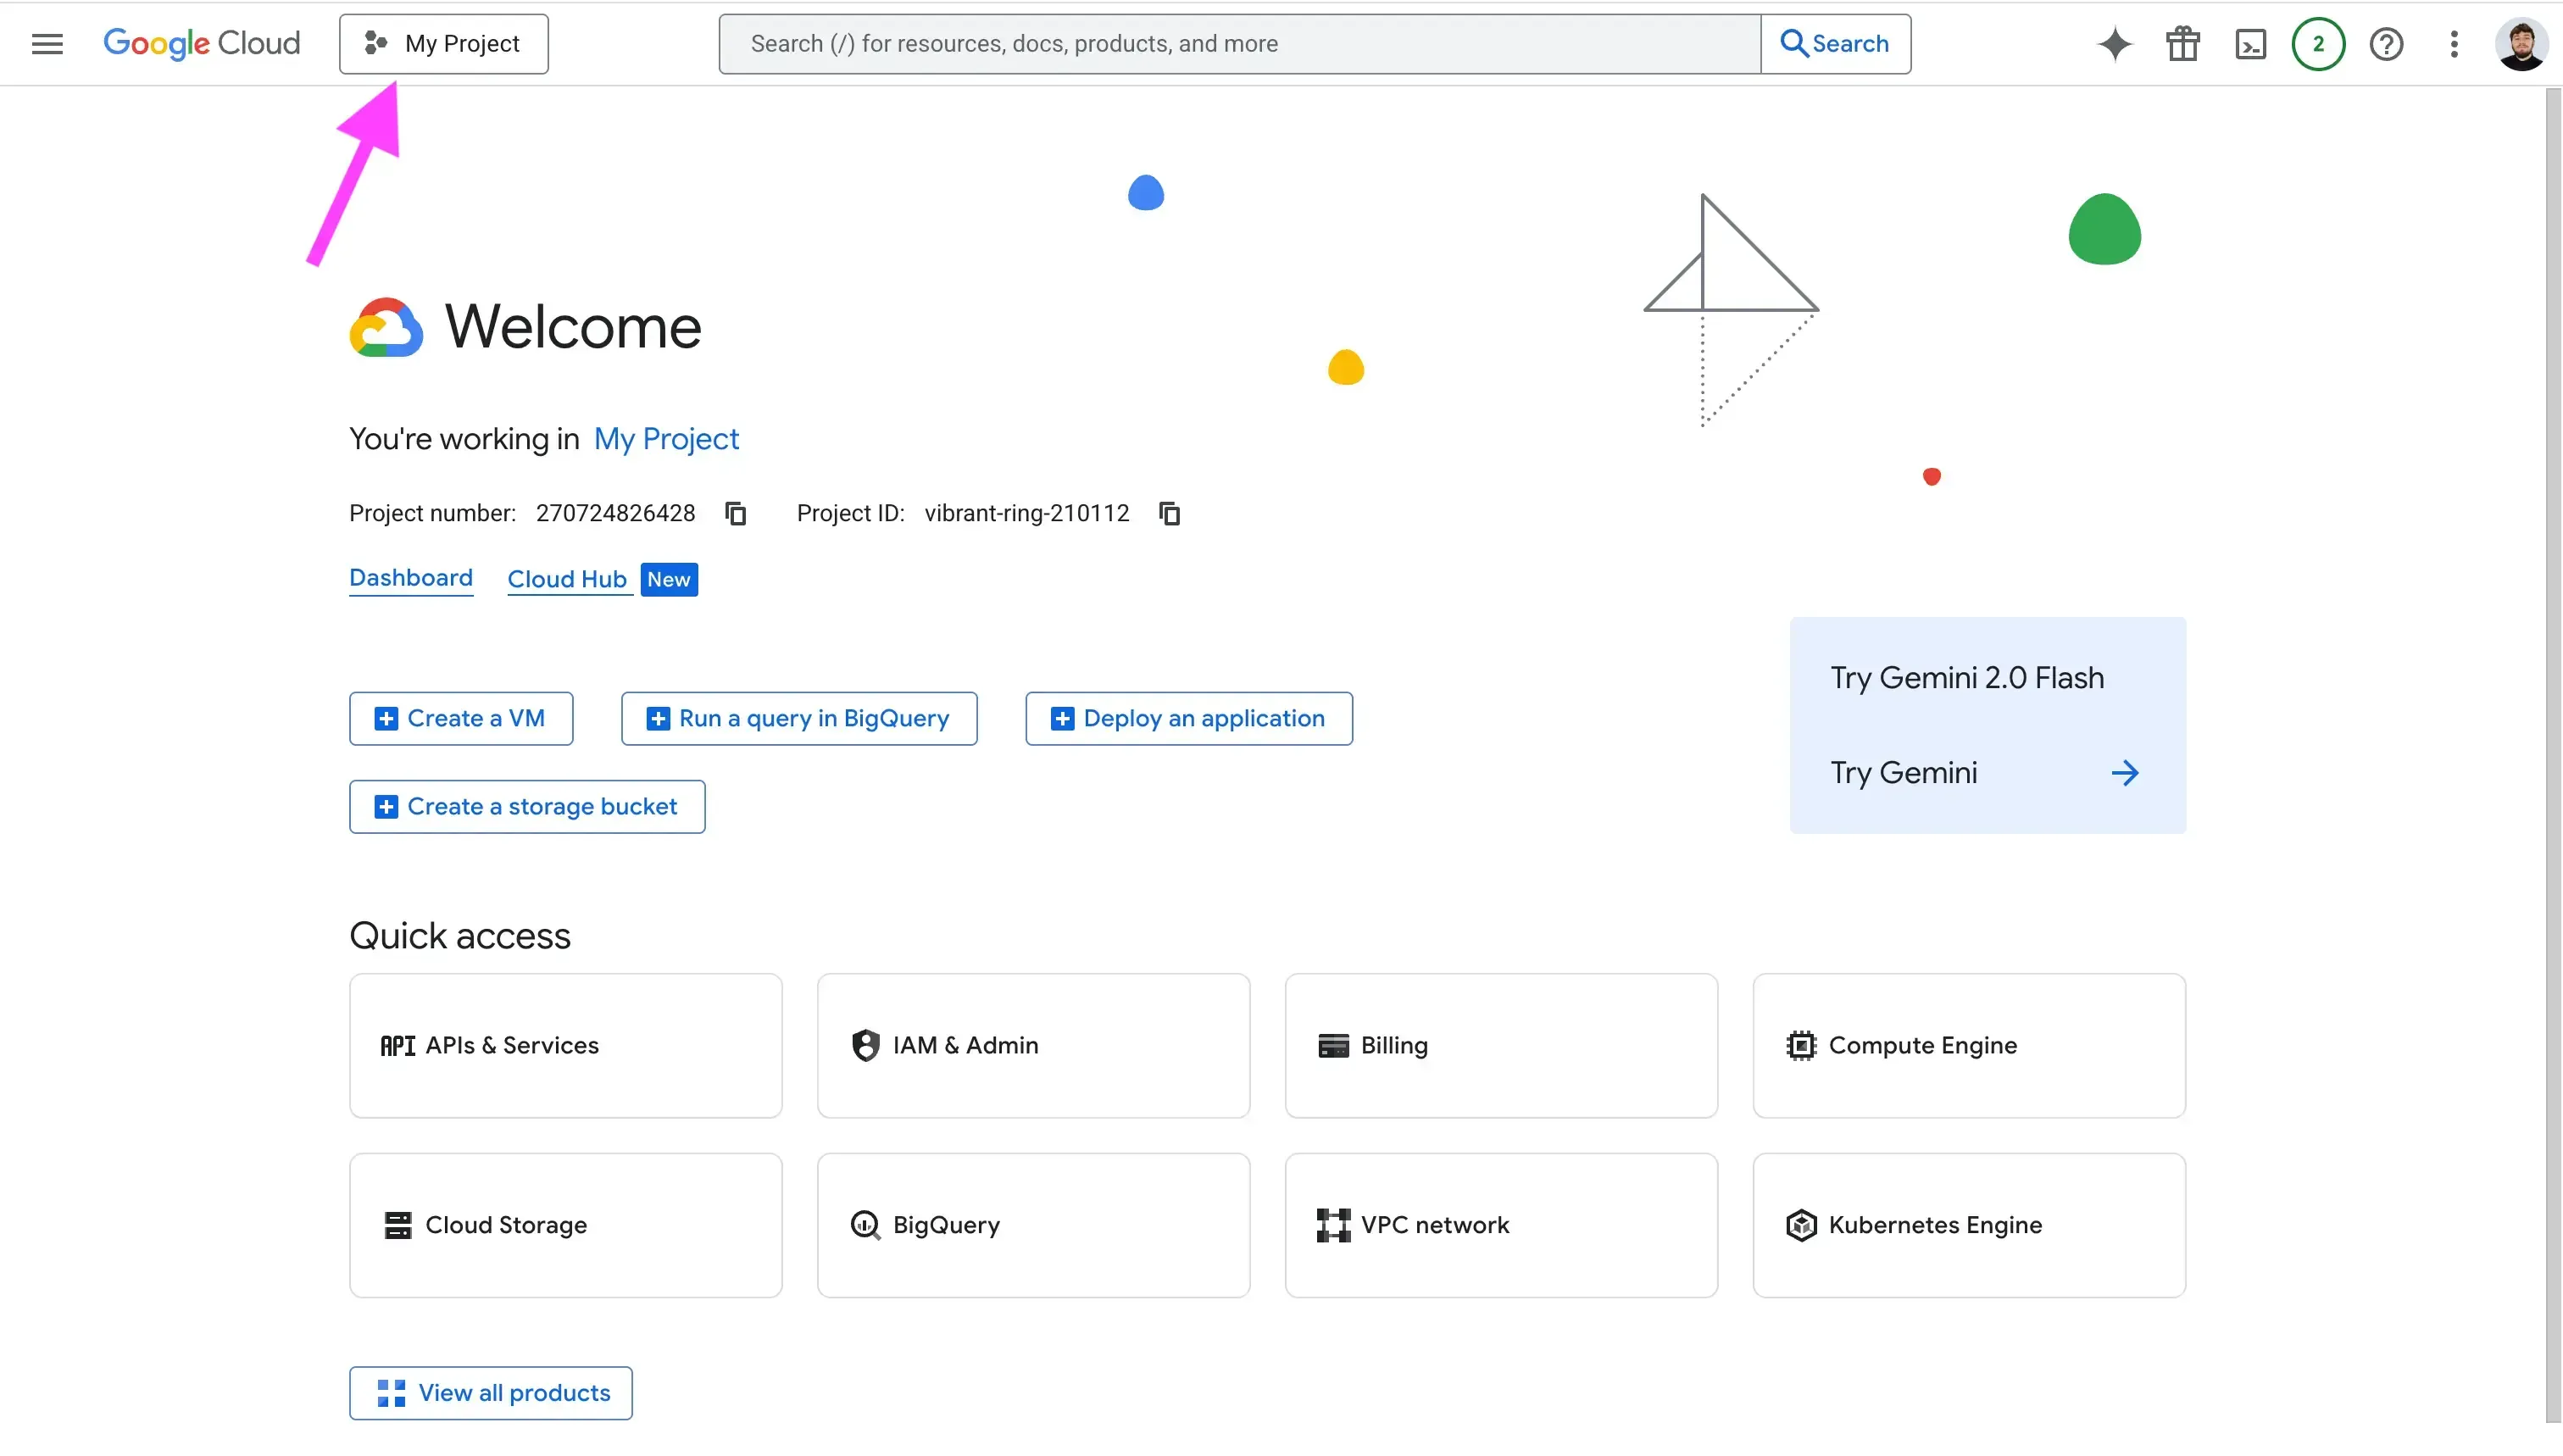
画面左上のプロジェクトドロップダウンをクリックします。通常、名前はプロジェクト名と一致します。
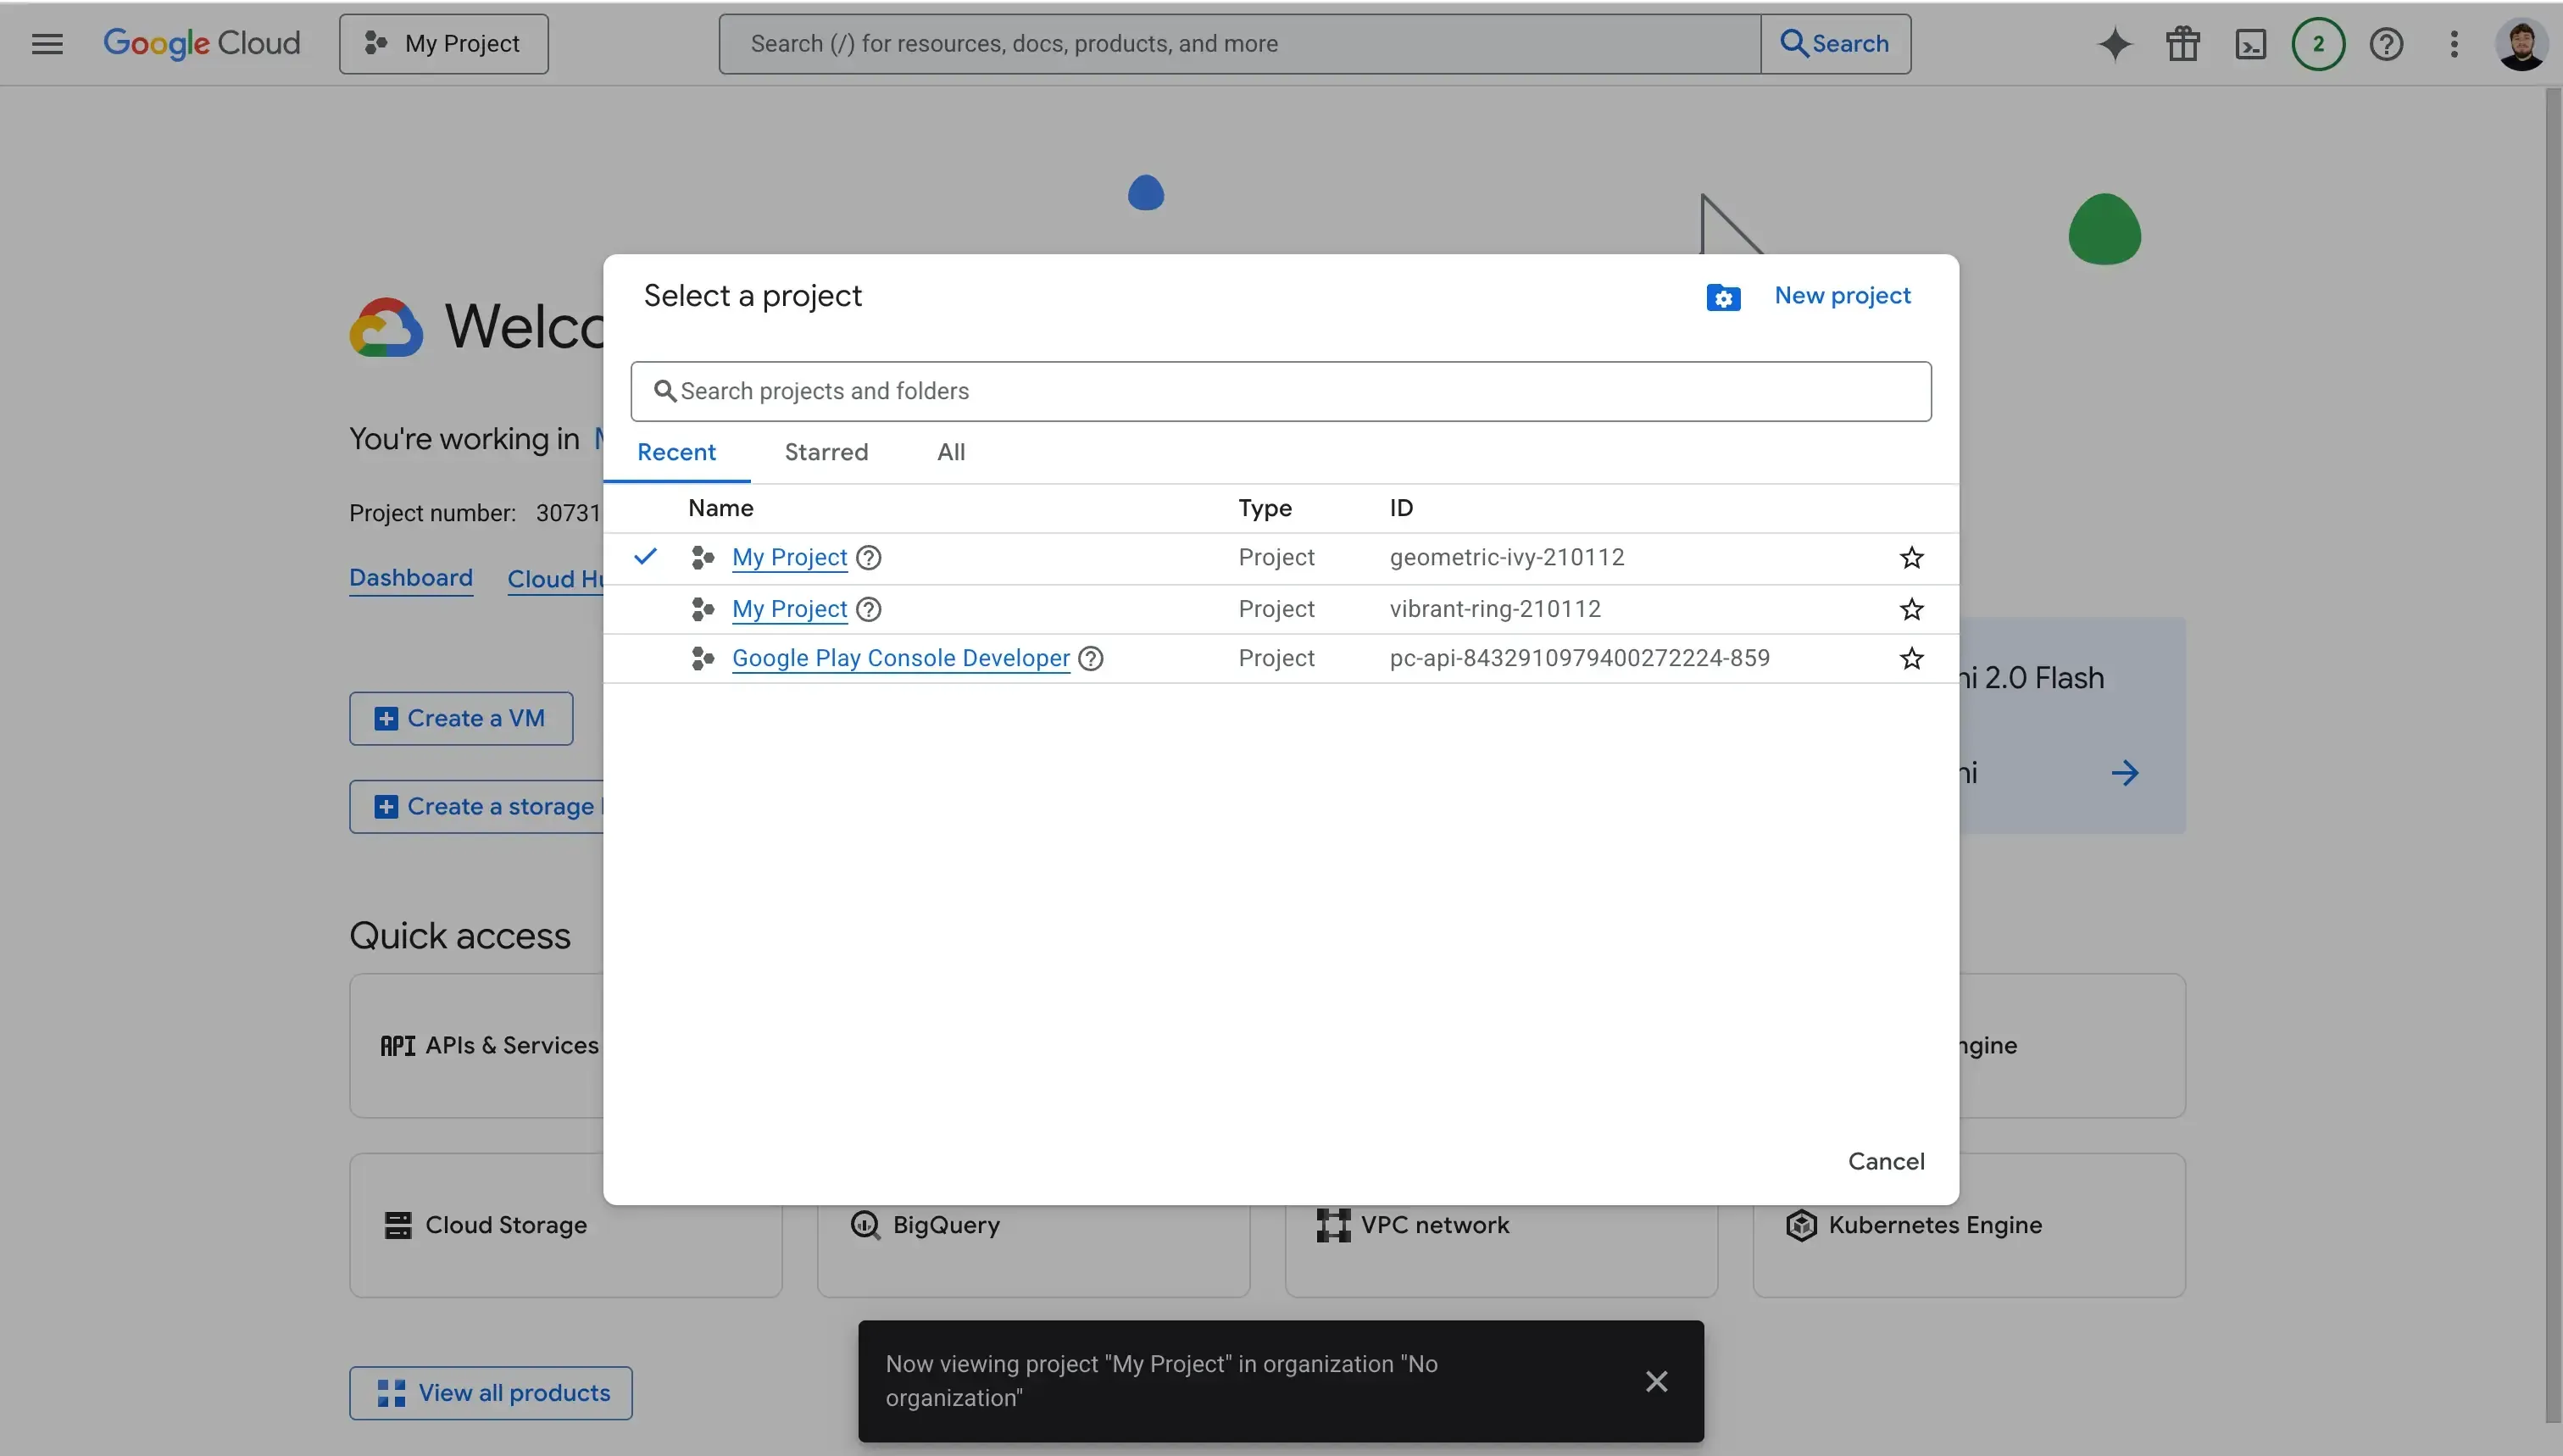
既存プロジェクトを選択するか、モーダル右上の 「New Project」 をクリックして新規プロジェクトを作成します。
3. Google Calendar API サービスを有効化する
アカウントを作成し、正しいプロジェクトにいることを確認したら、次の手順で Google Calendar API サービスを有効にします。
- Google Cloud Console にアクセス
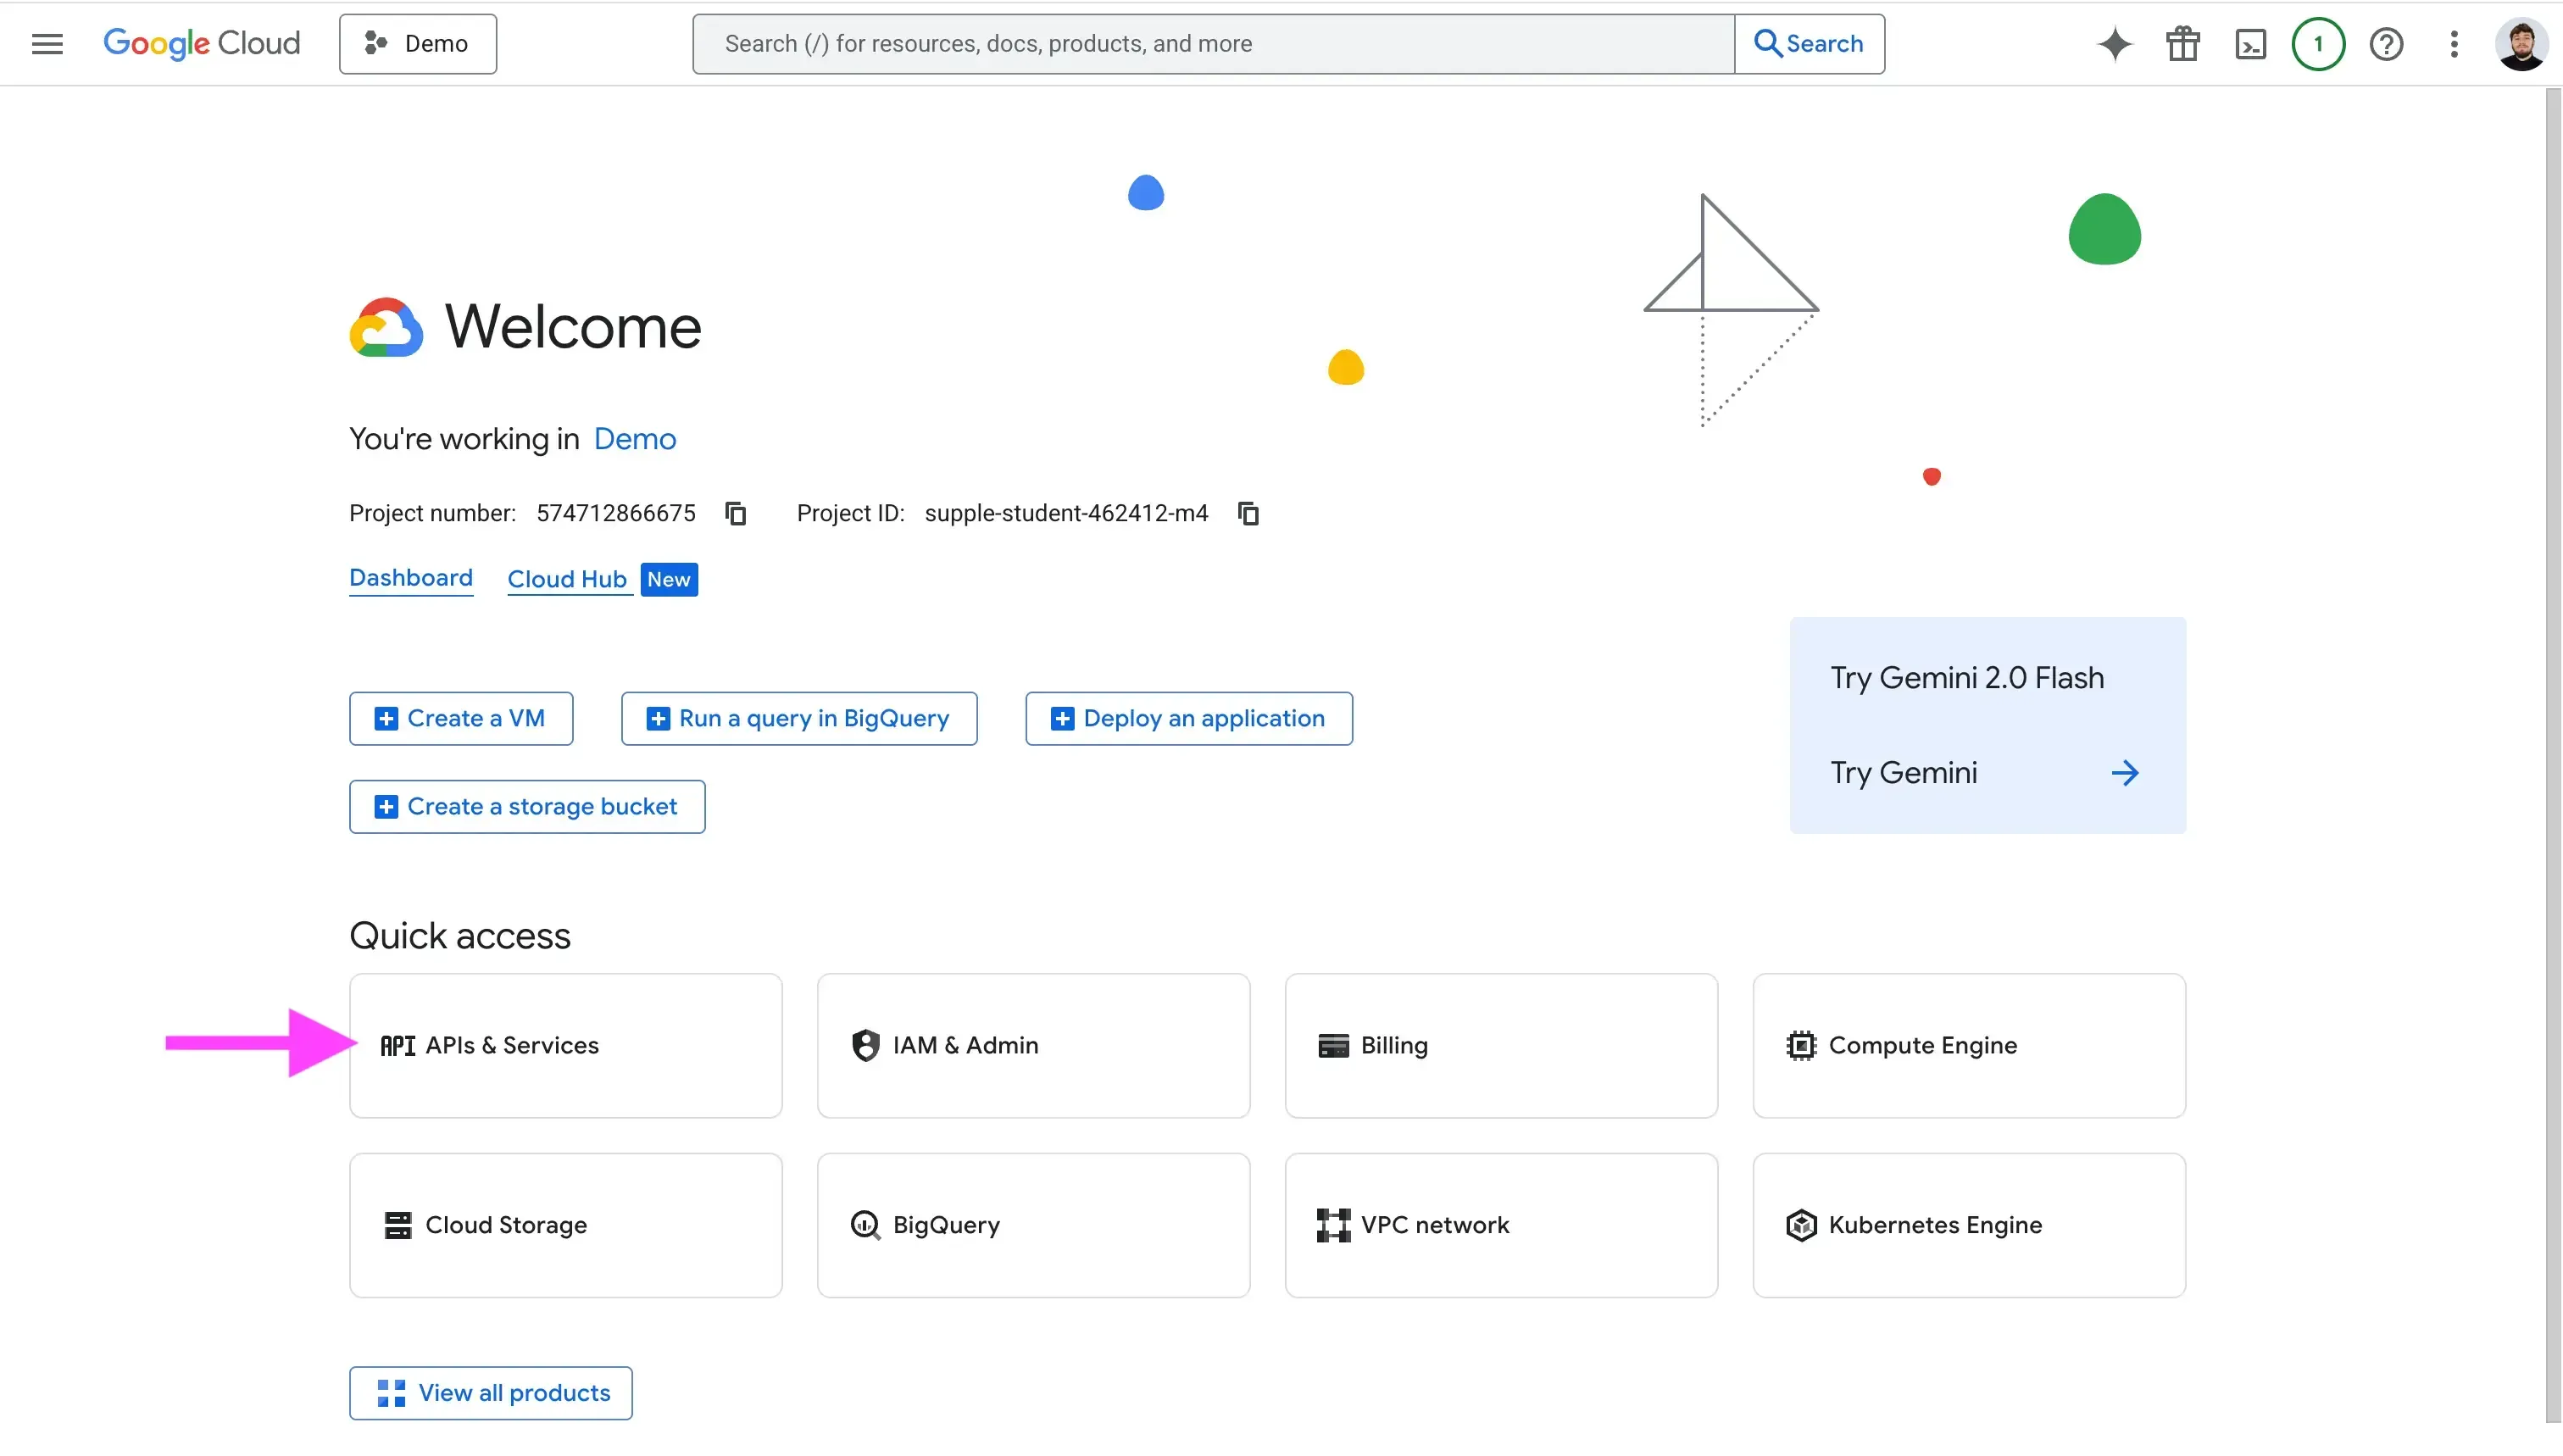
- 「APIs & Services」 をクリック
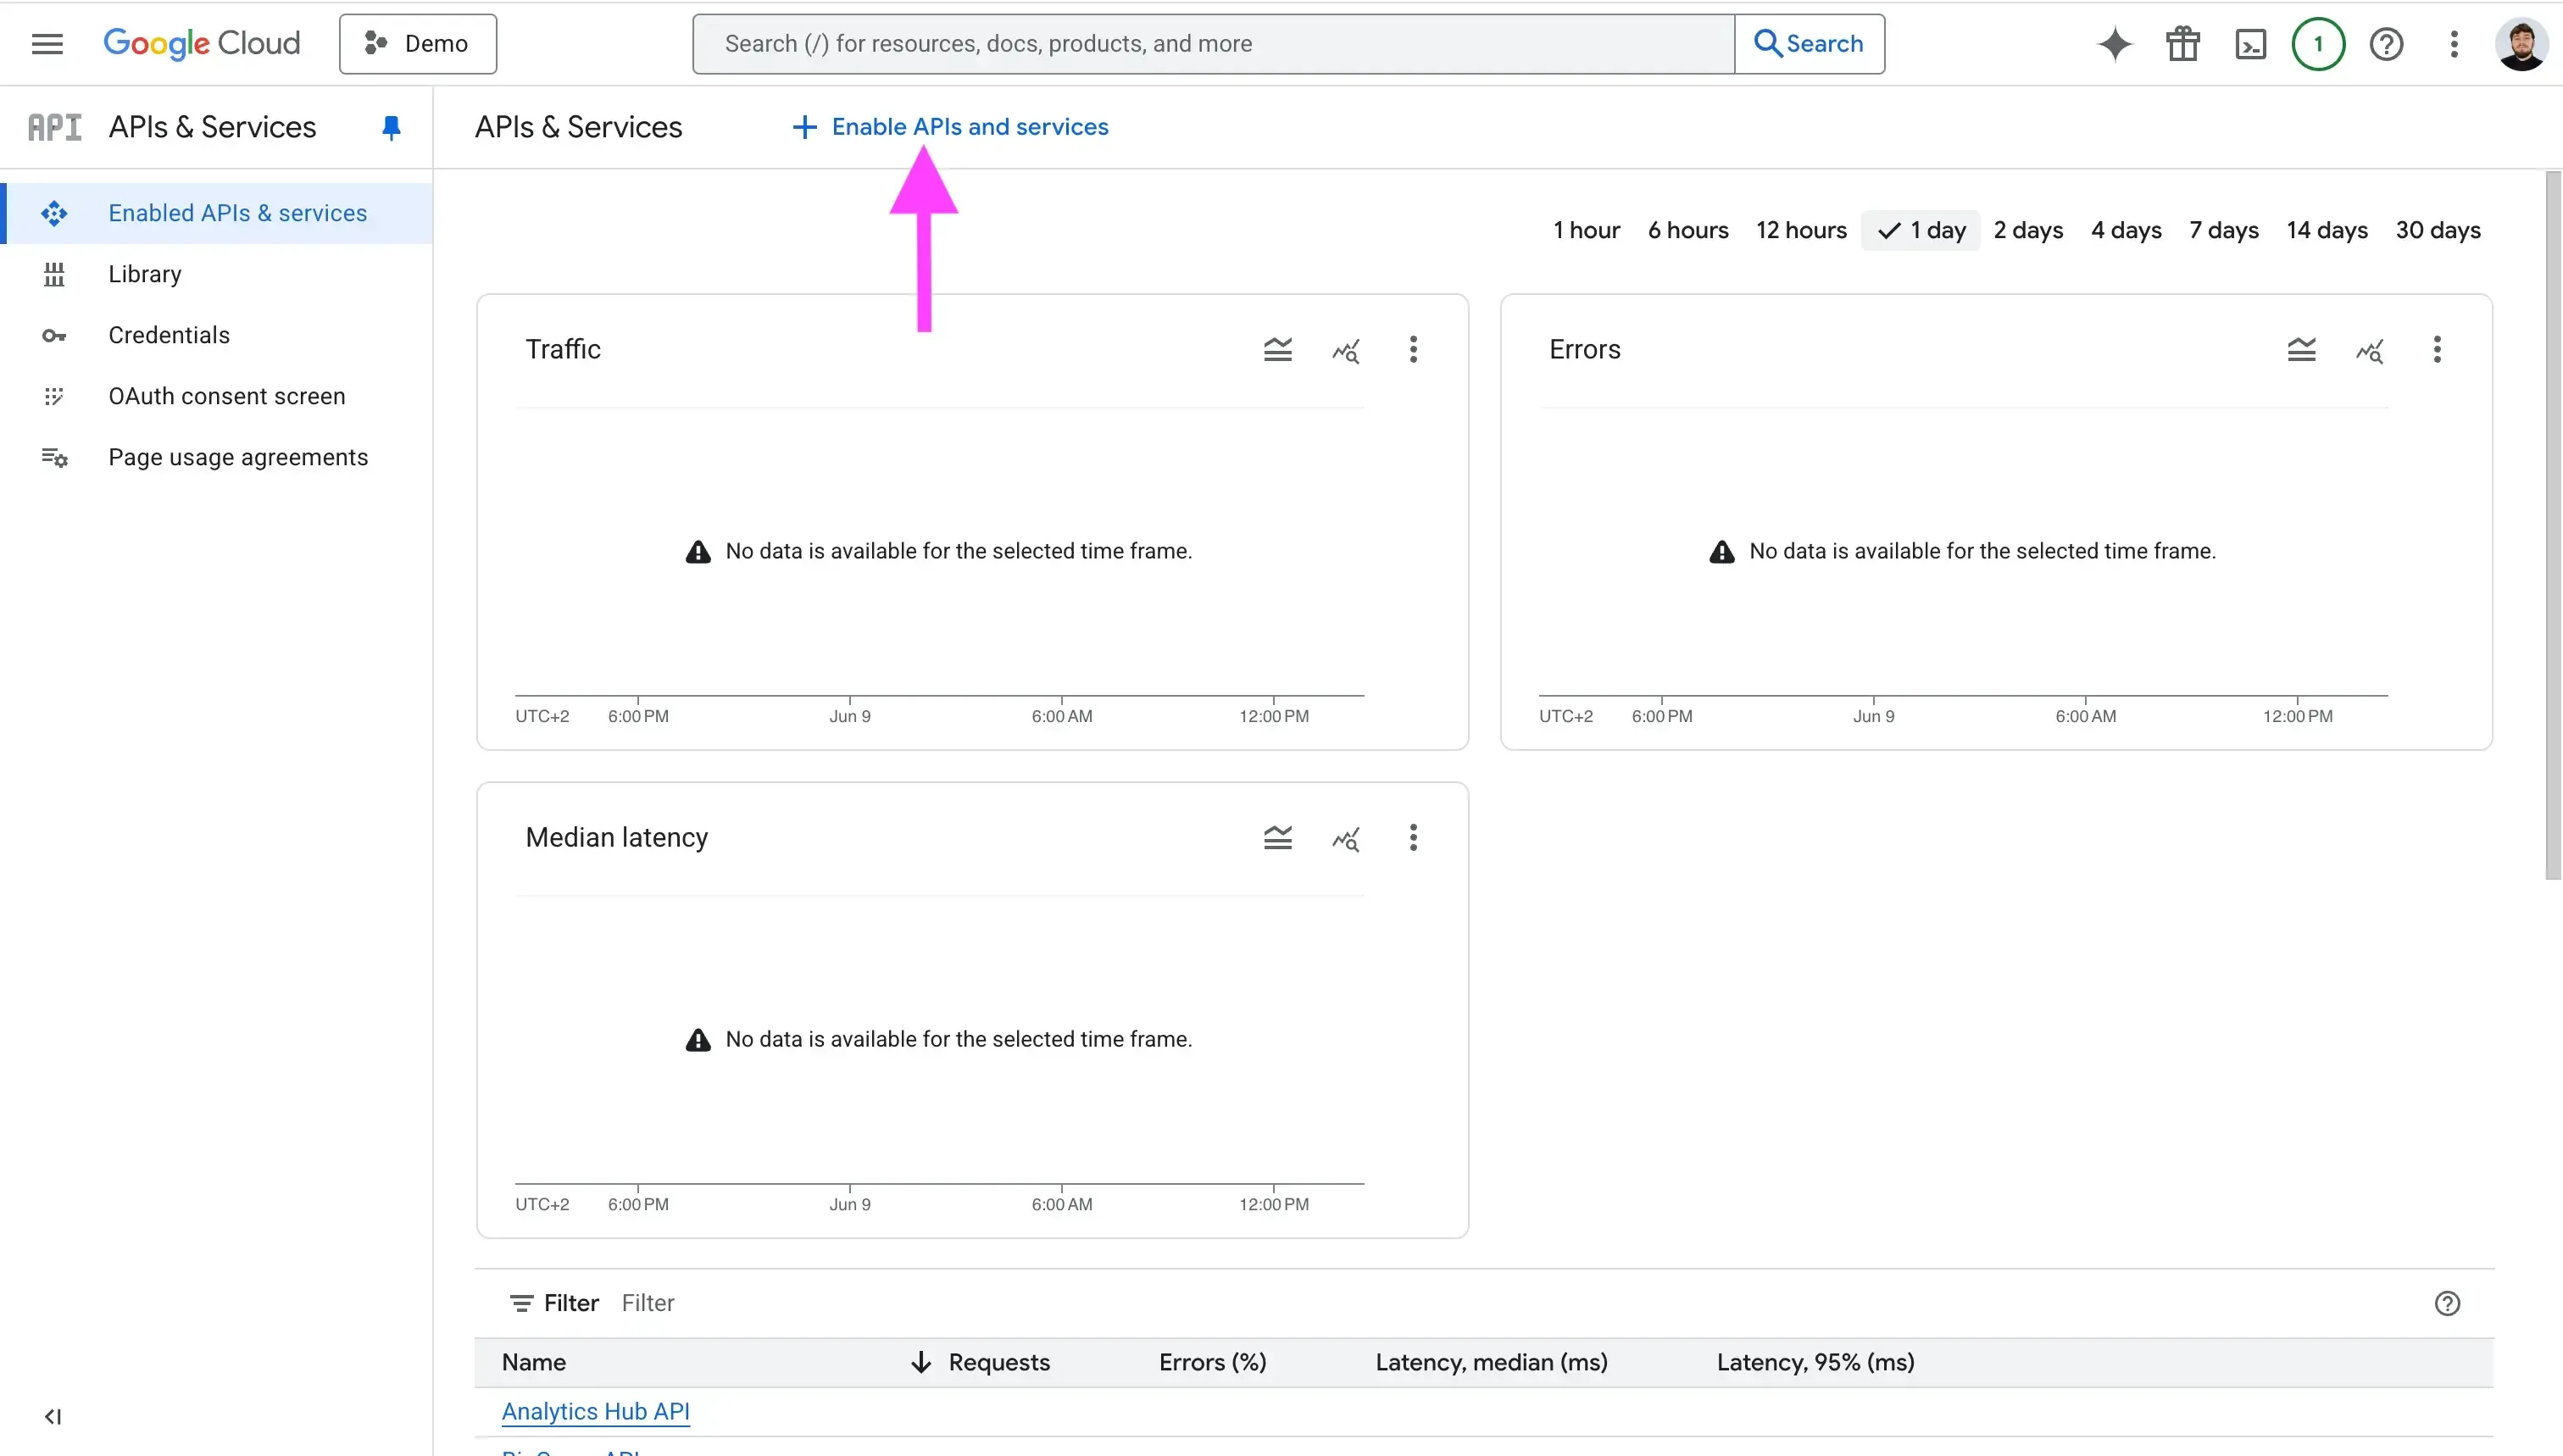
- 「Enable APIs and services」 をクリック
- 「Google Calendar API」を検索

- 「Enable」をクリックしてサービスを有効化

4. OAuth 同意画面を設定する
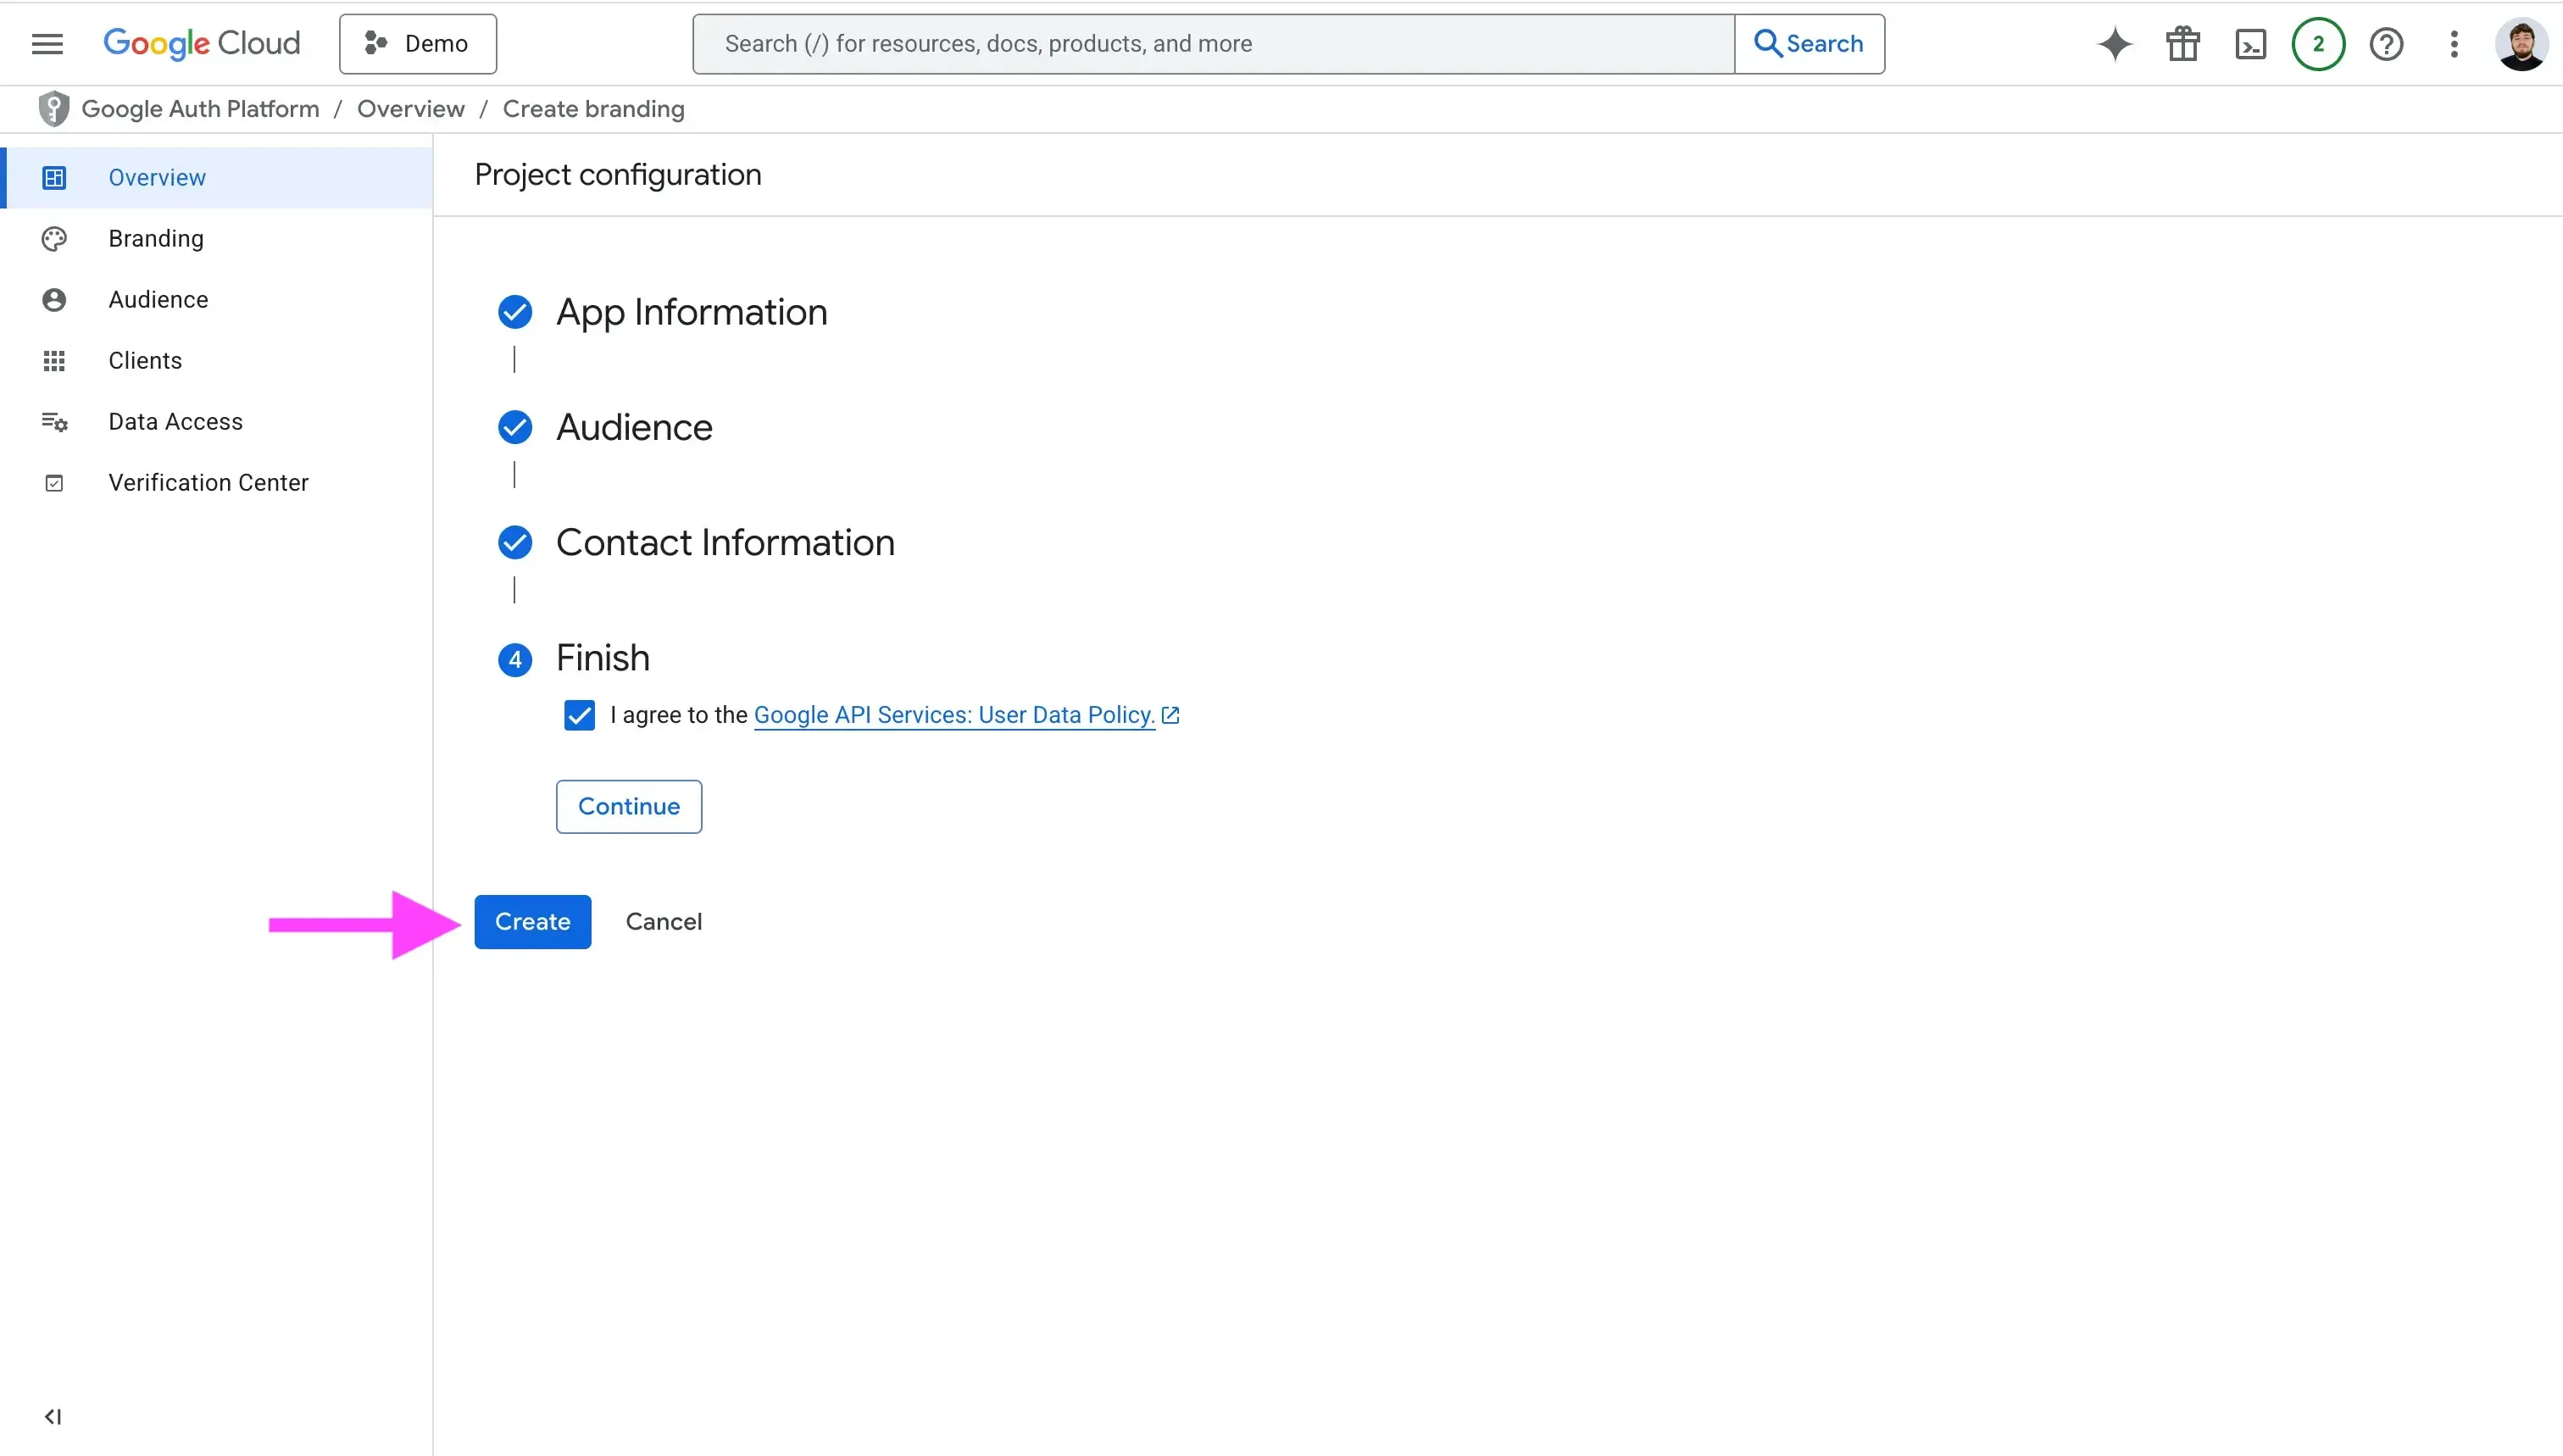
Google Calendar API サービスを有効化したら、次に OAuth 同意画面を設定します。OAuth 同意画面は、ユーザーがカレンダーをアプリに接続する際に表示される画面で、アプリのロゴや名前、要求する権限などが表示されます。
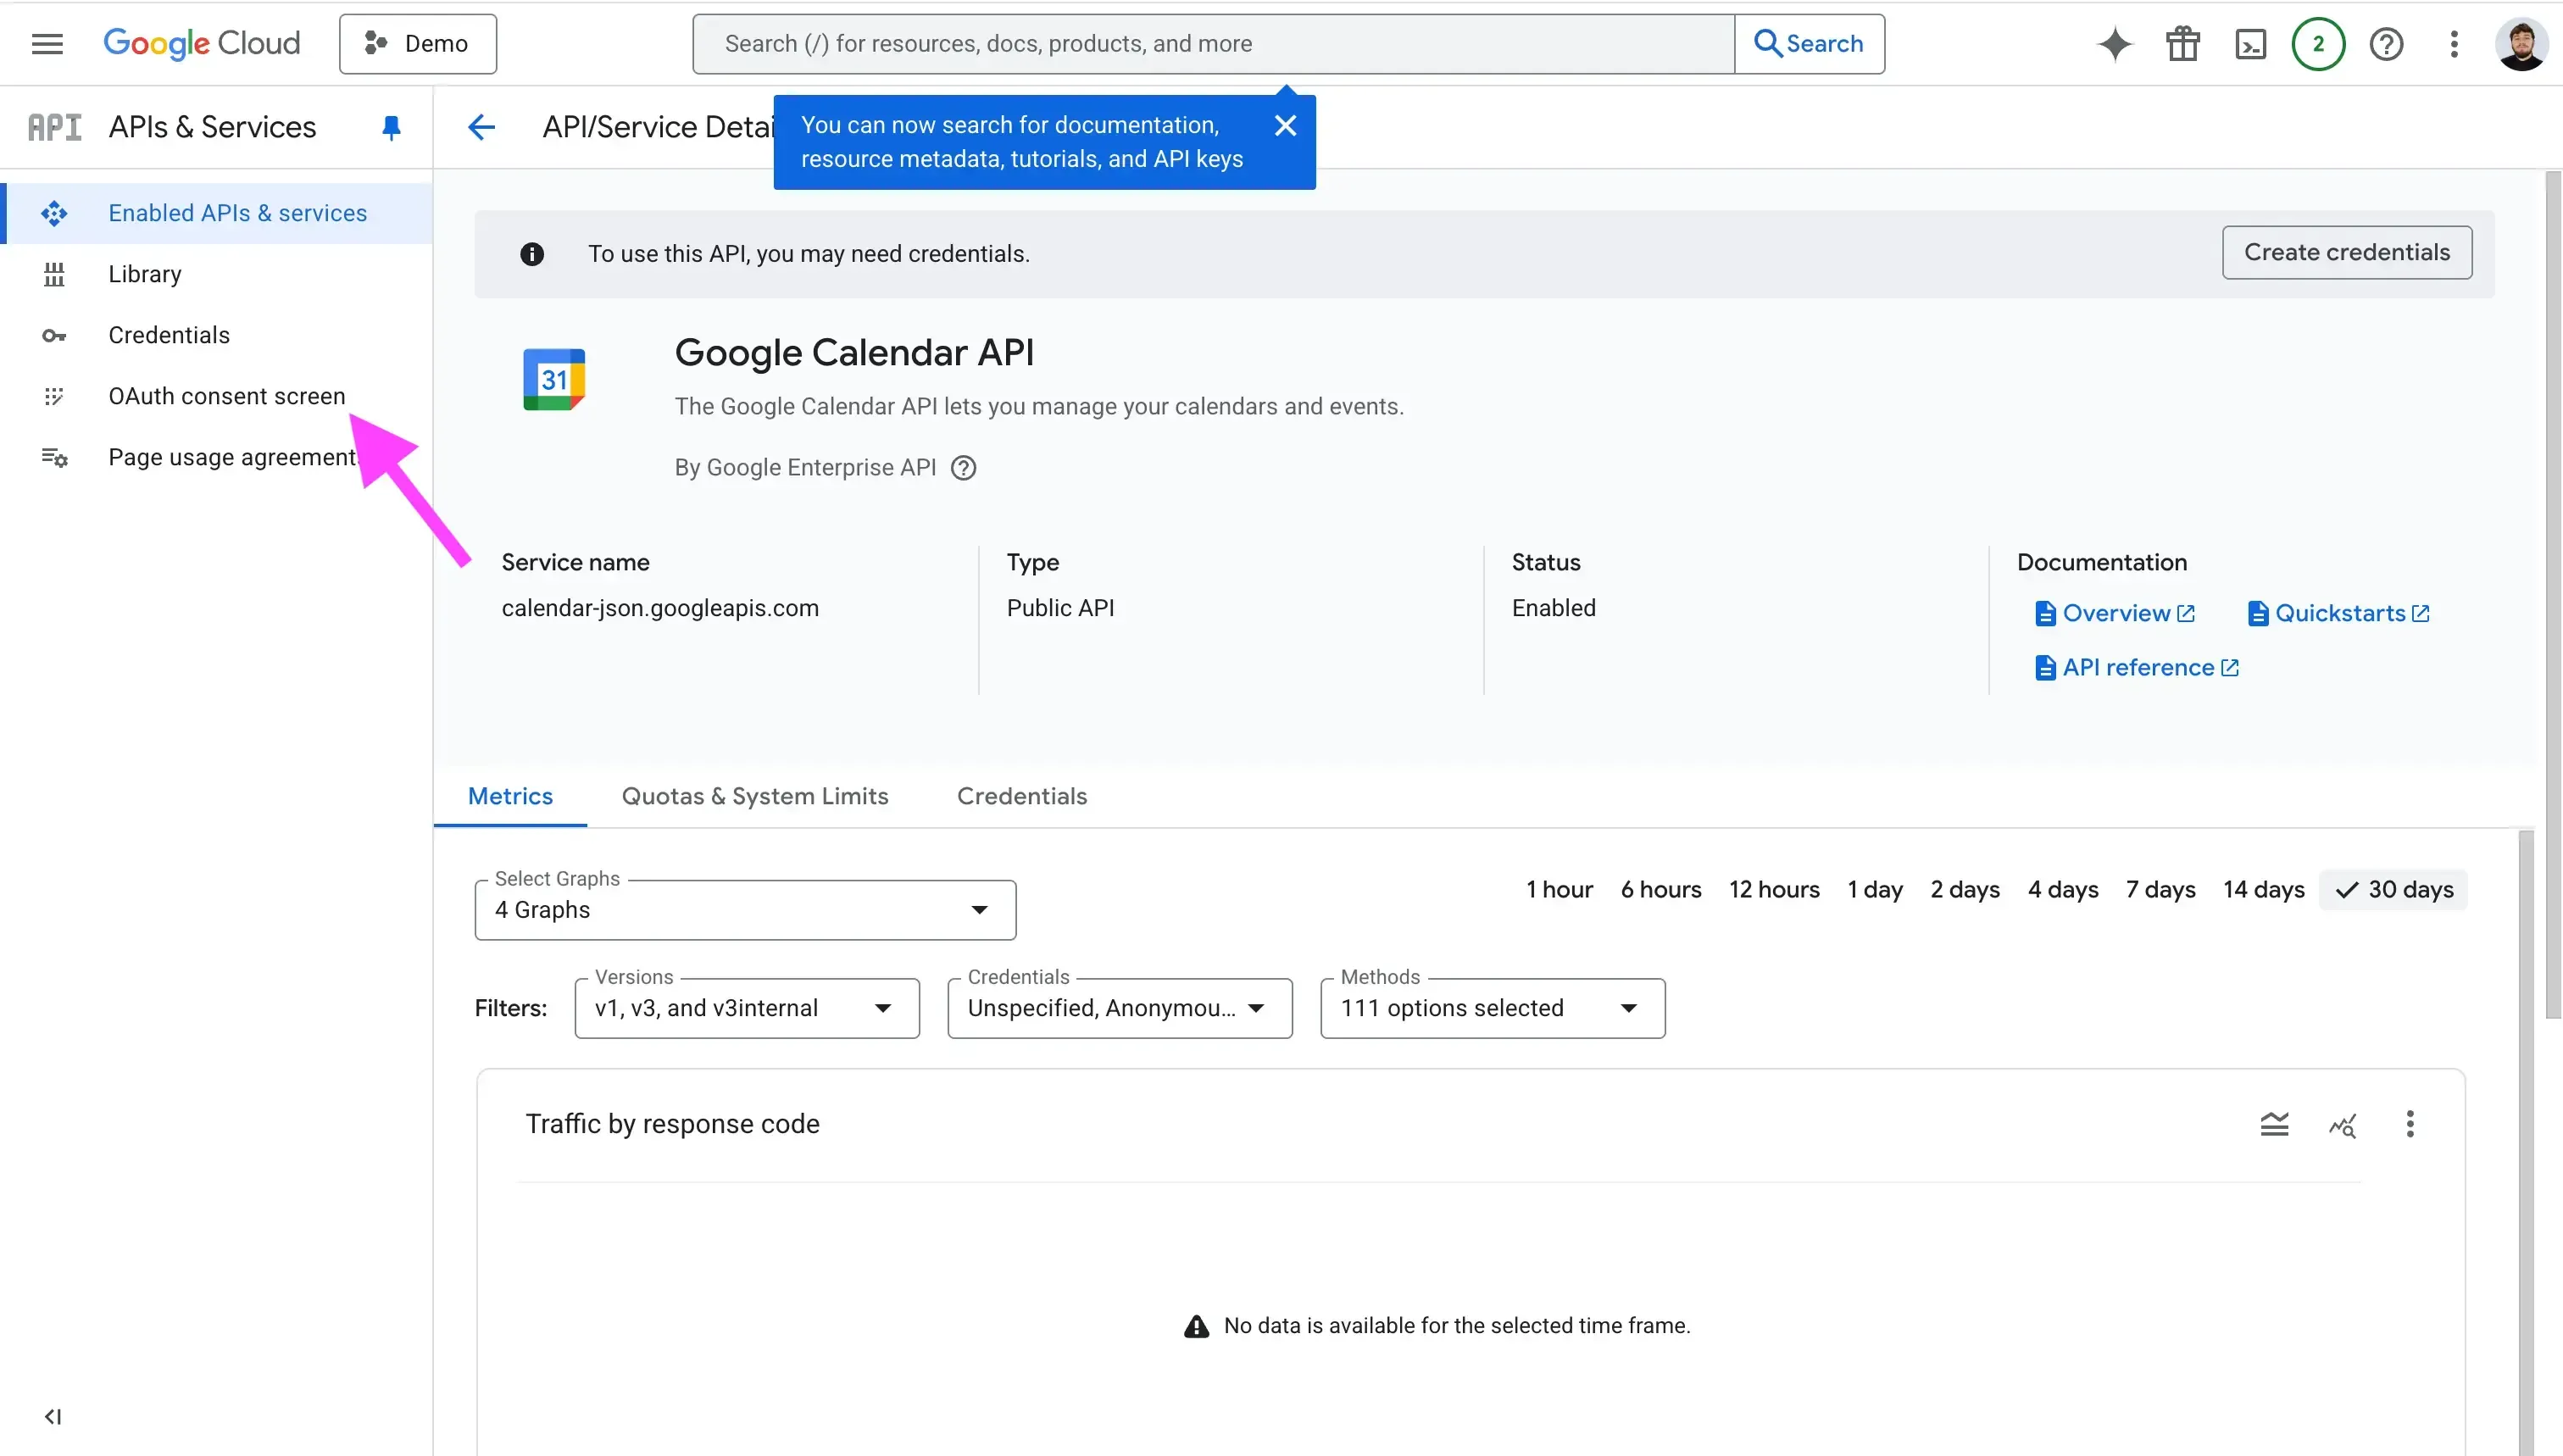
- 「OAuth Consent Screen」タブをクリック
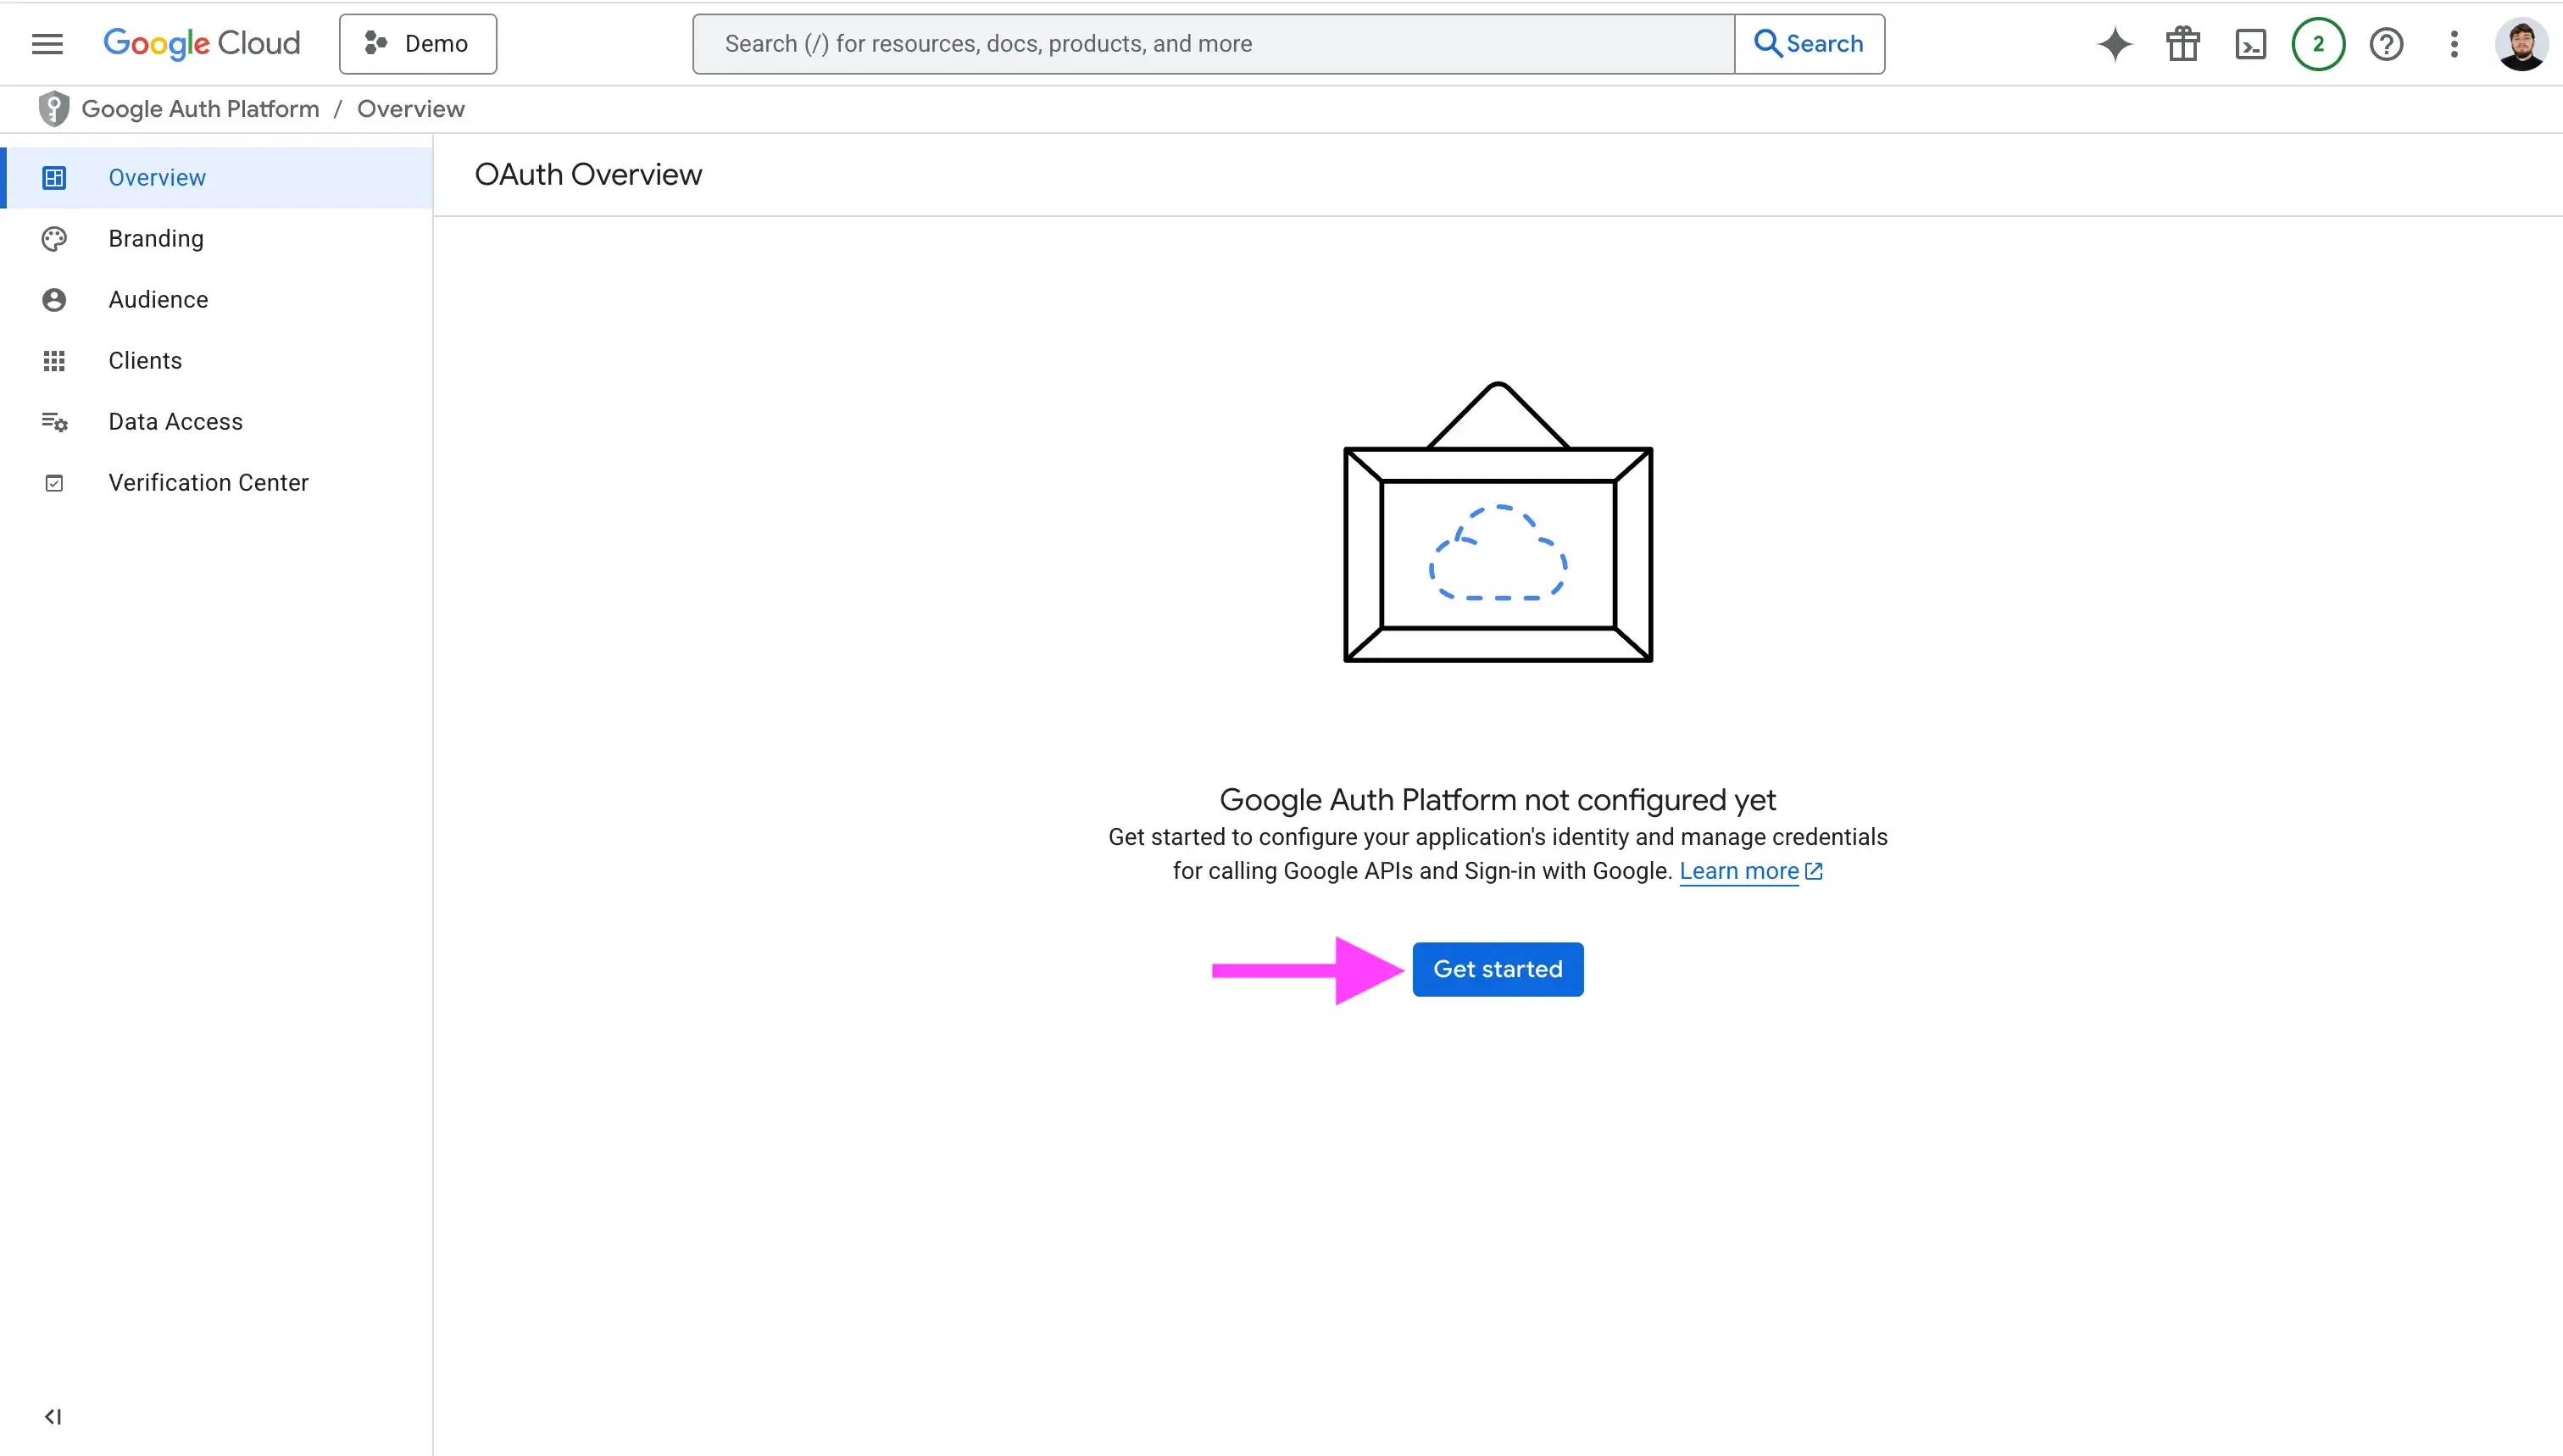
- 「Get Started」をクリック
- 「App Information」セクションを入力 – アプリ名とカスタマーサポート用メールアドレスを入力します。
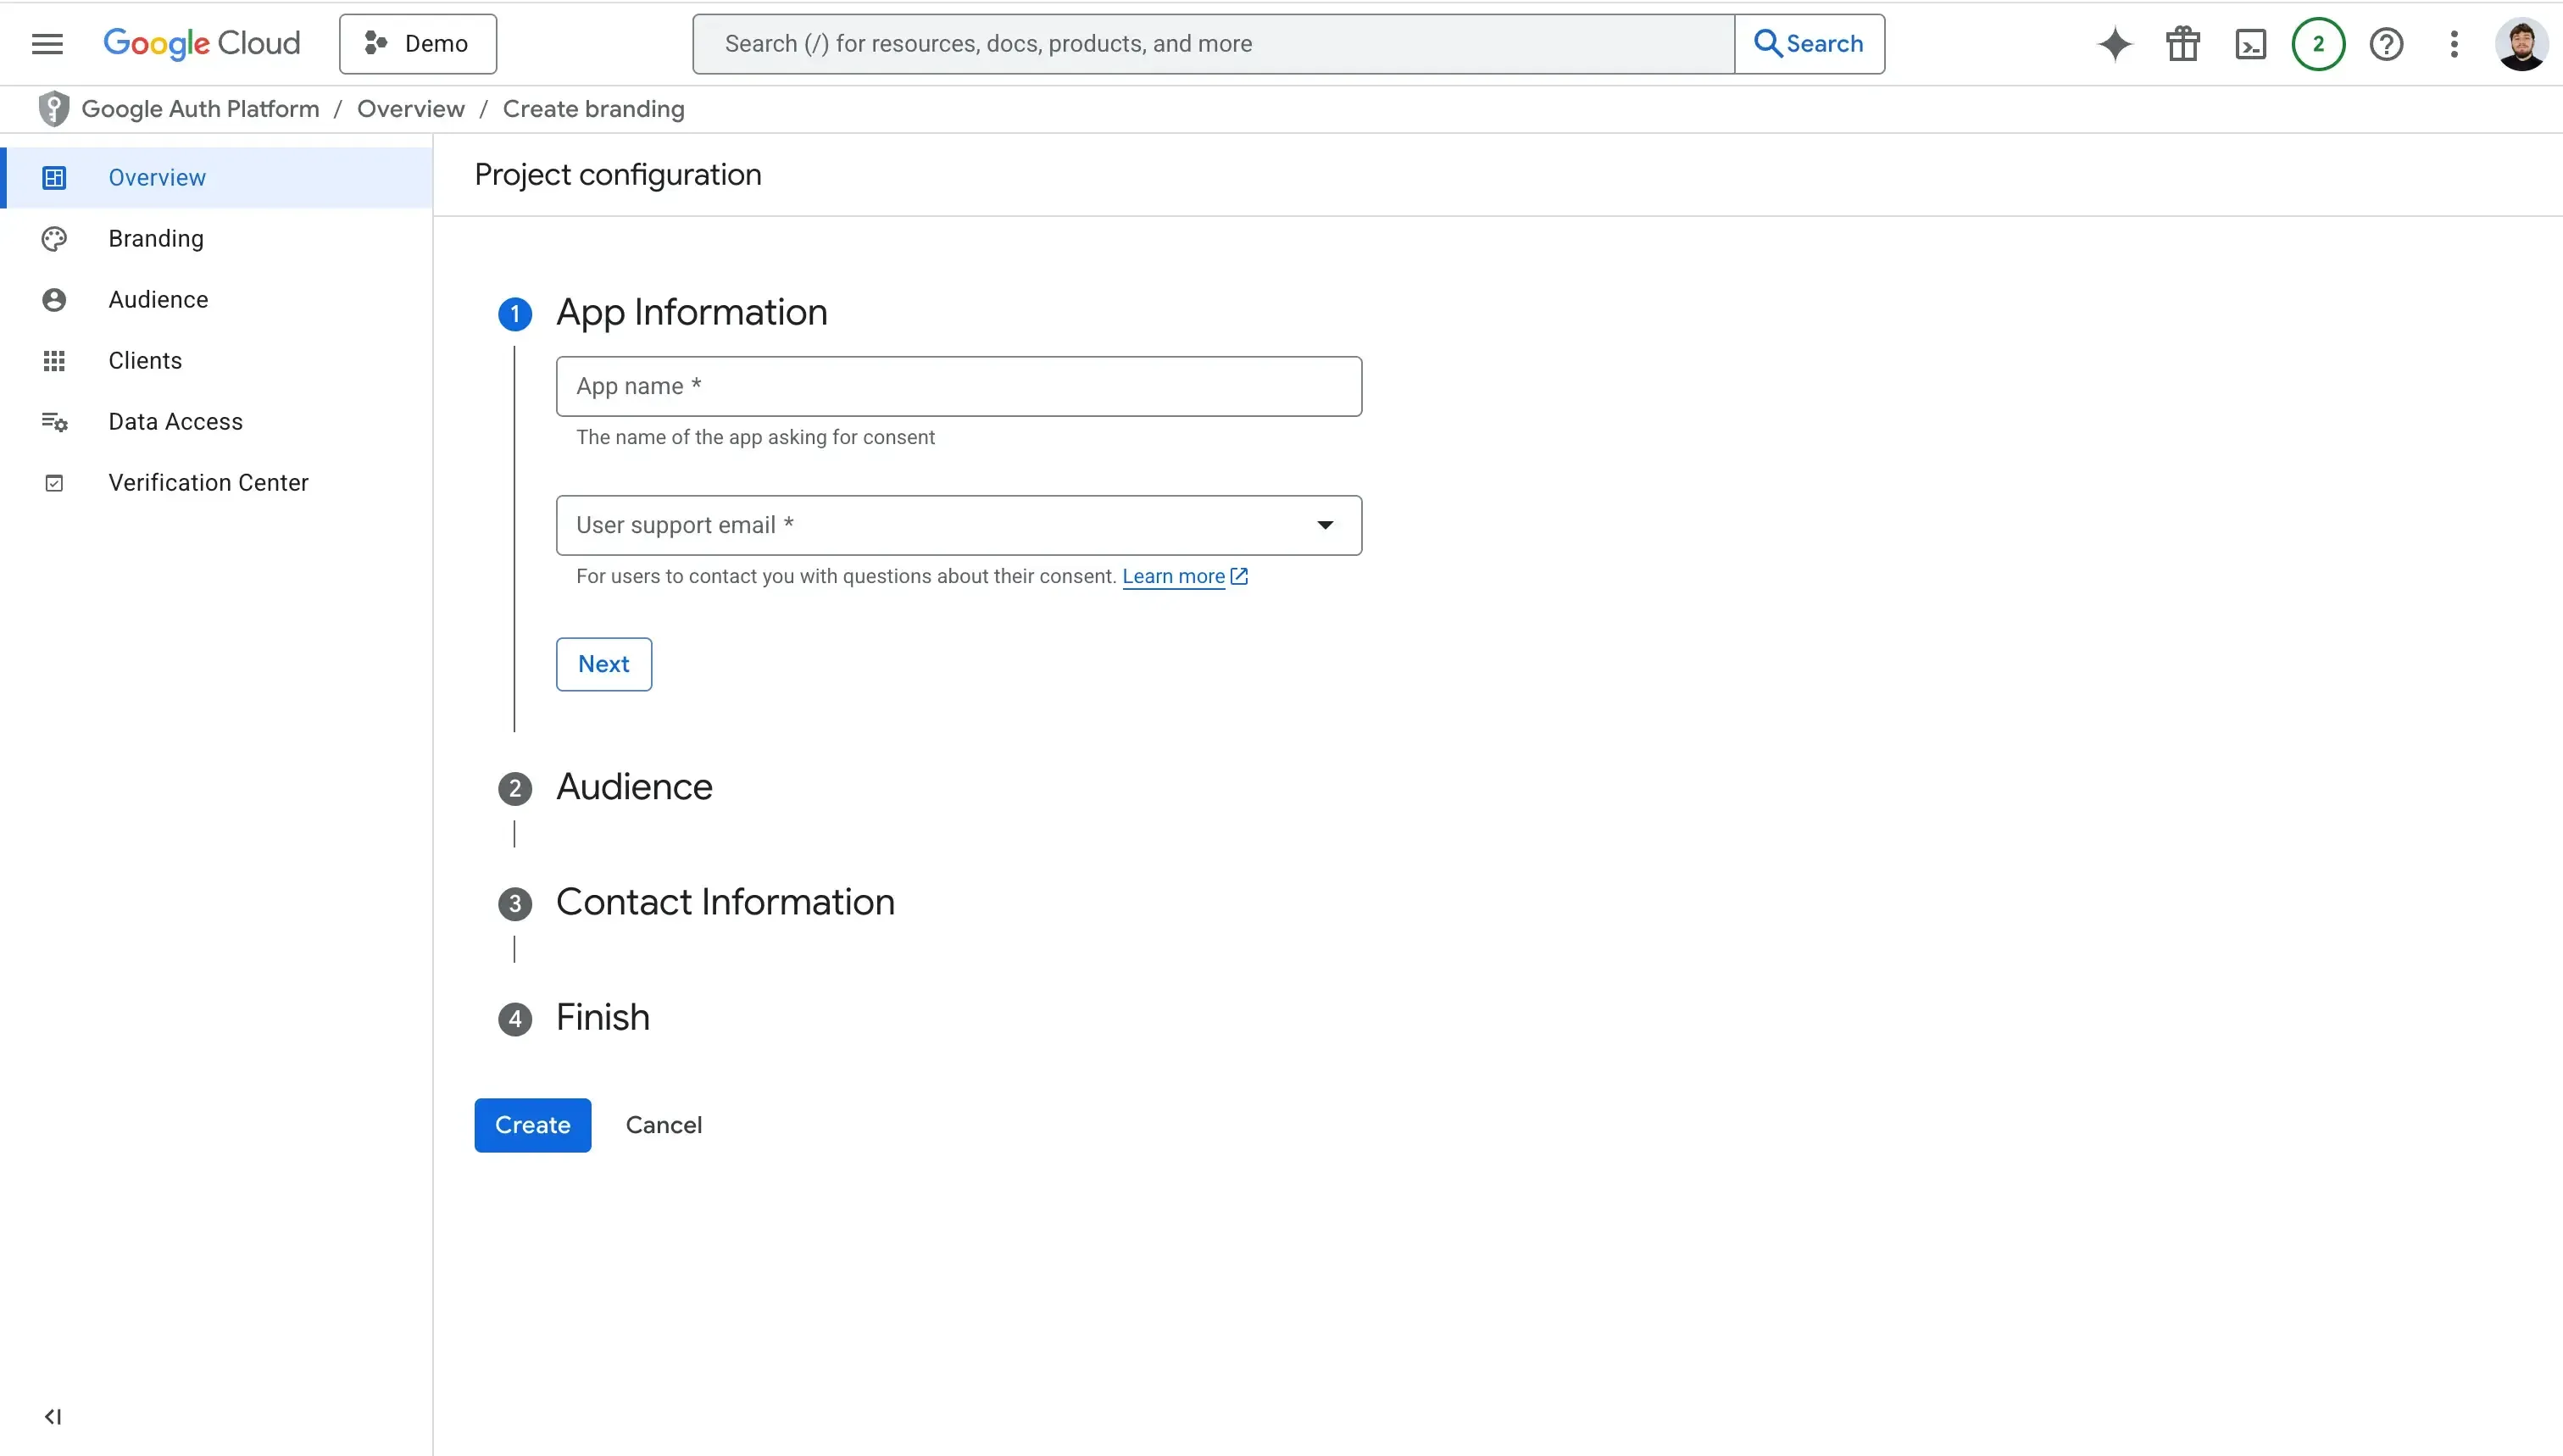
- 対象ユーザーを選択 – internal は自社内ユーザーのみ、external は一般公開。

- 連絡先情報を入力 – Google からの通知を受け取るメールアドレスを入力します。

- 「Google API Services: User Data Policy」に同意 チェックボックスをオンにします。
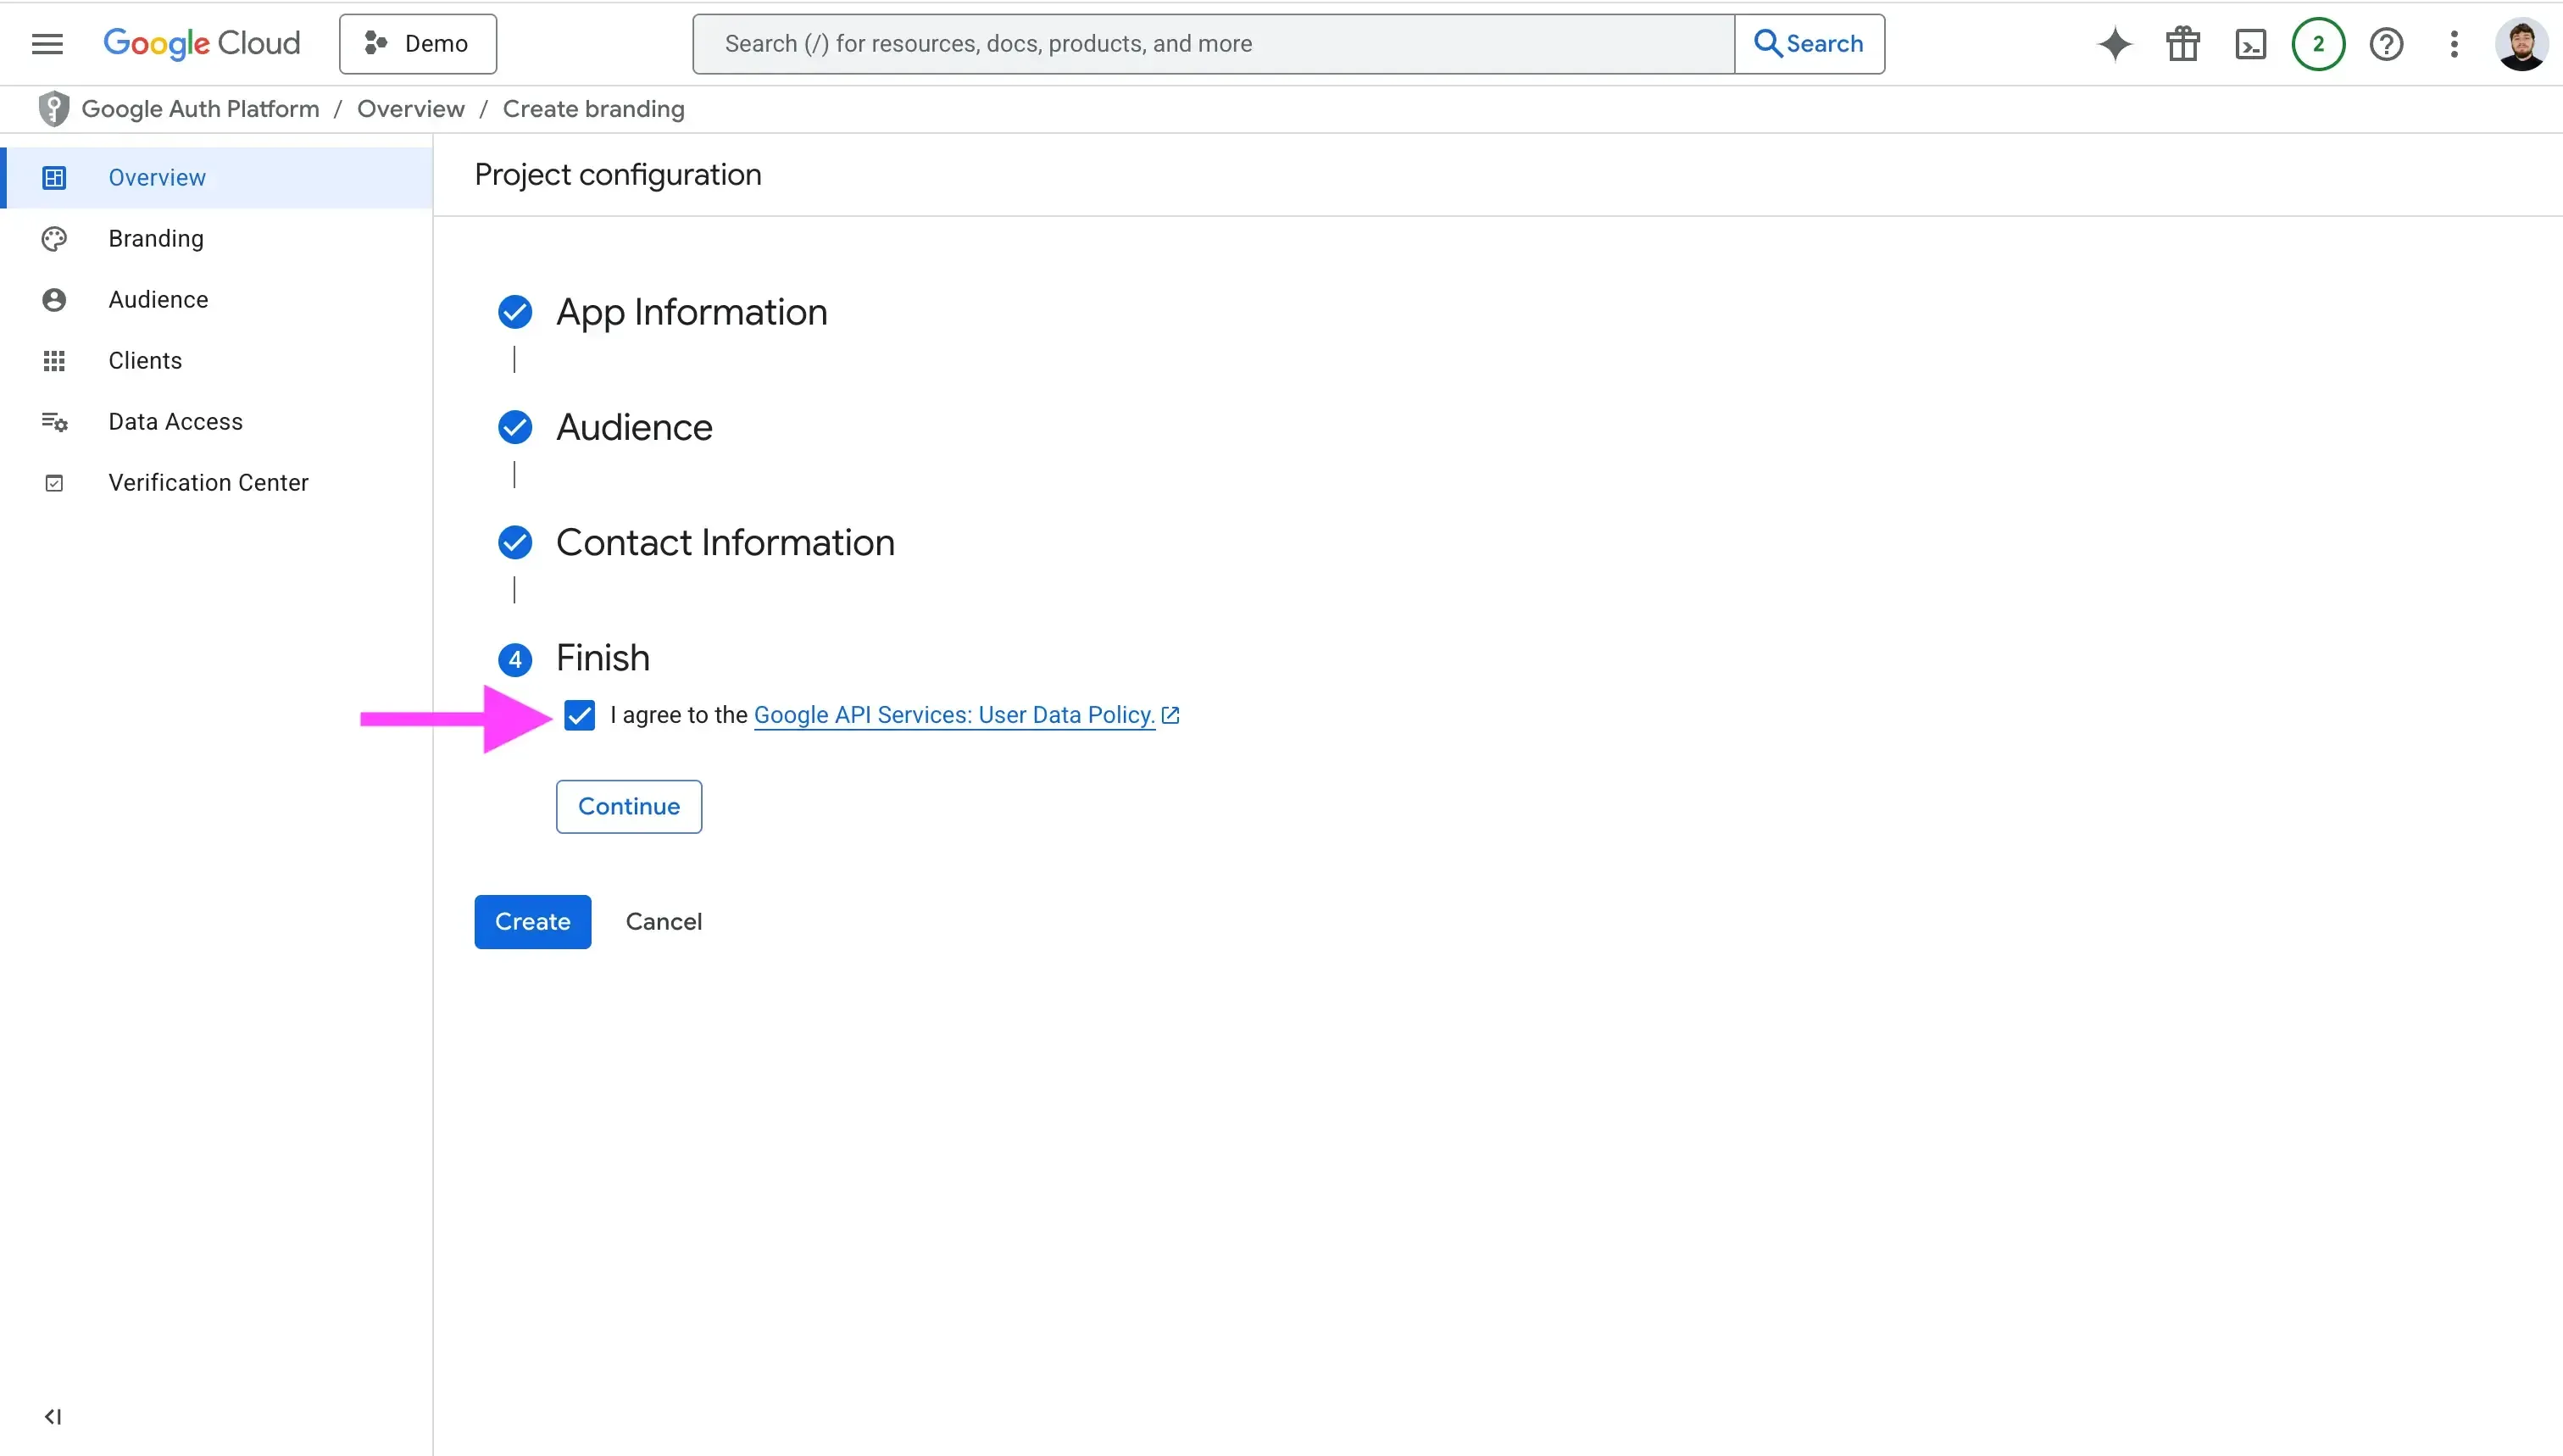
- 「Create」 をクリック
5. OAuth クライアントを作成する
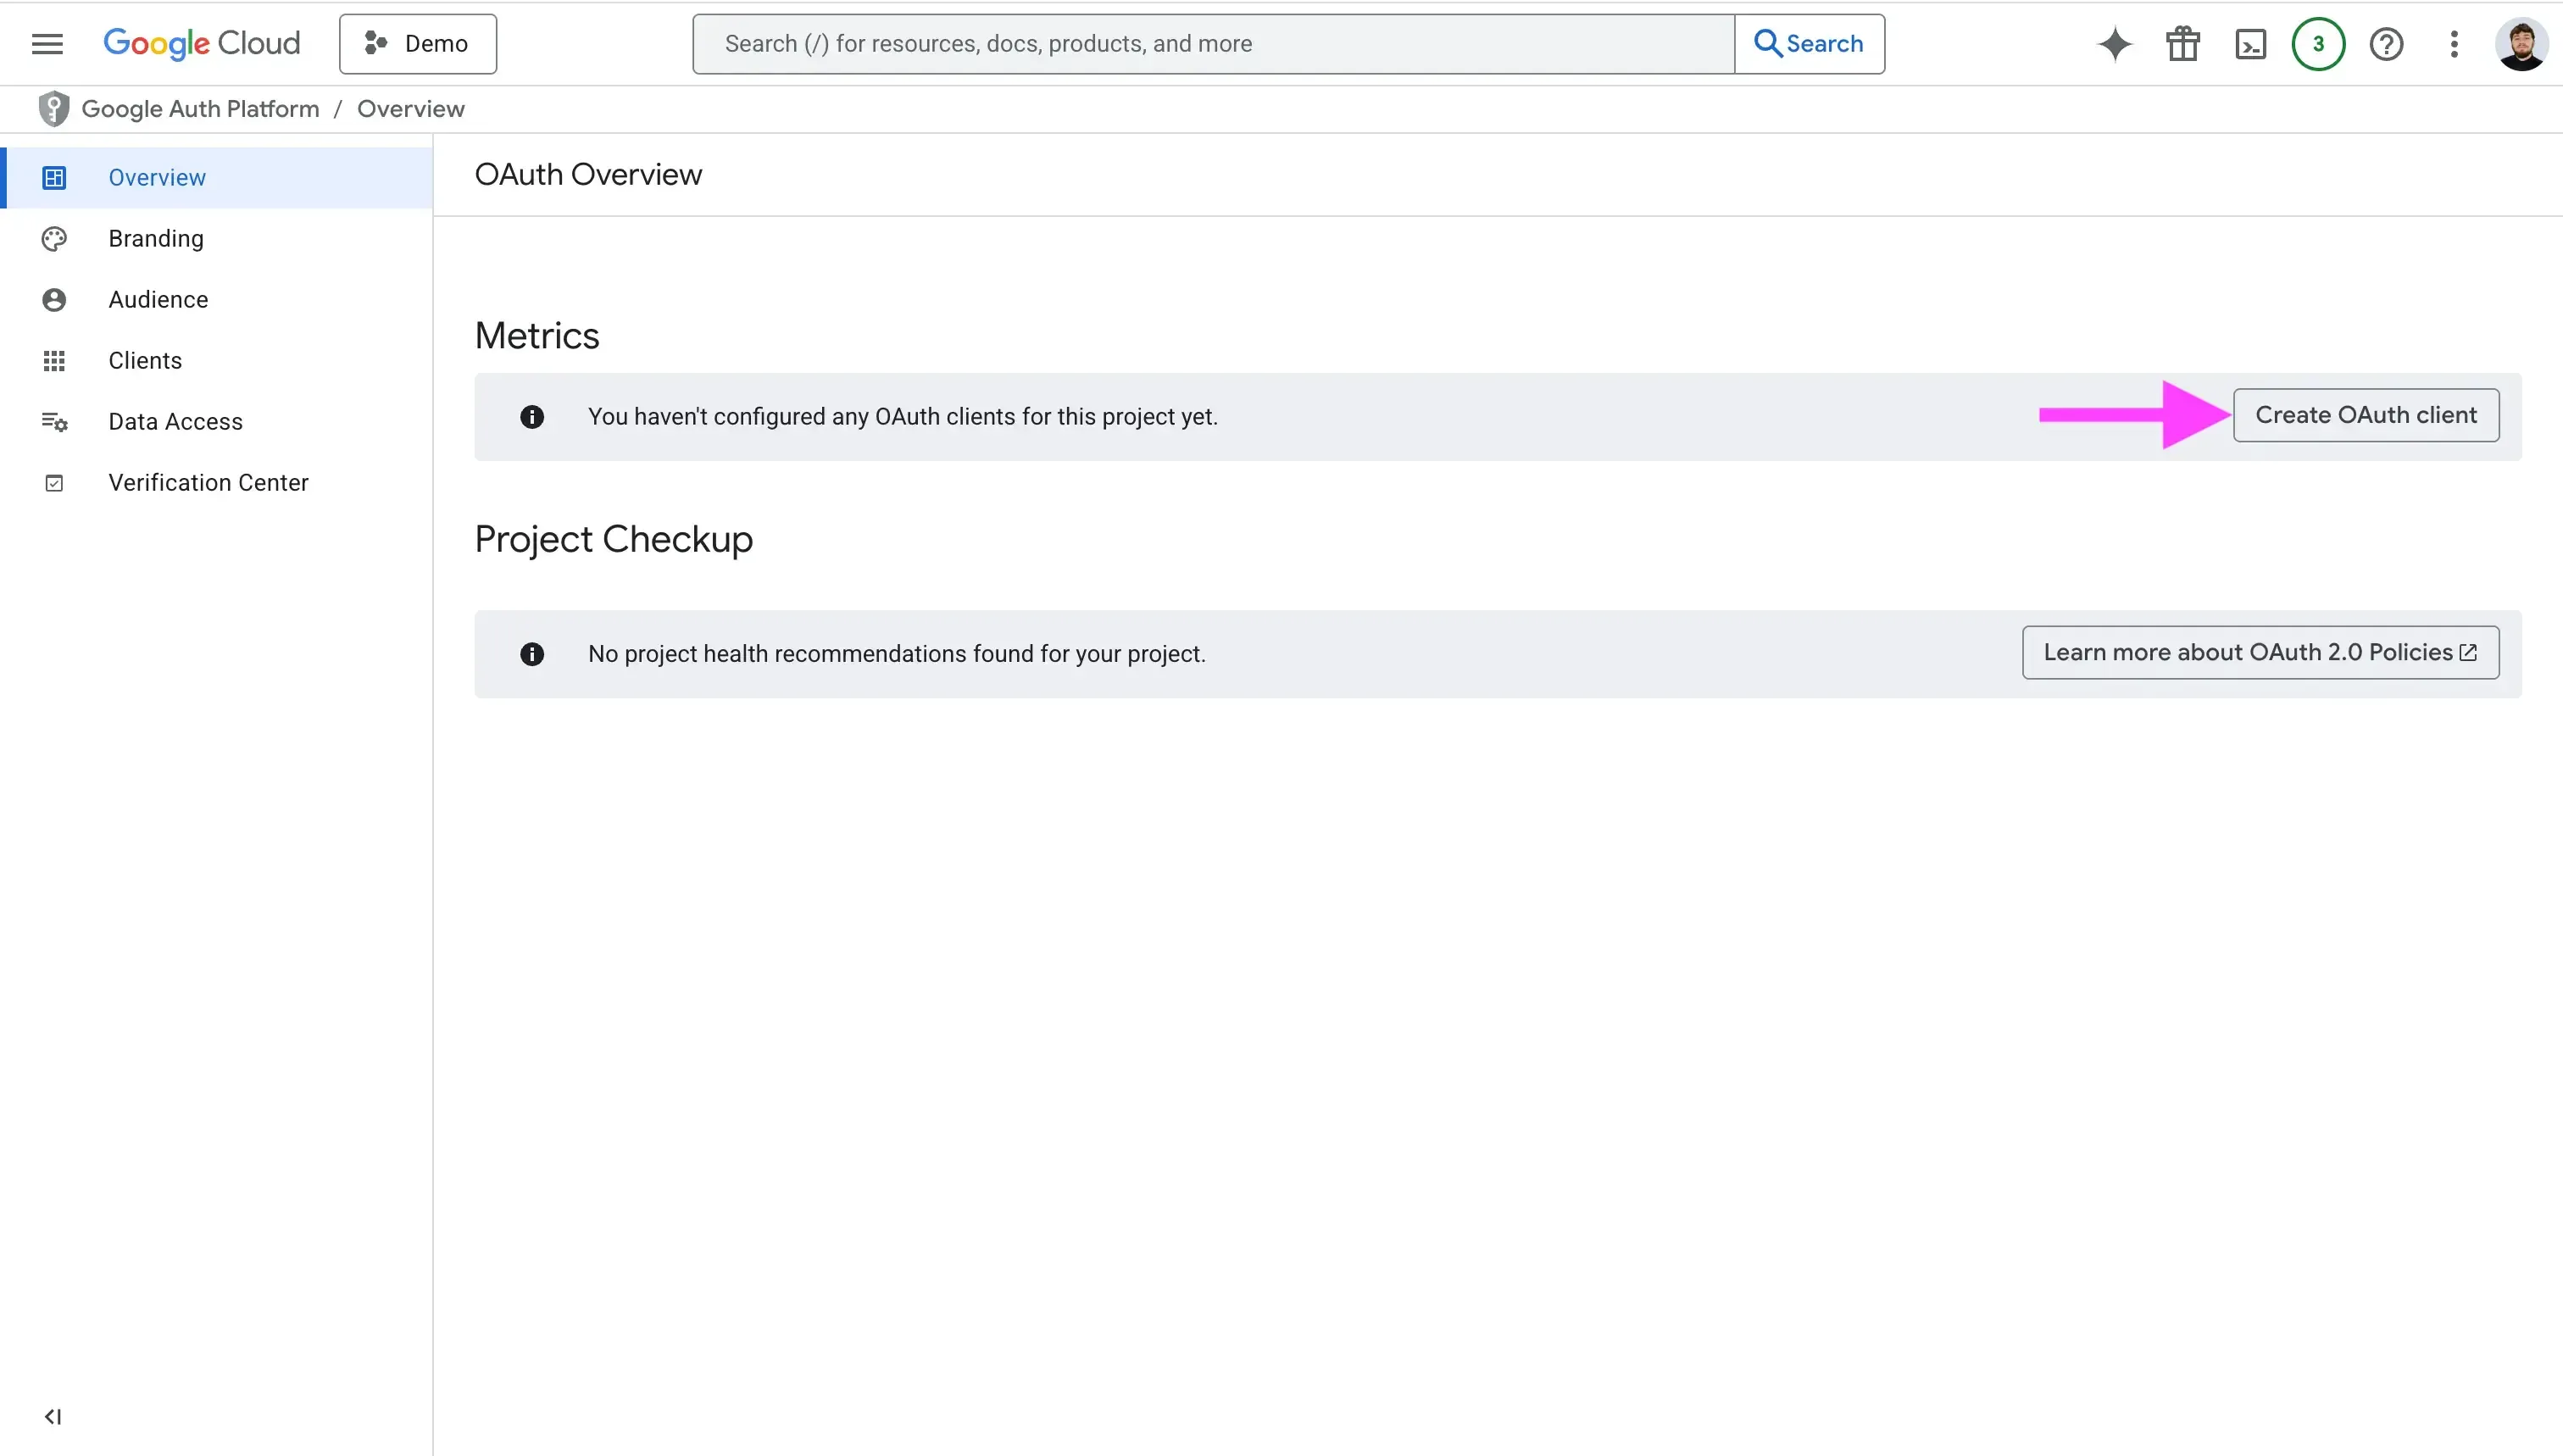
OAuth 同意画面の設定後、プロジェクト用の OAuth クライアントを作成できます。「Clients」タブで 「Create Client」 をクリックするか、概要ページの 「Create OAuth Client」 をクリックします。
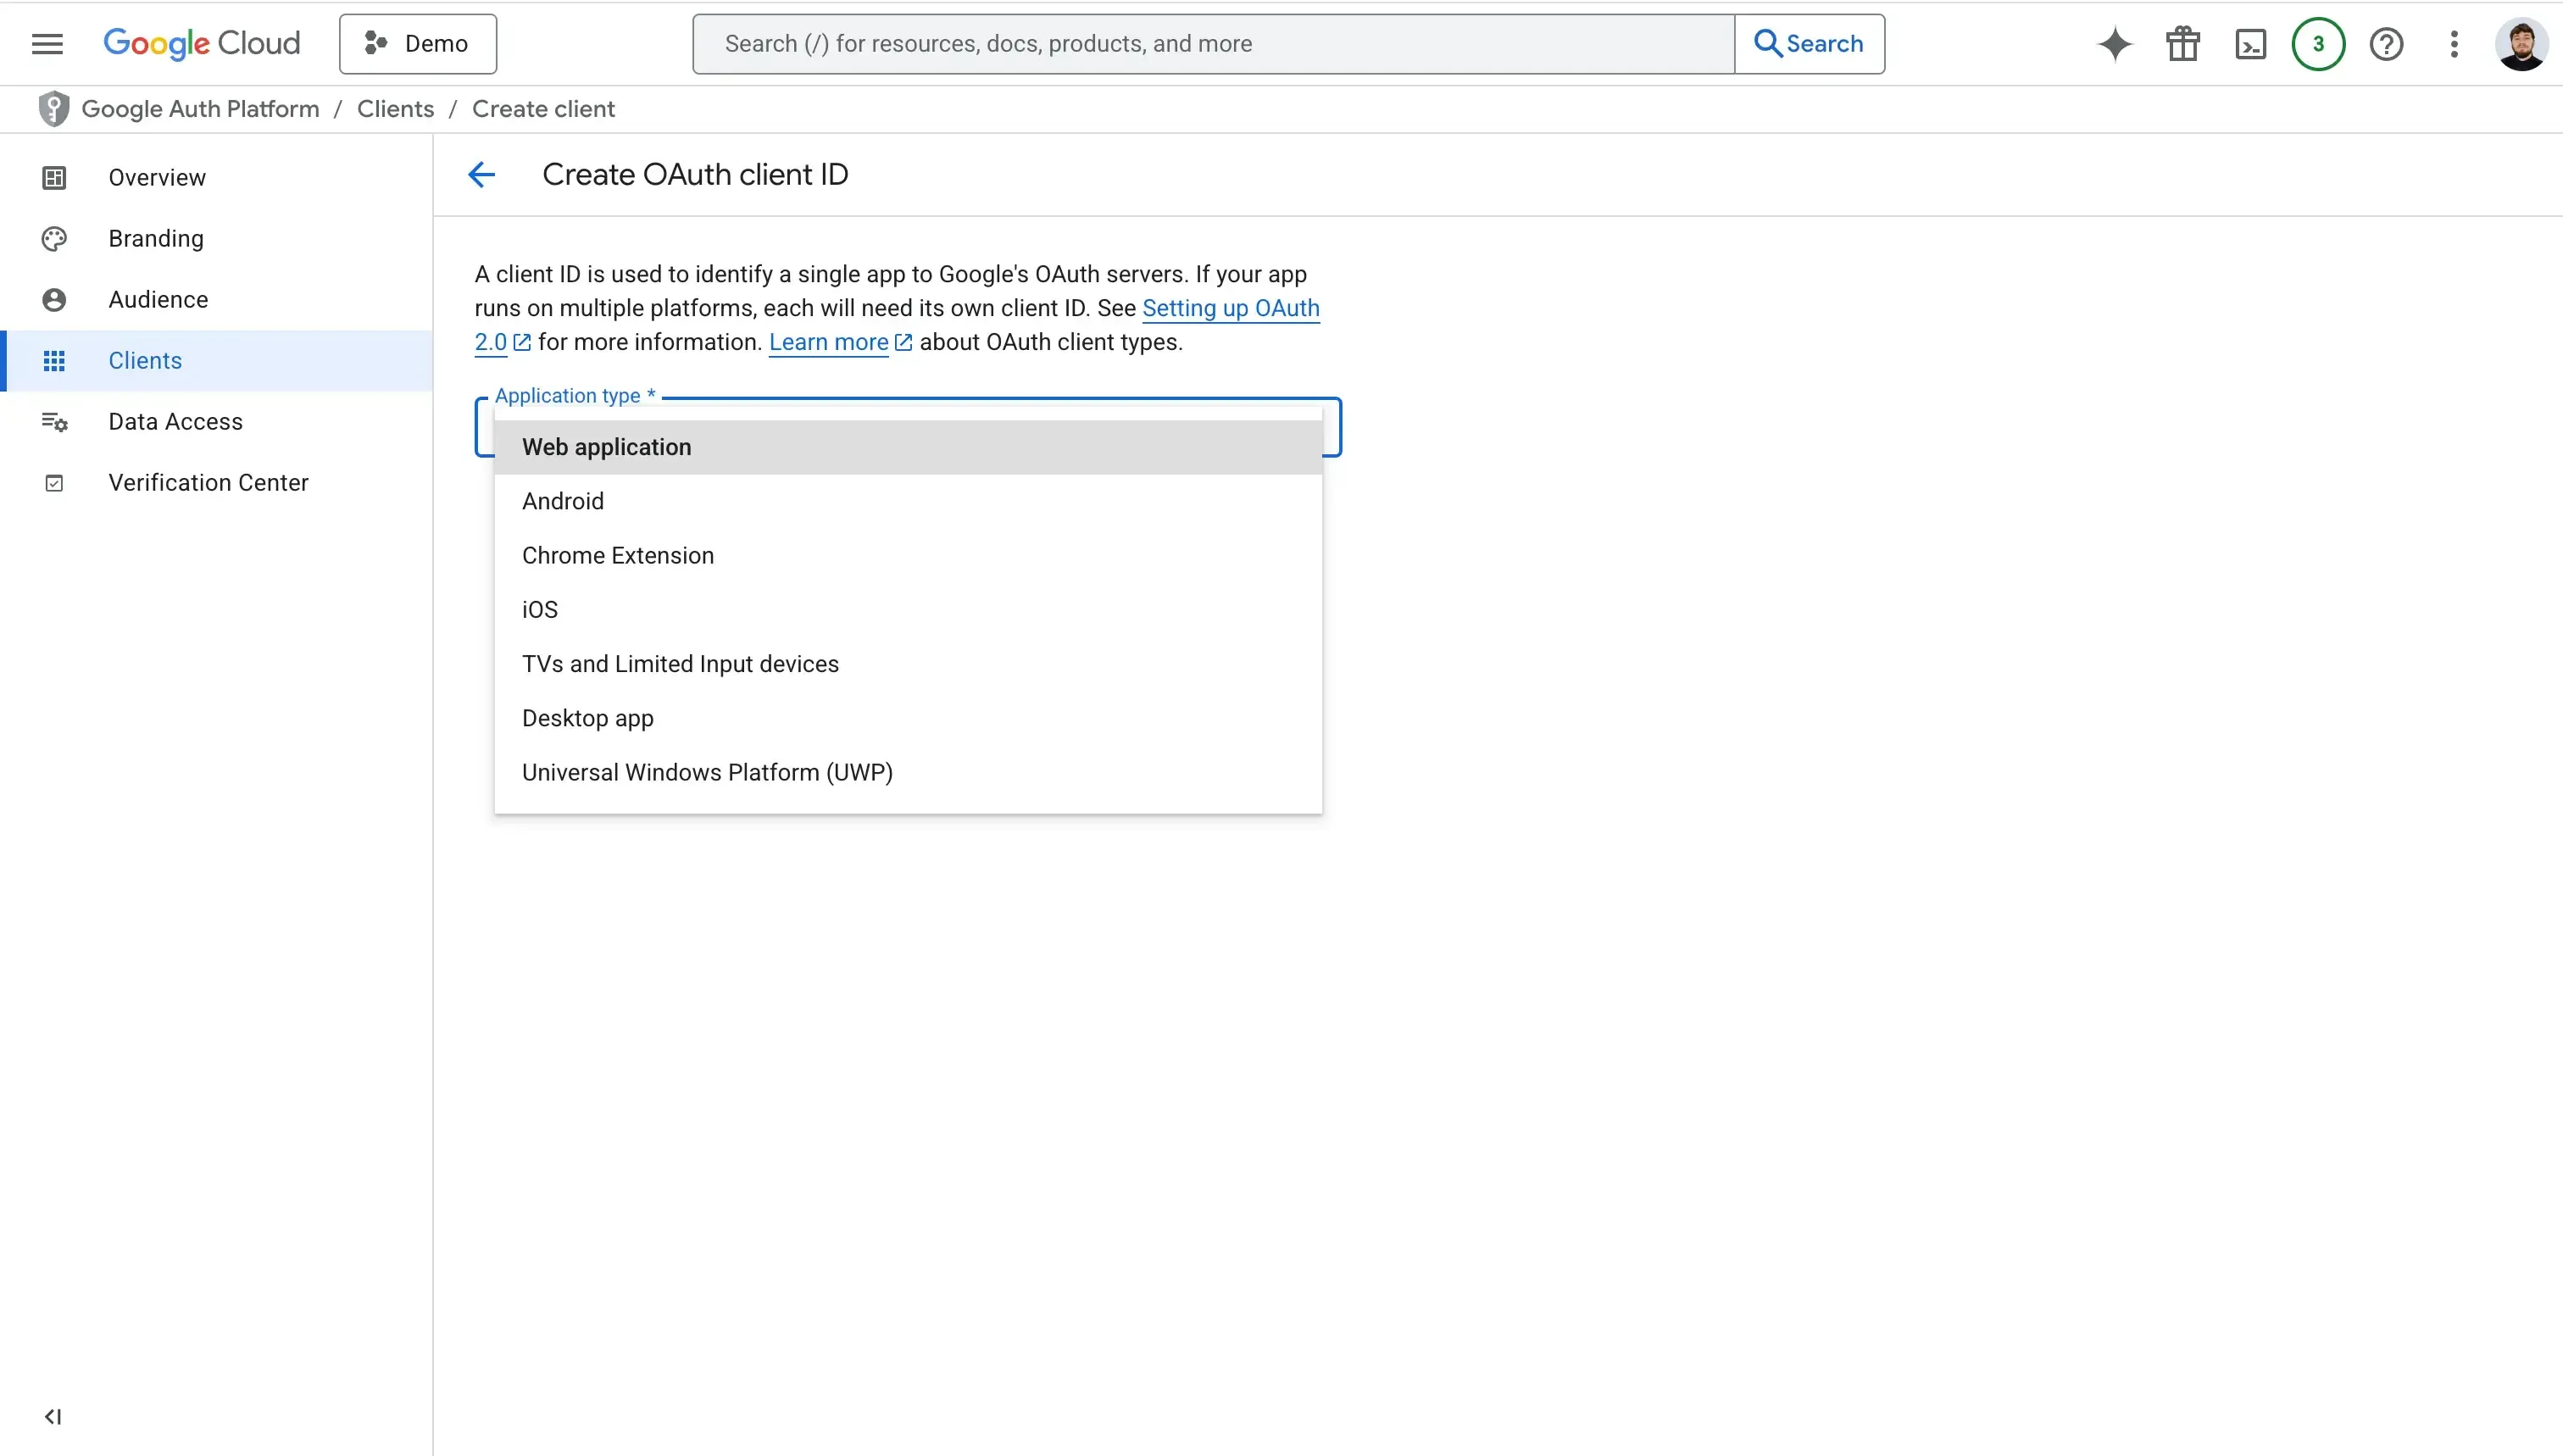
アプリが複数プラットフォームで動作する場合、プラットフォームごとにクライアント ID を作成します。例として「Web Application」クライアントを「Web Client」として作成します。
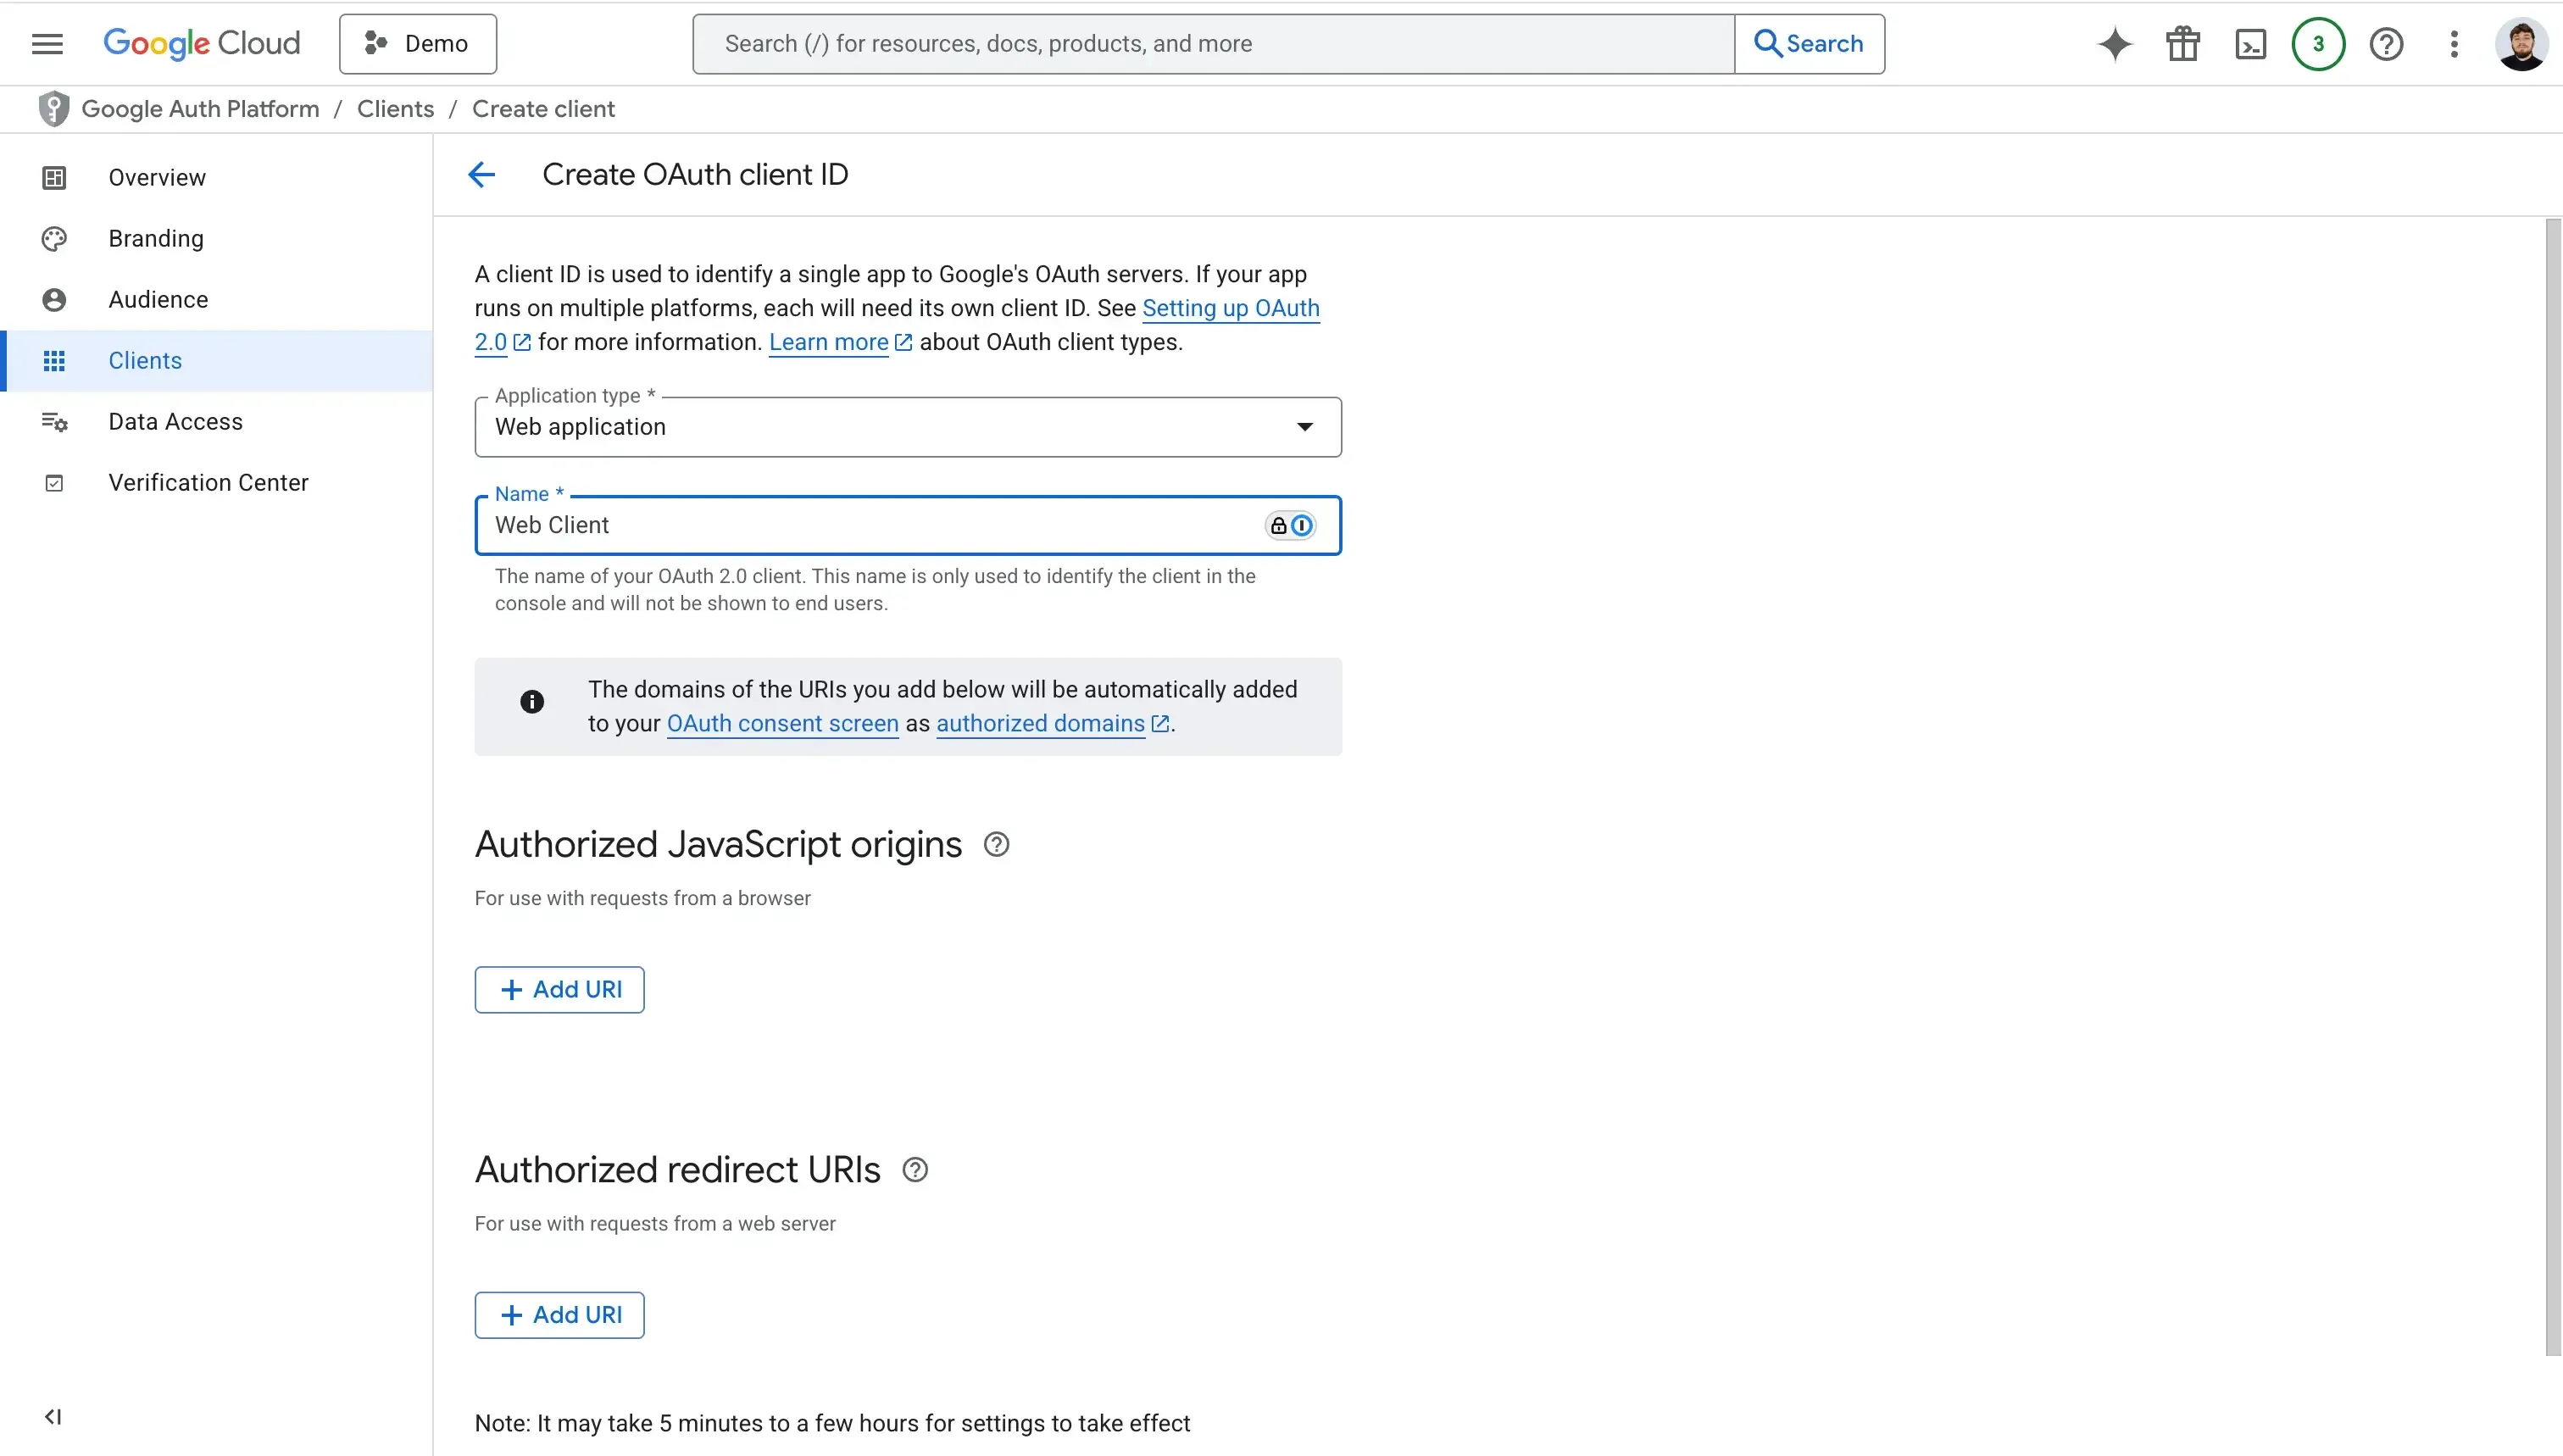
このフローでは、Authorized JavaScript origins と Authorized redirect URIs も設定します。
Authorized JavaScript origins には、例として myapp.domain.com のようにアプリをホストするドメインを入力します。
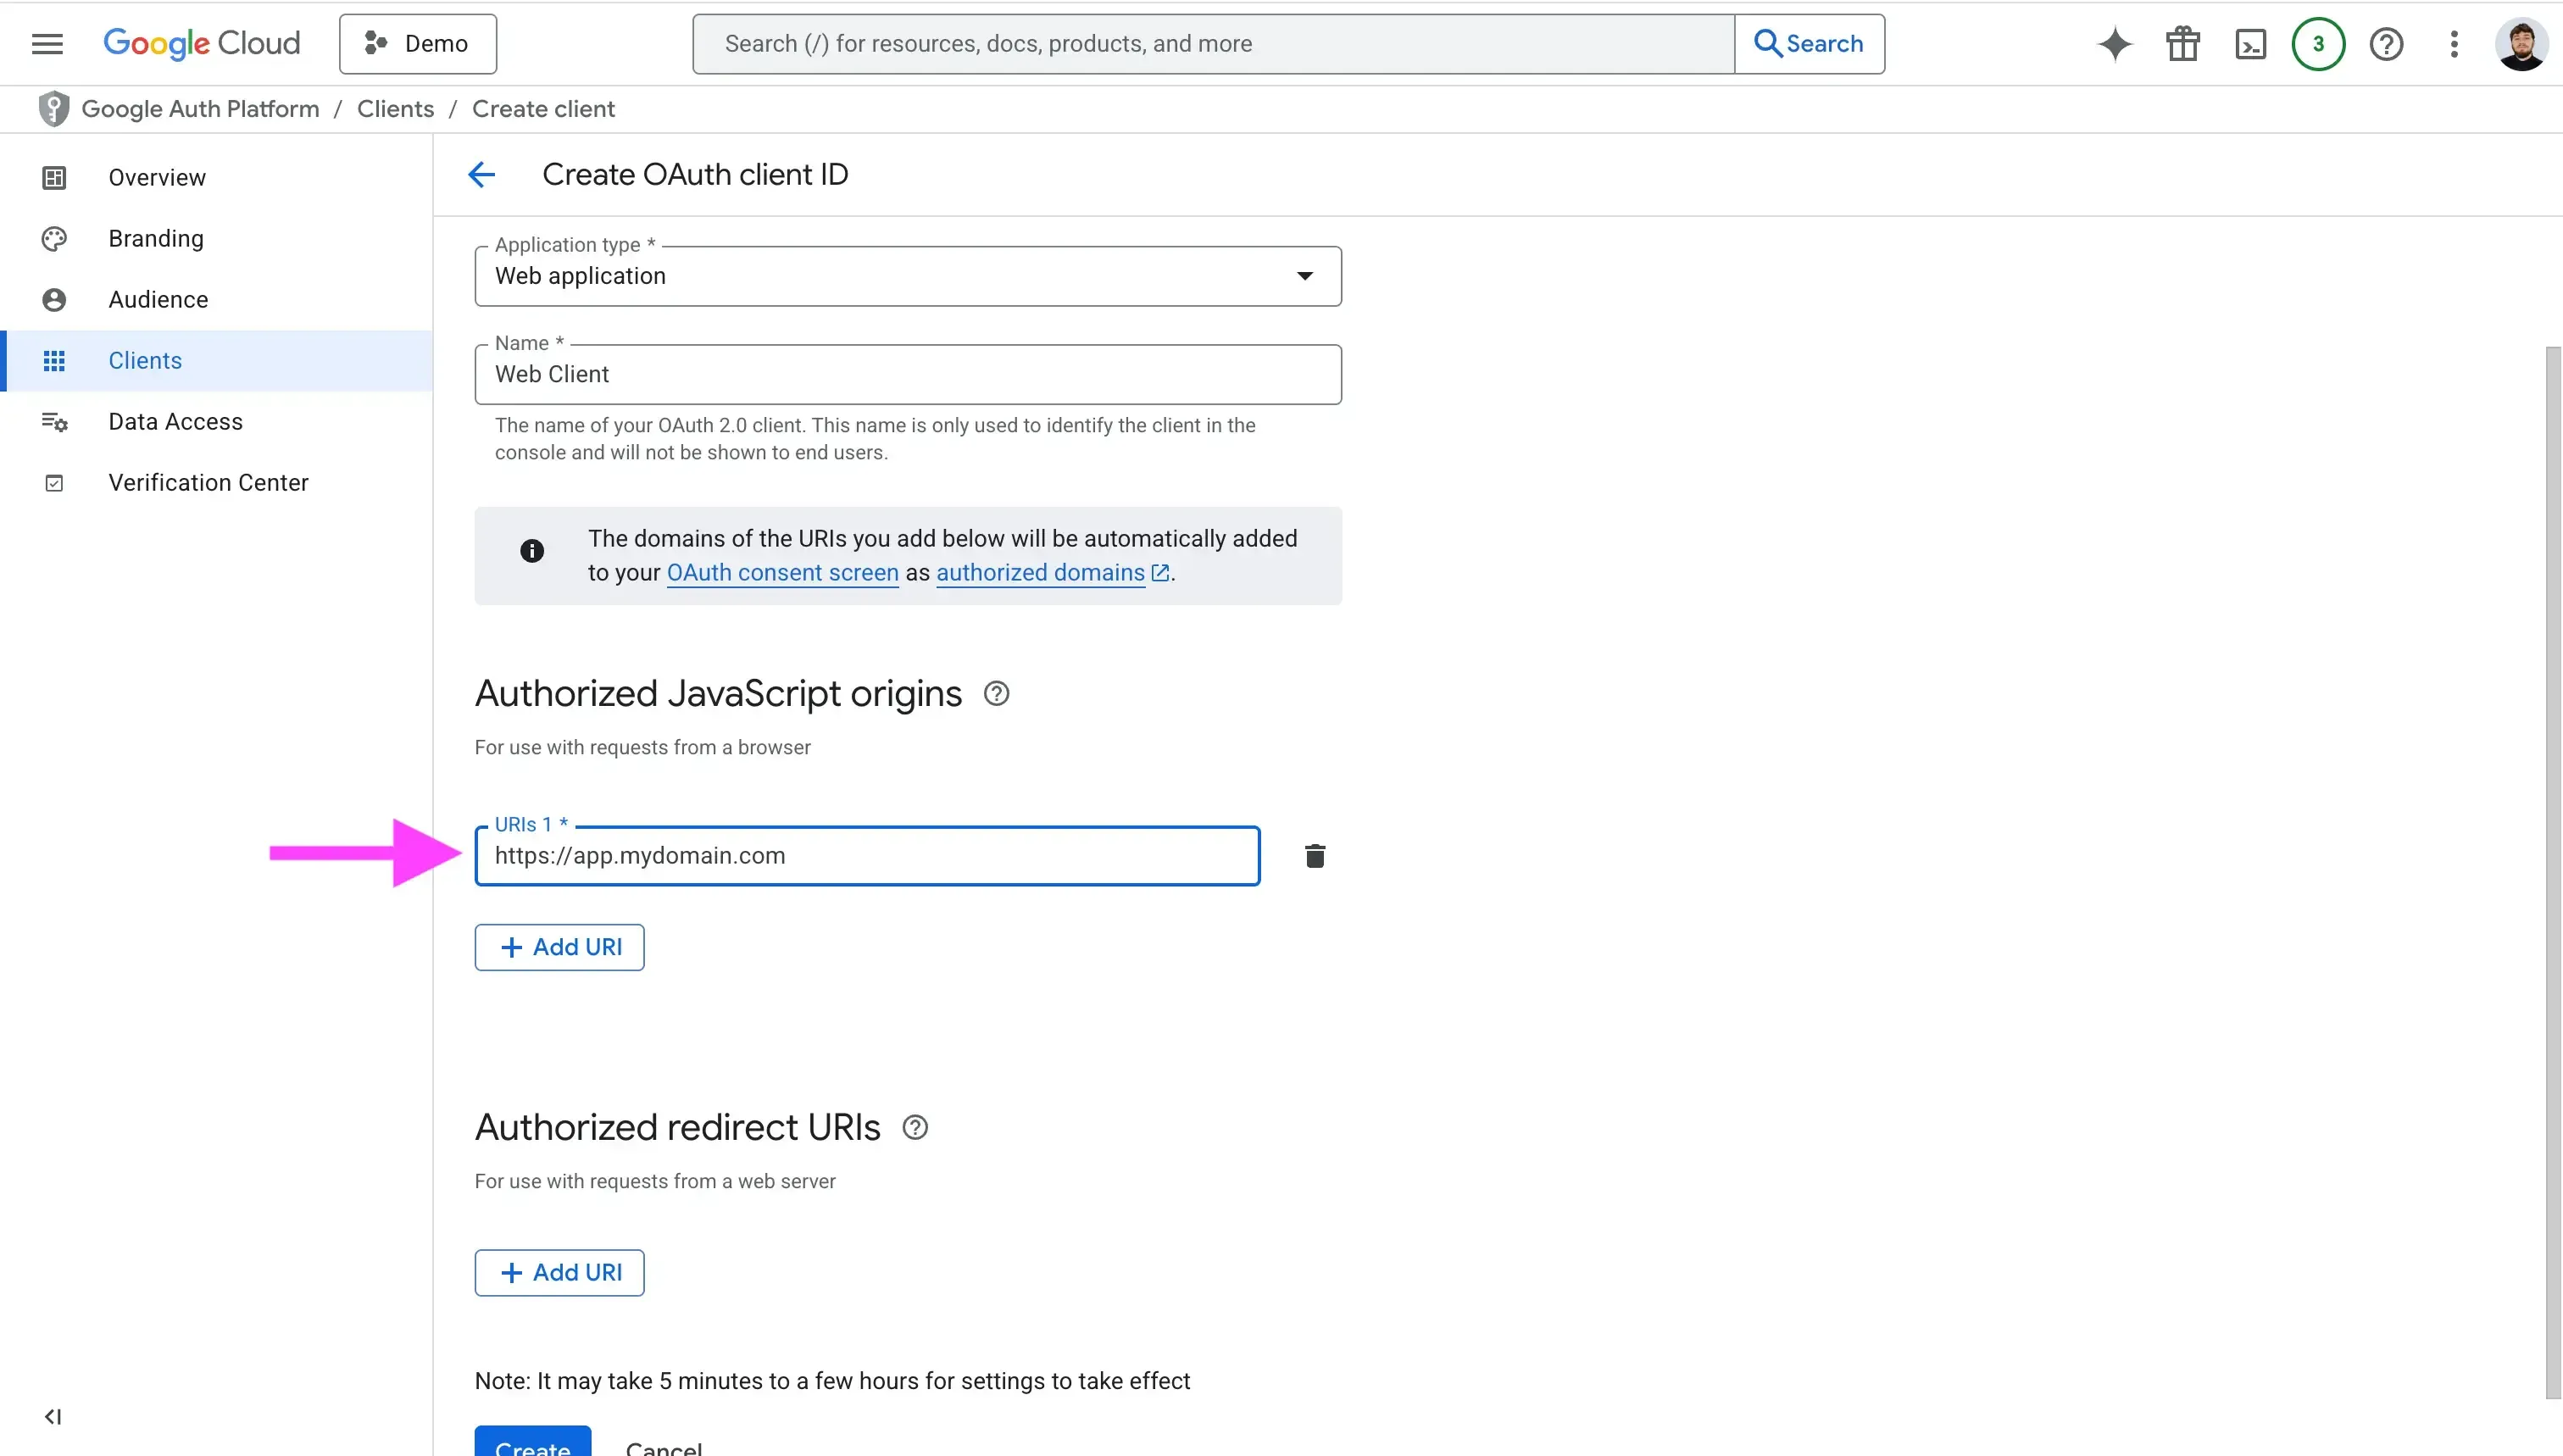
Authorized redirect URIs には、認証後にユーザーをリダイレクトする URL をすべて入力します。URL にはプロトコルが必要です。
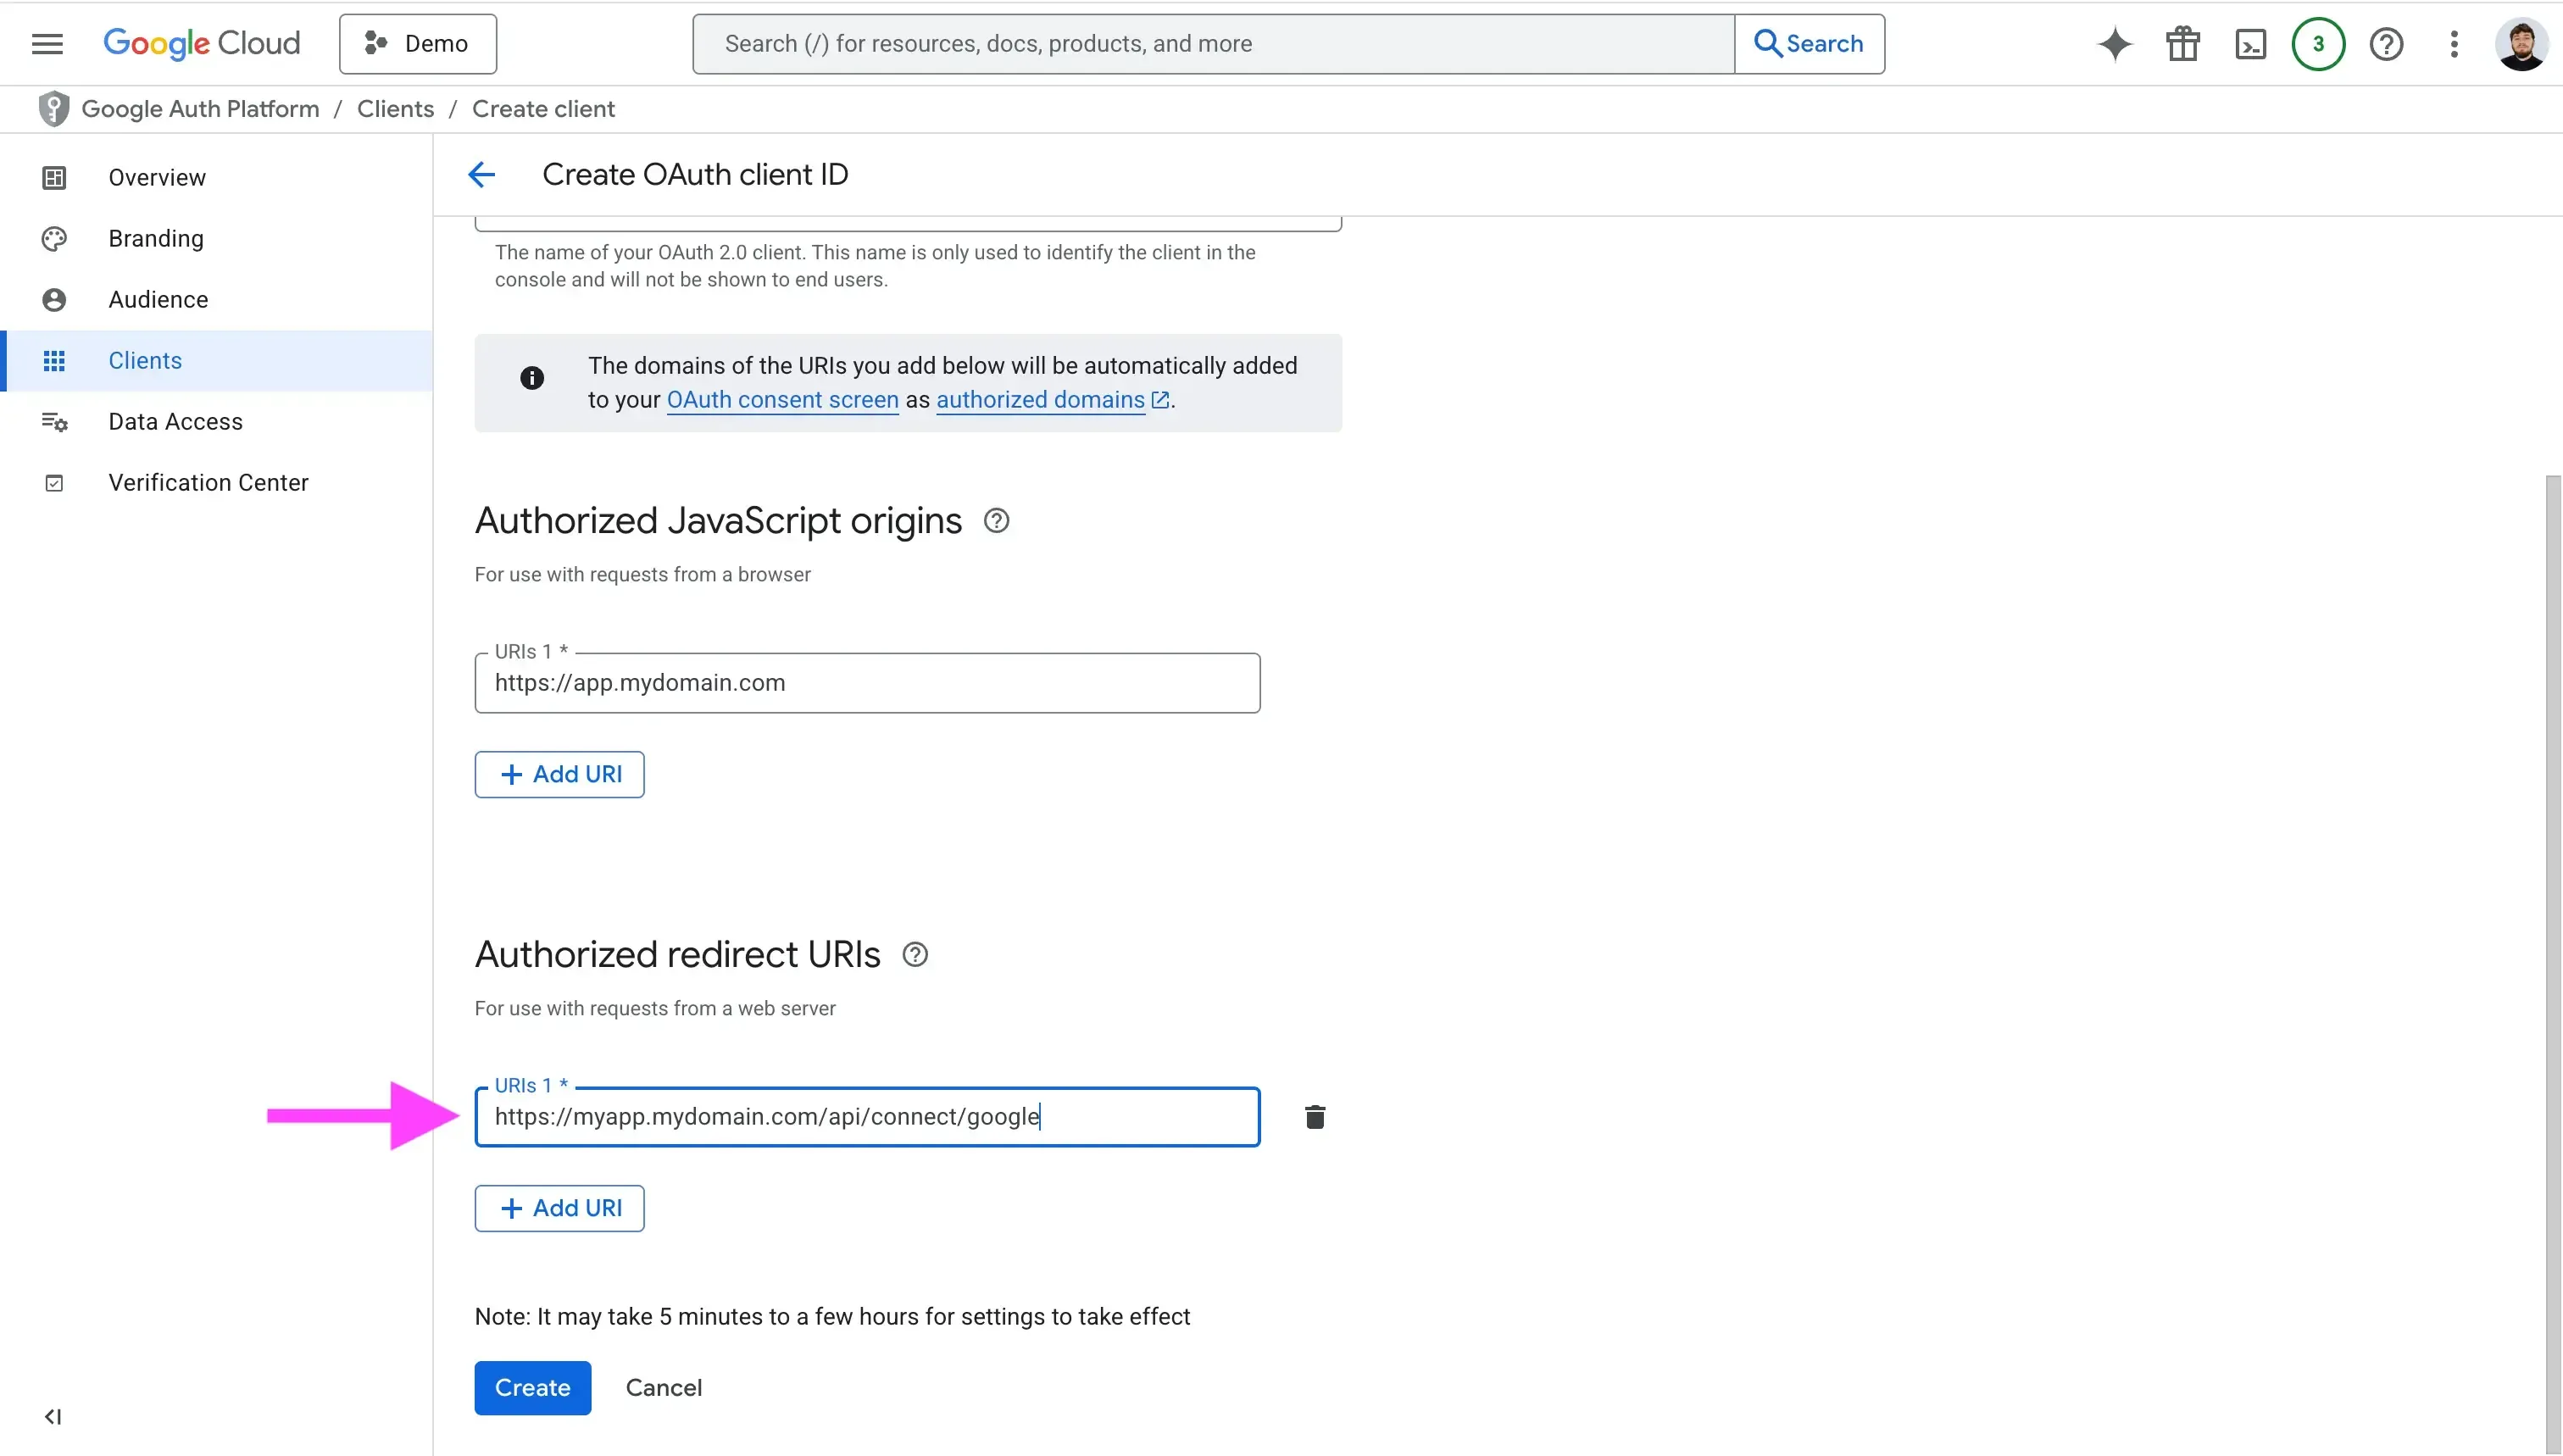
開発段階でアプリを使用する場合に備え、localhost のリダイレクト URL も必ずホワイトリストに追加してください。この例でも localhost を追加します。
必要事項を入力したら「Create」をクリックします。Google がモーダルを表示し、Client ID と Client Secret を表示します。これらを必ずコピーして安全な場所(通常は .env ファイル)に保管してください。または JSON をダウンロードして 1Password などのシークレットマネージャに保存できます。
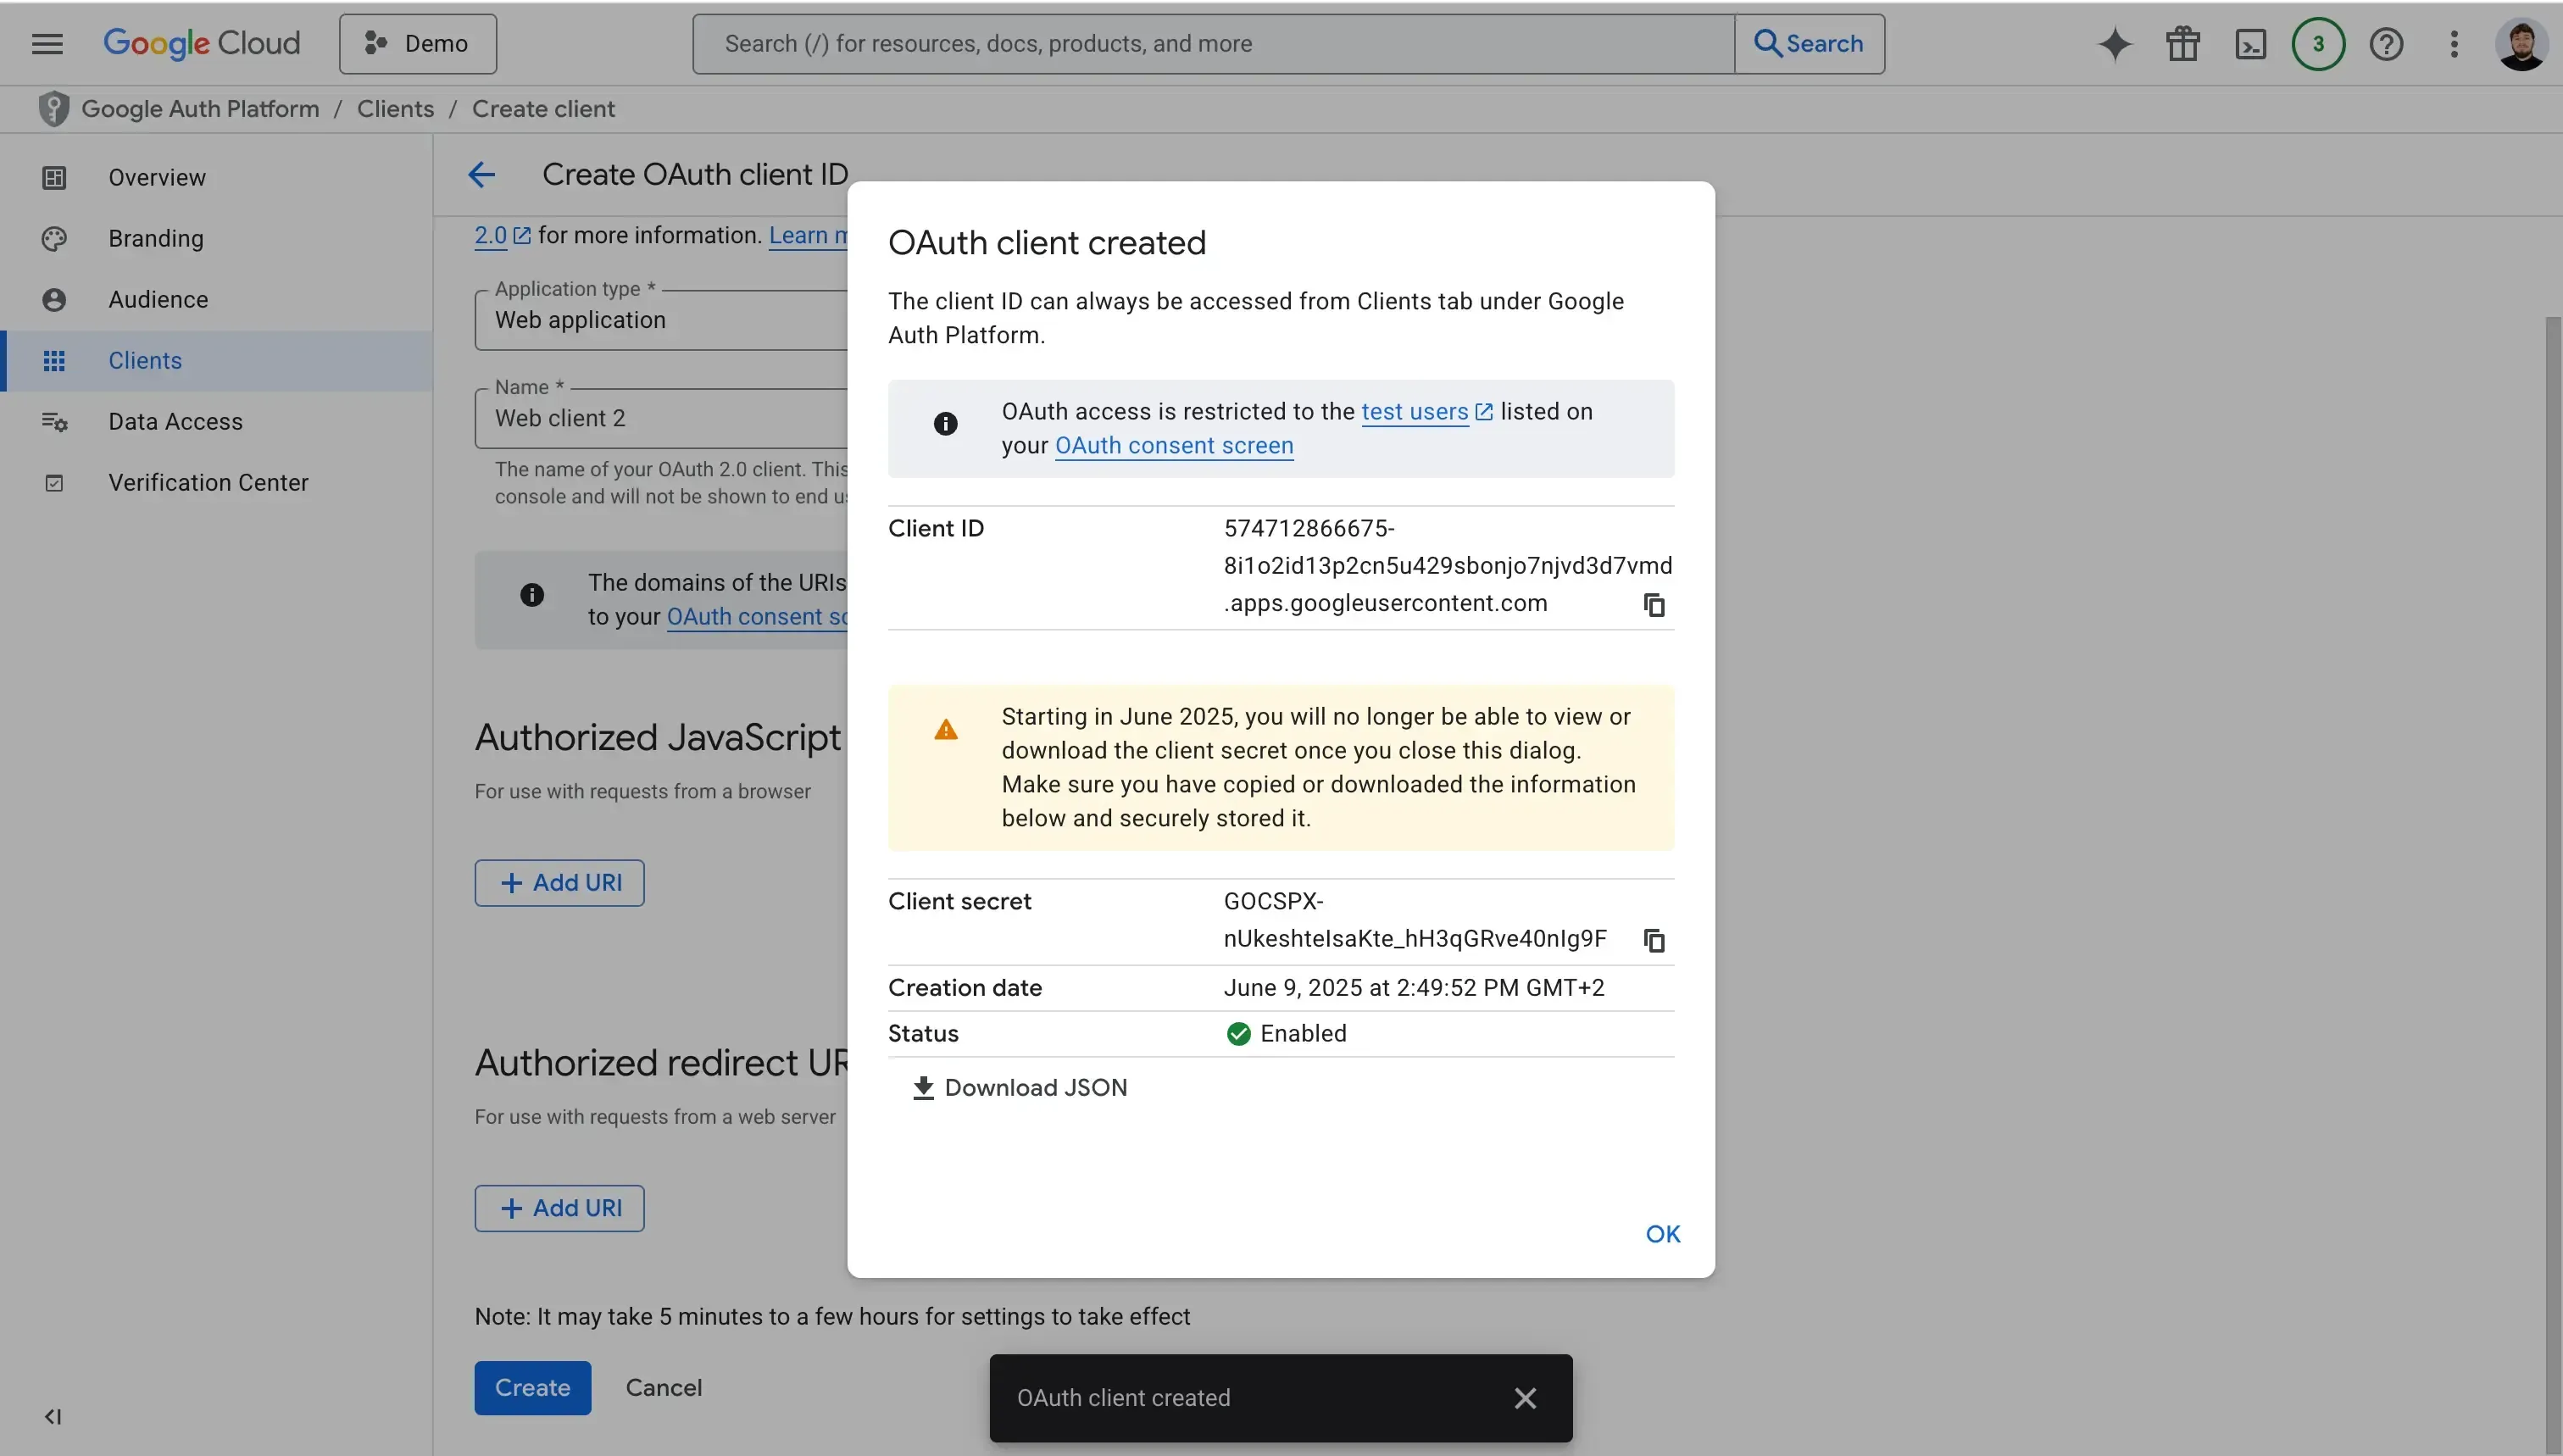
JSON ファイルをダウンロードするか Client Secret をコピーして安全に保管してください。モーダルを閉じると Client Secret は再表示できません。
6. テストユーザーを追加して動作確認する
ローカル開発時、Google から認可を受けるにはテストユーザーをホワイトリストに追加する必要があります。外部アプリで Google に未承認のためです。
- 「Audience」タブをクリック
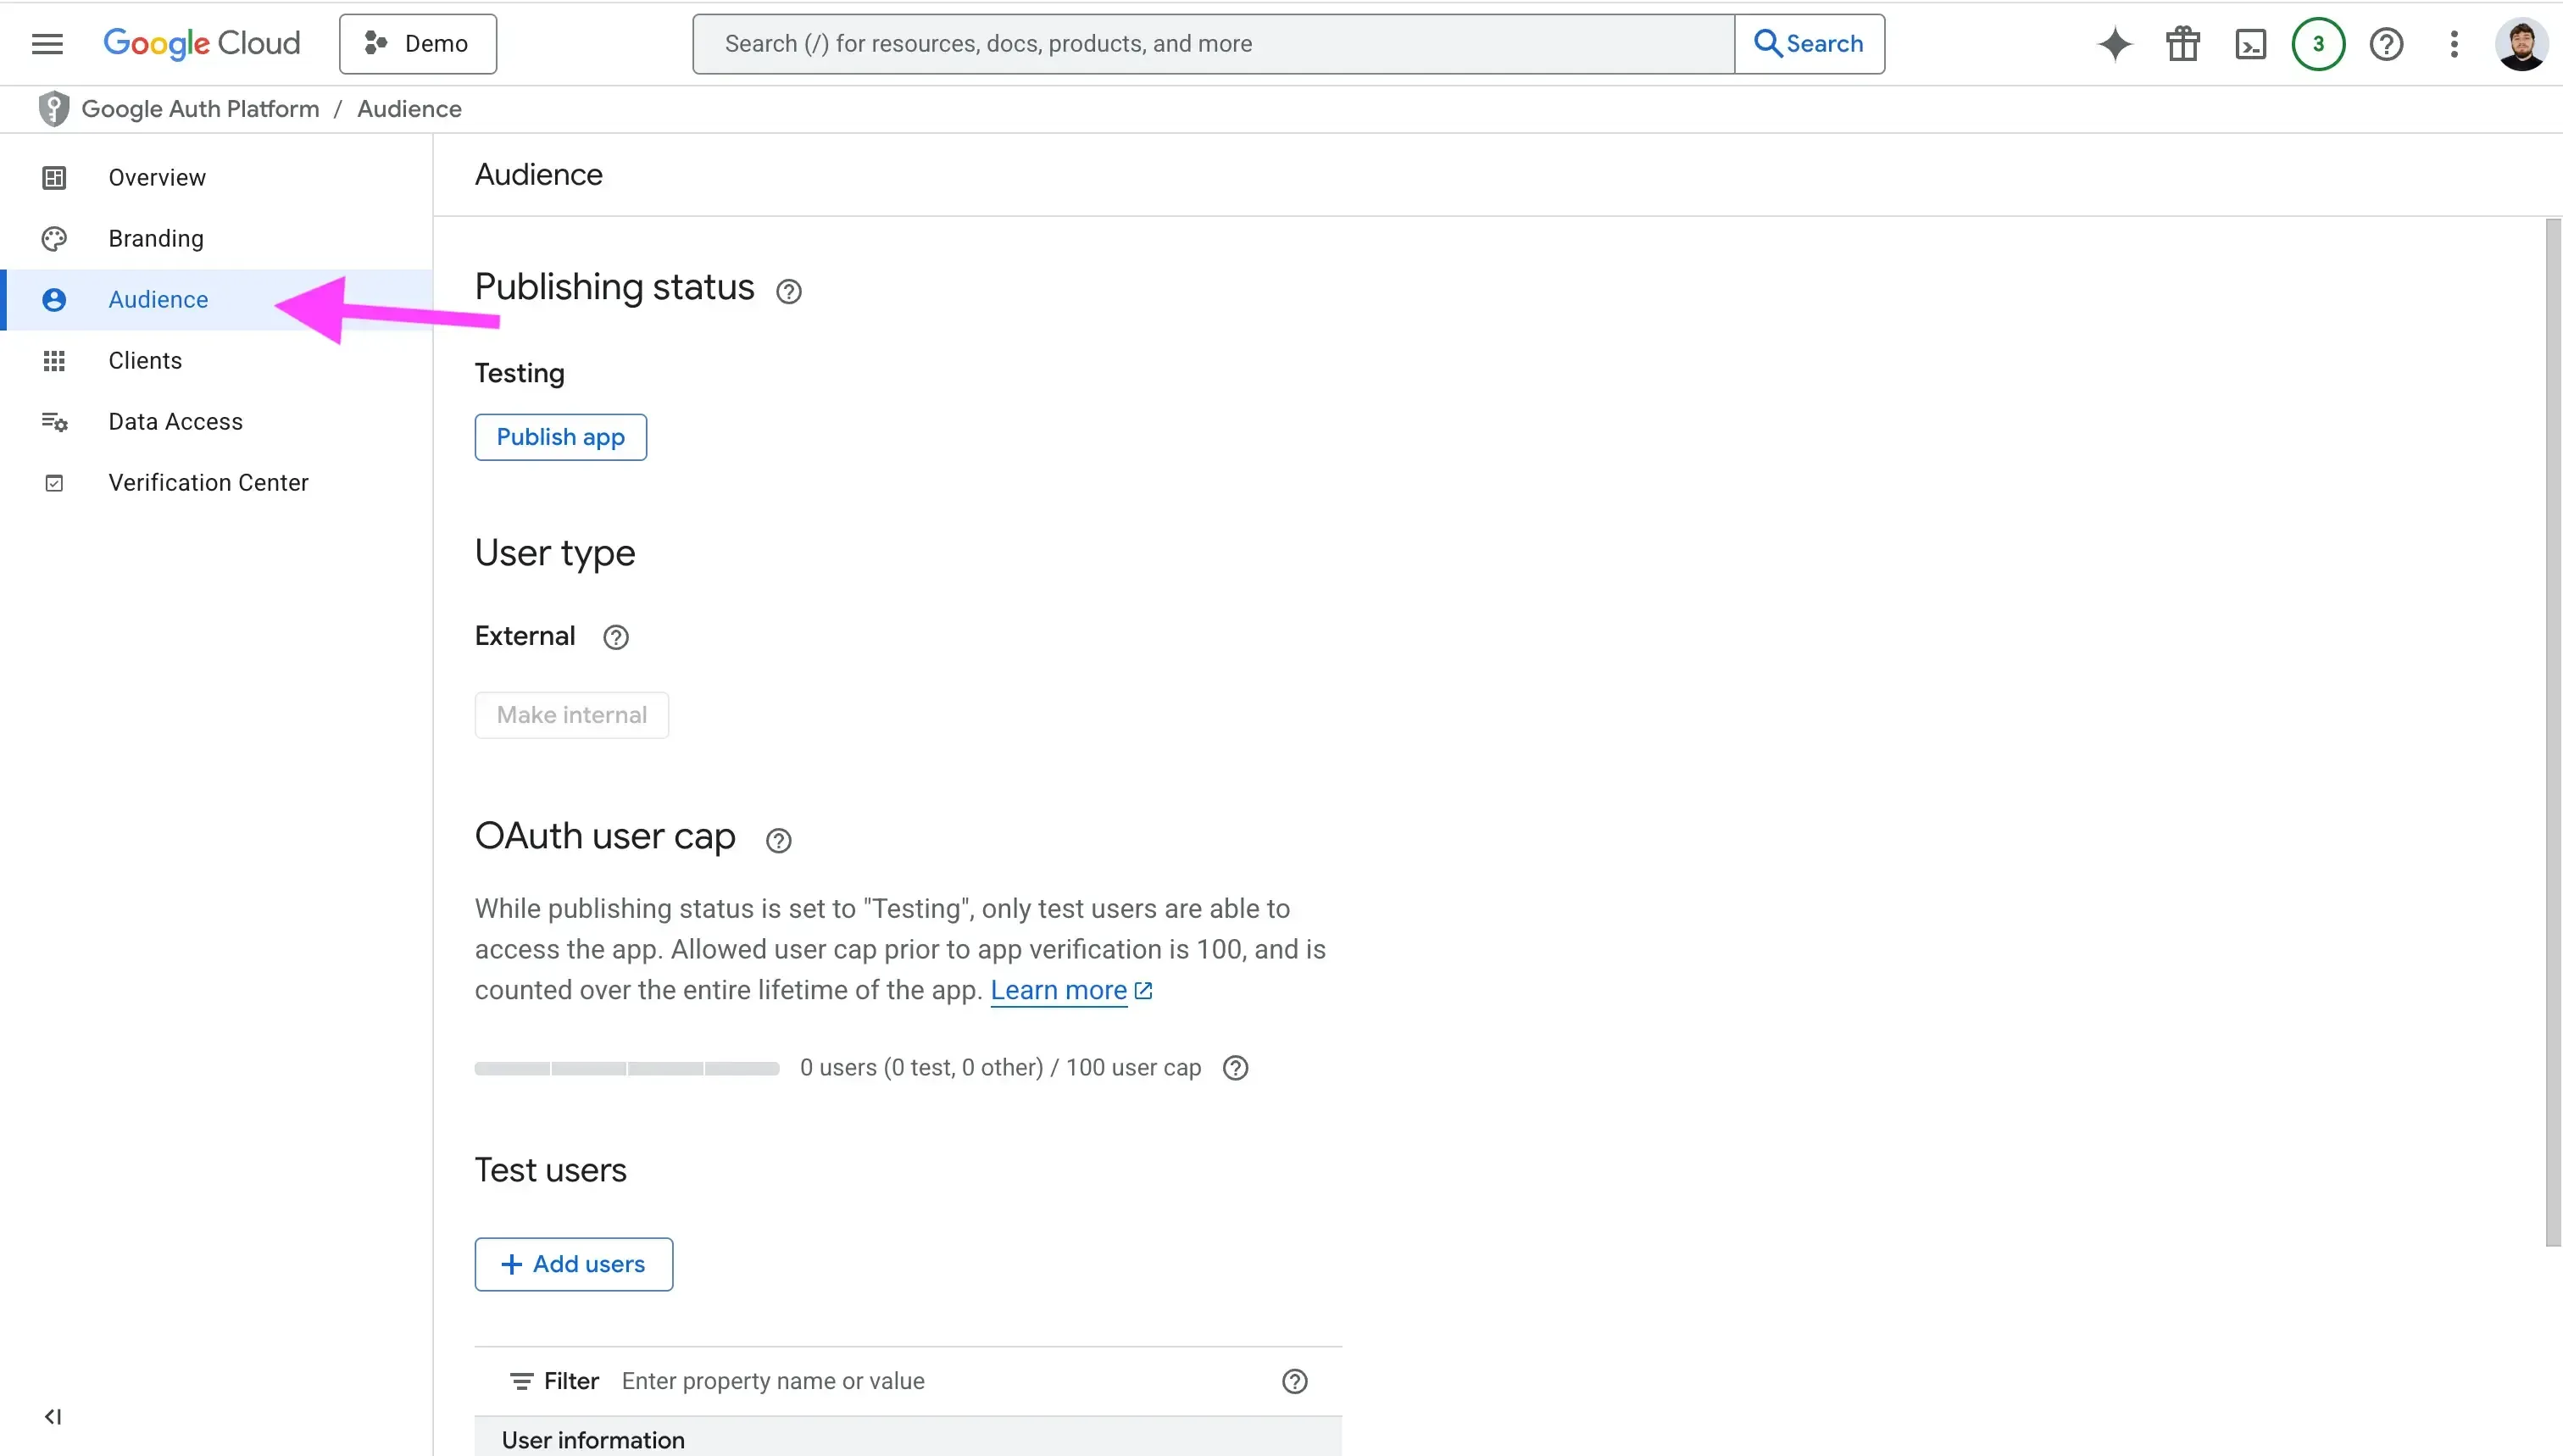
- 「Test Users」セクションまでスクロール
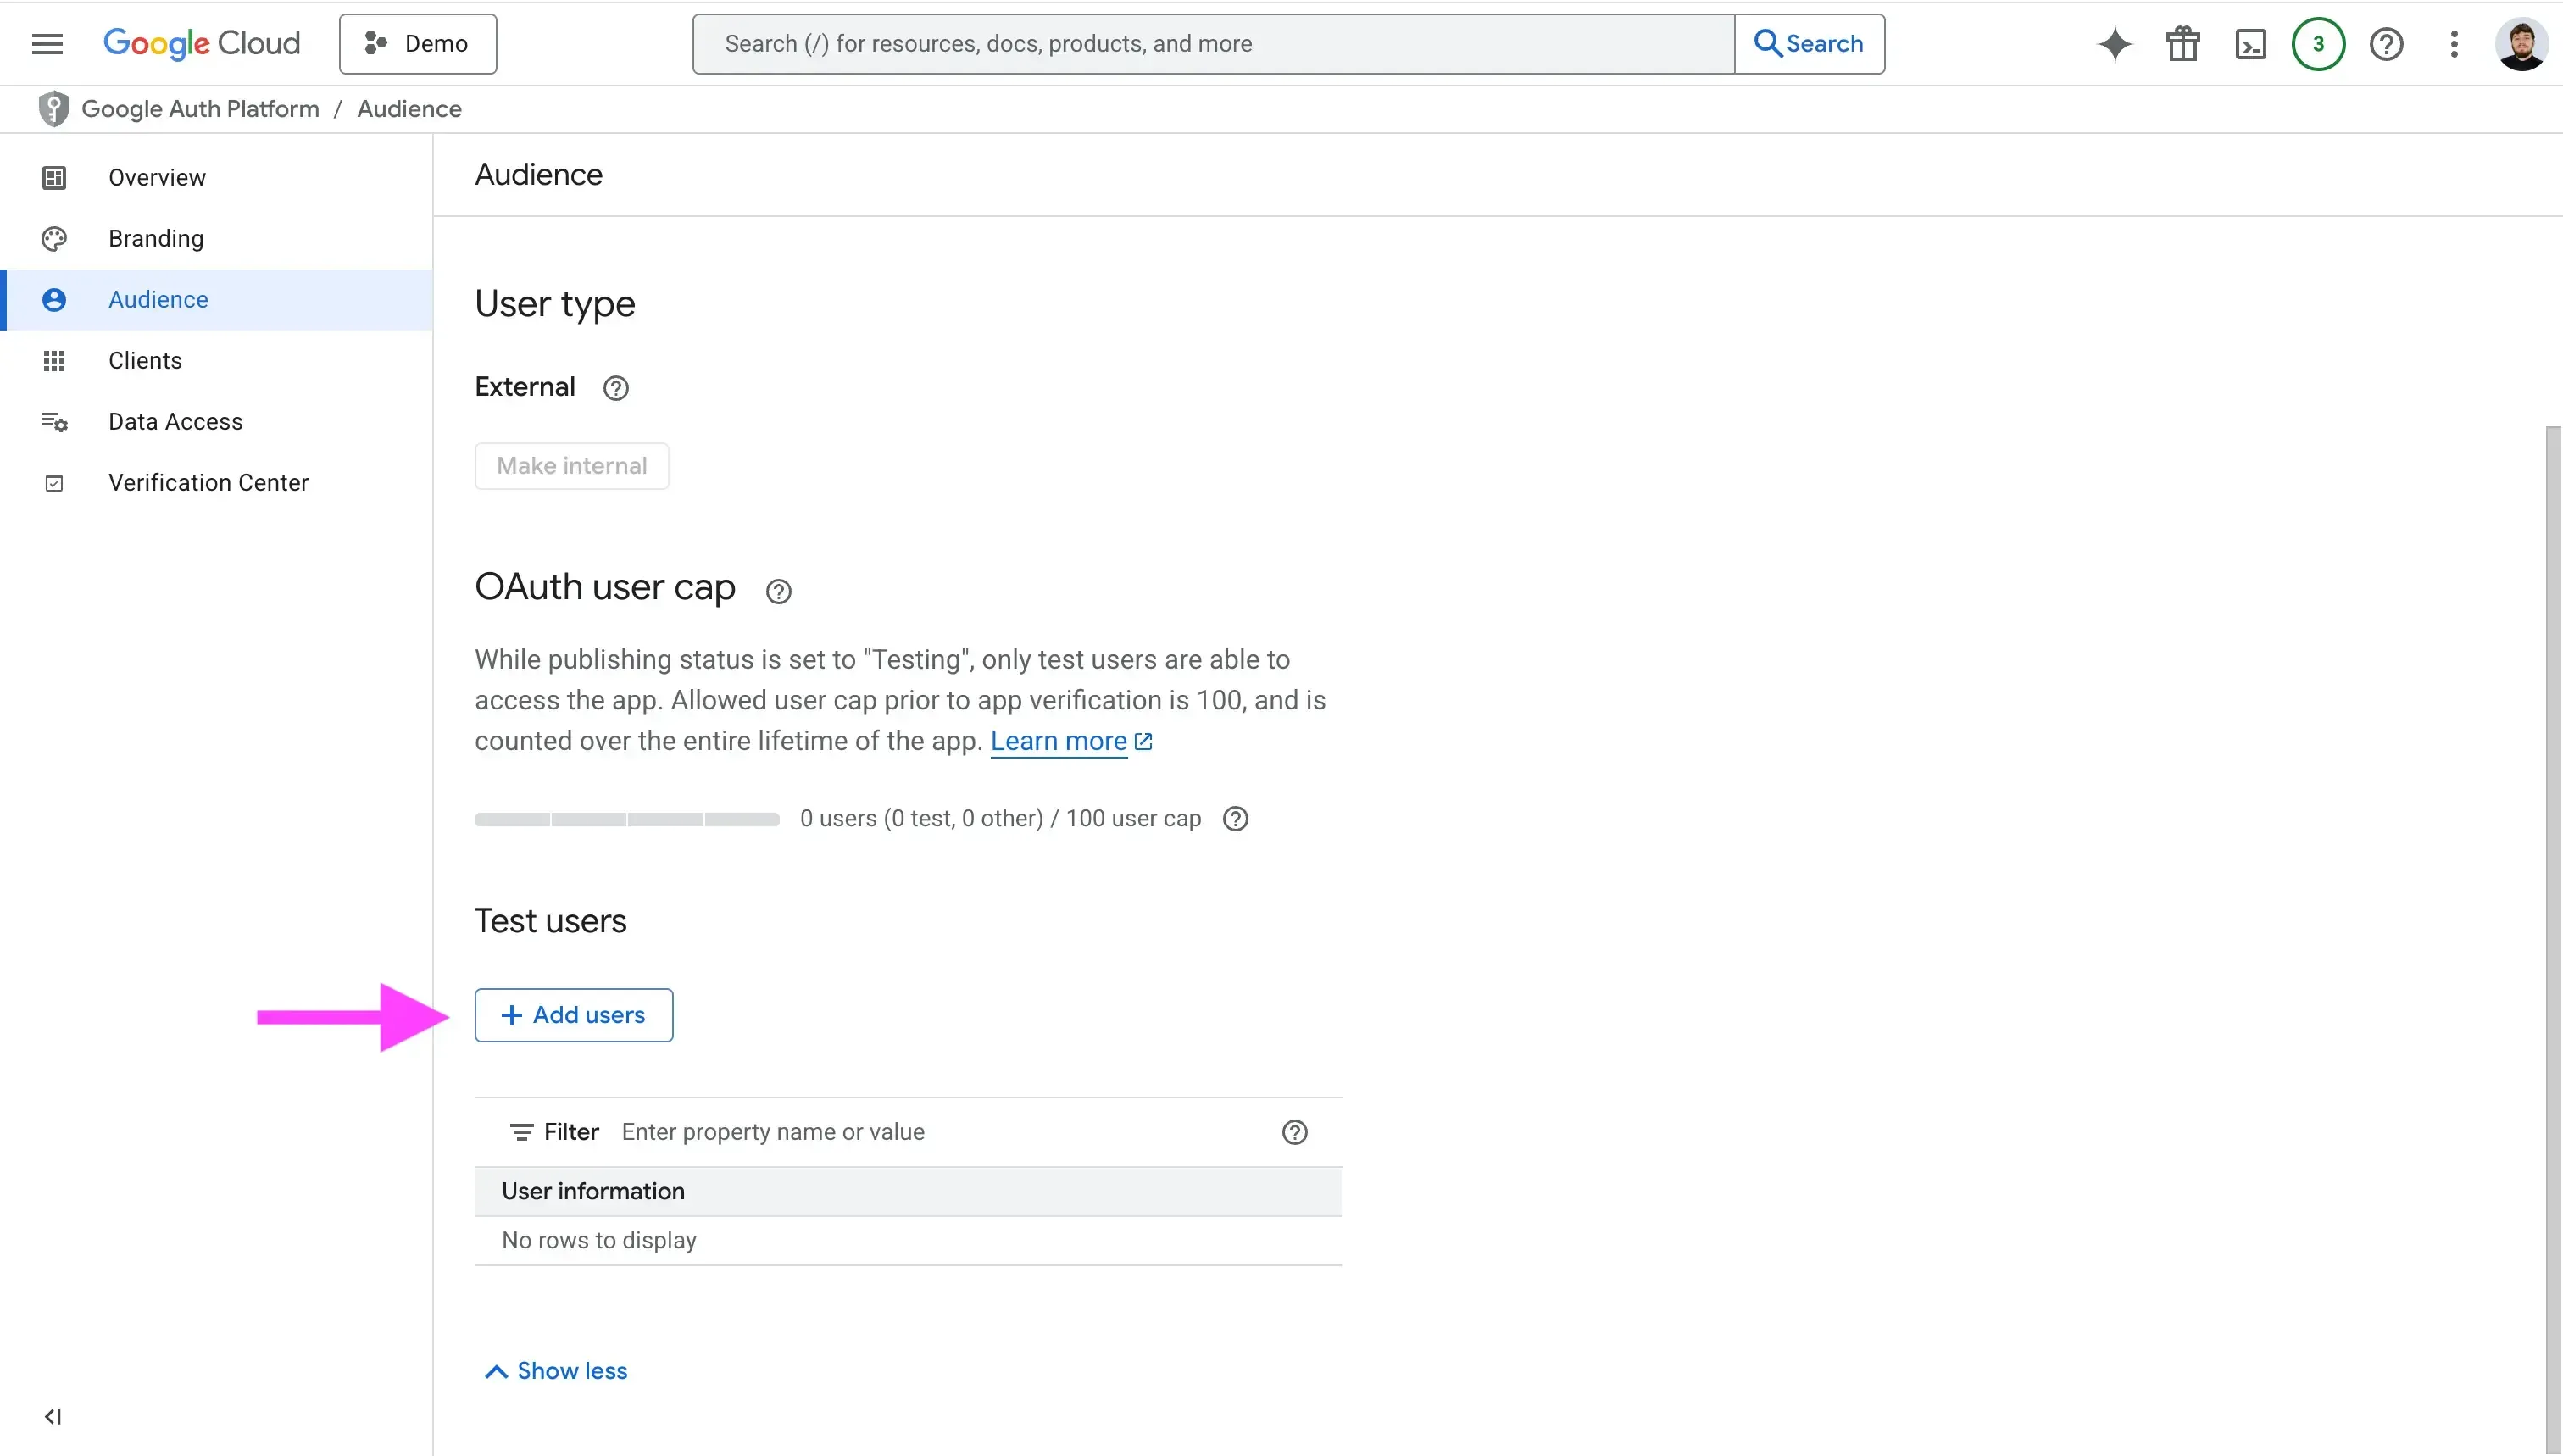
- 「Add Users」をクリックし、メールアドレスを入力
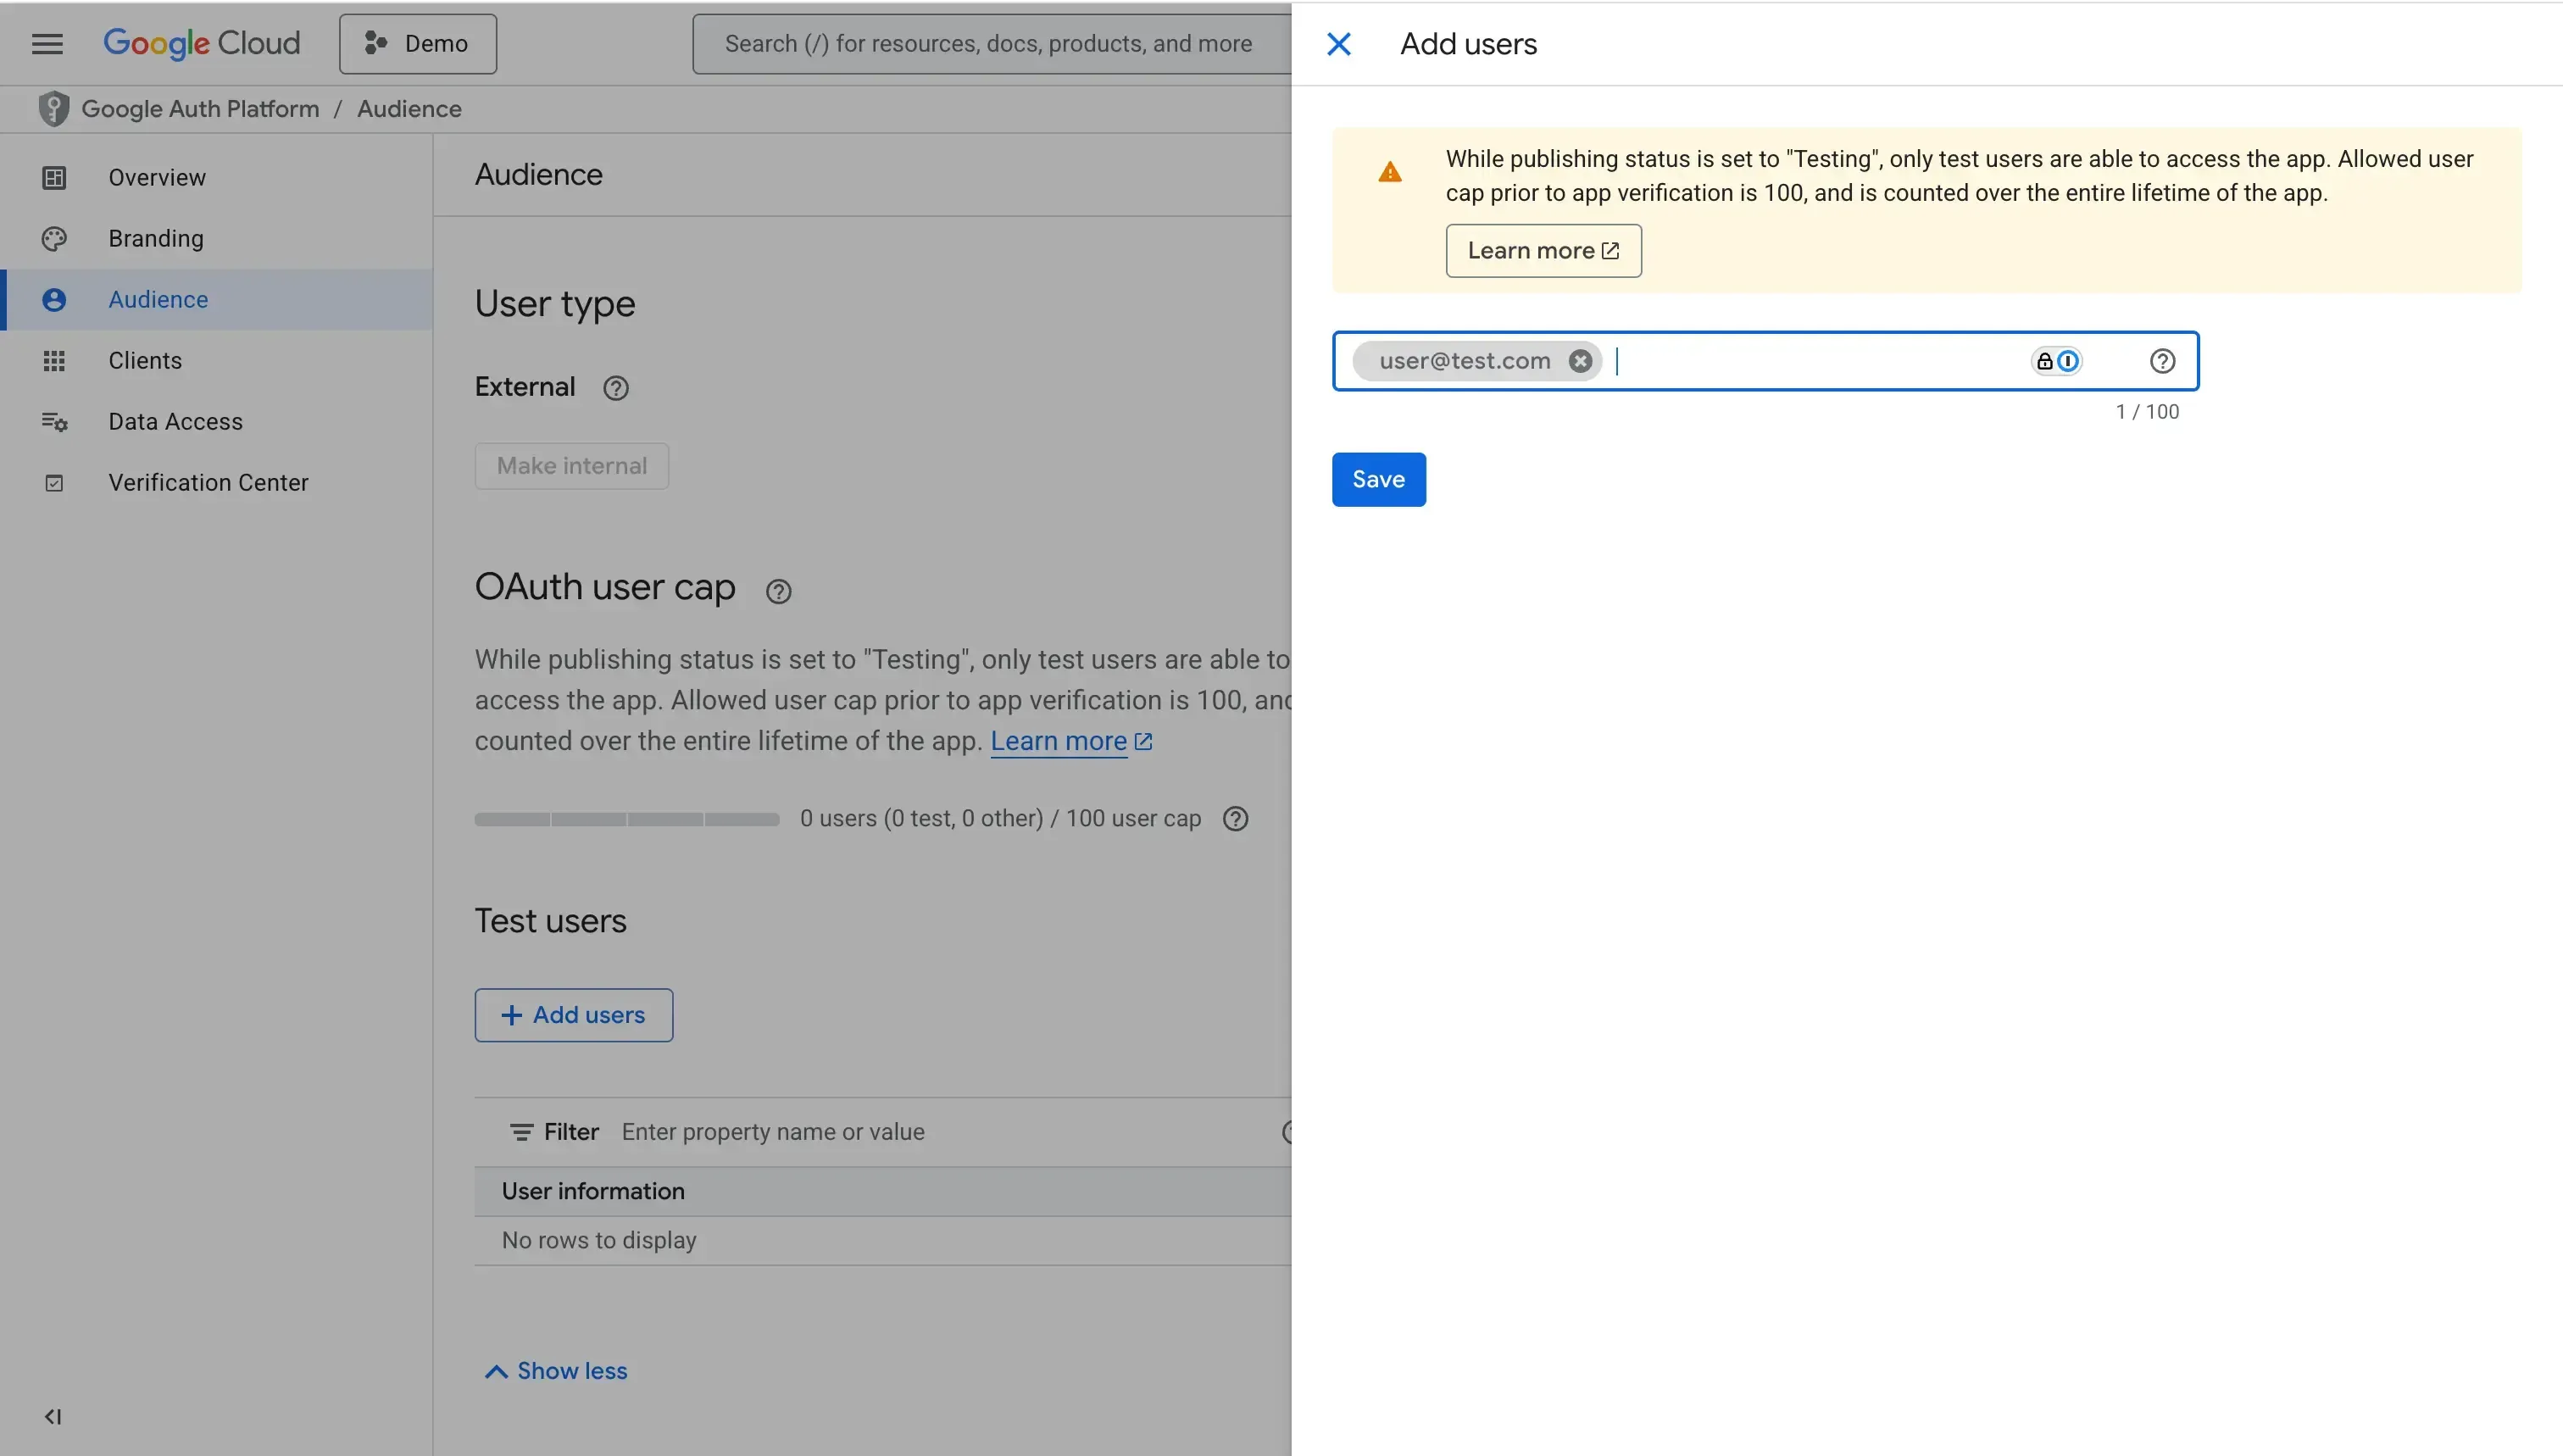
7. 使用予定のカレンダースコープを追加する
Google Calendar を統合する目的に応じて、ユーザーに付与を求めるスコープを選択します。スコープはアプリがユーザーデータへアクセスする権限です。
Google はスコープを非機密 (non-sensitive) と機密 (sensitive) に分けています。機密スコープを追加した場合はアプリの審査が必要です。
必要なスコープを入力したら、各スコープの理由とデモ動画を必ず添付してください。審査時に必須です。
- 「Data Access」タブをクリック
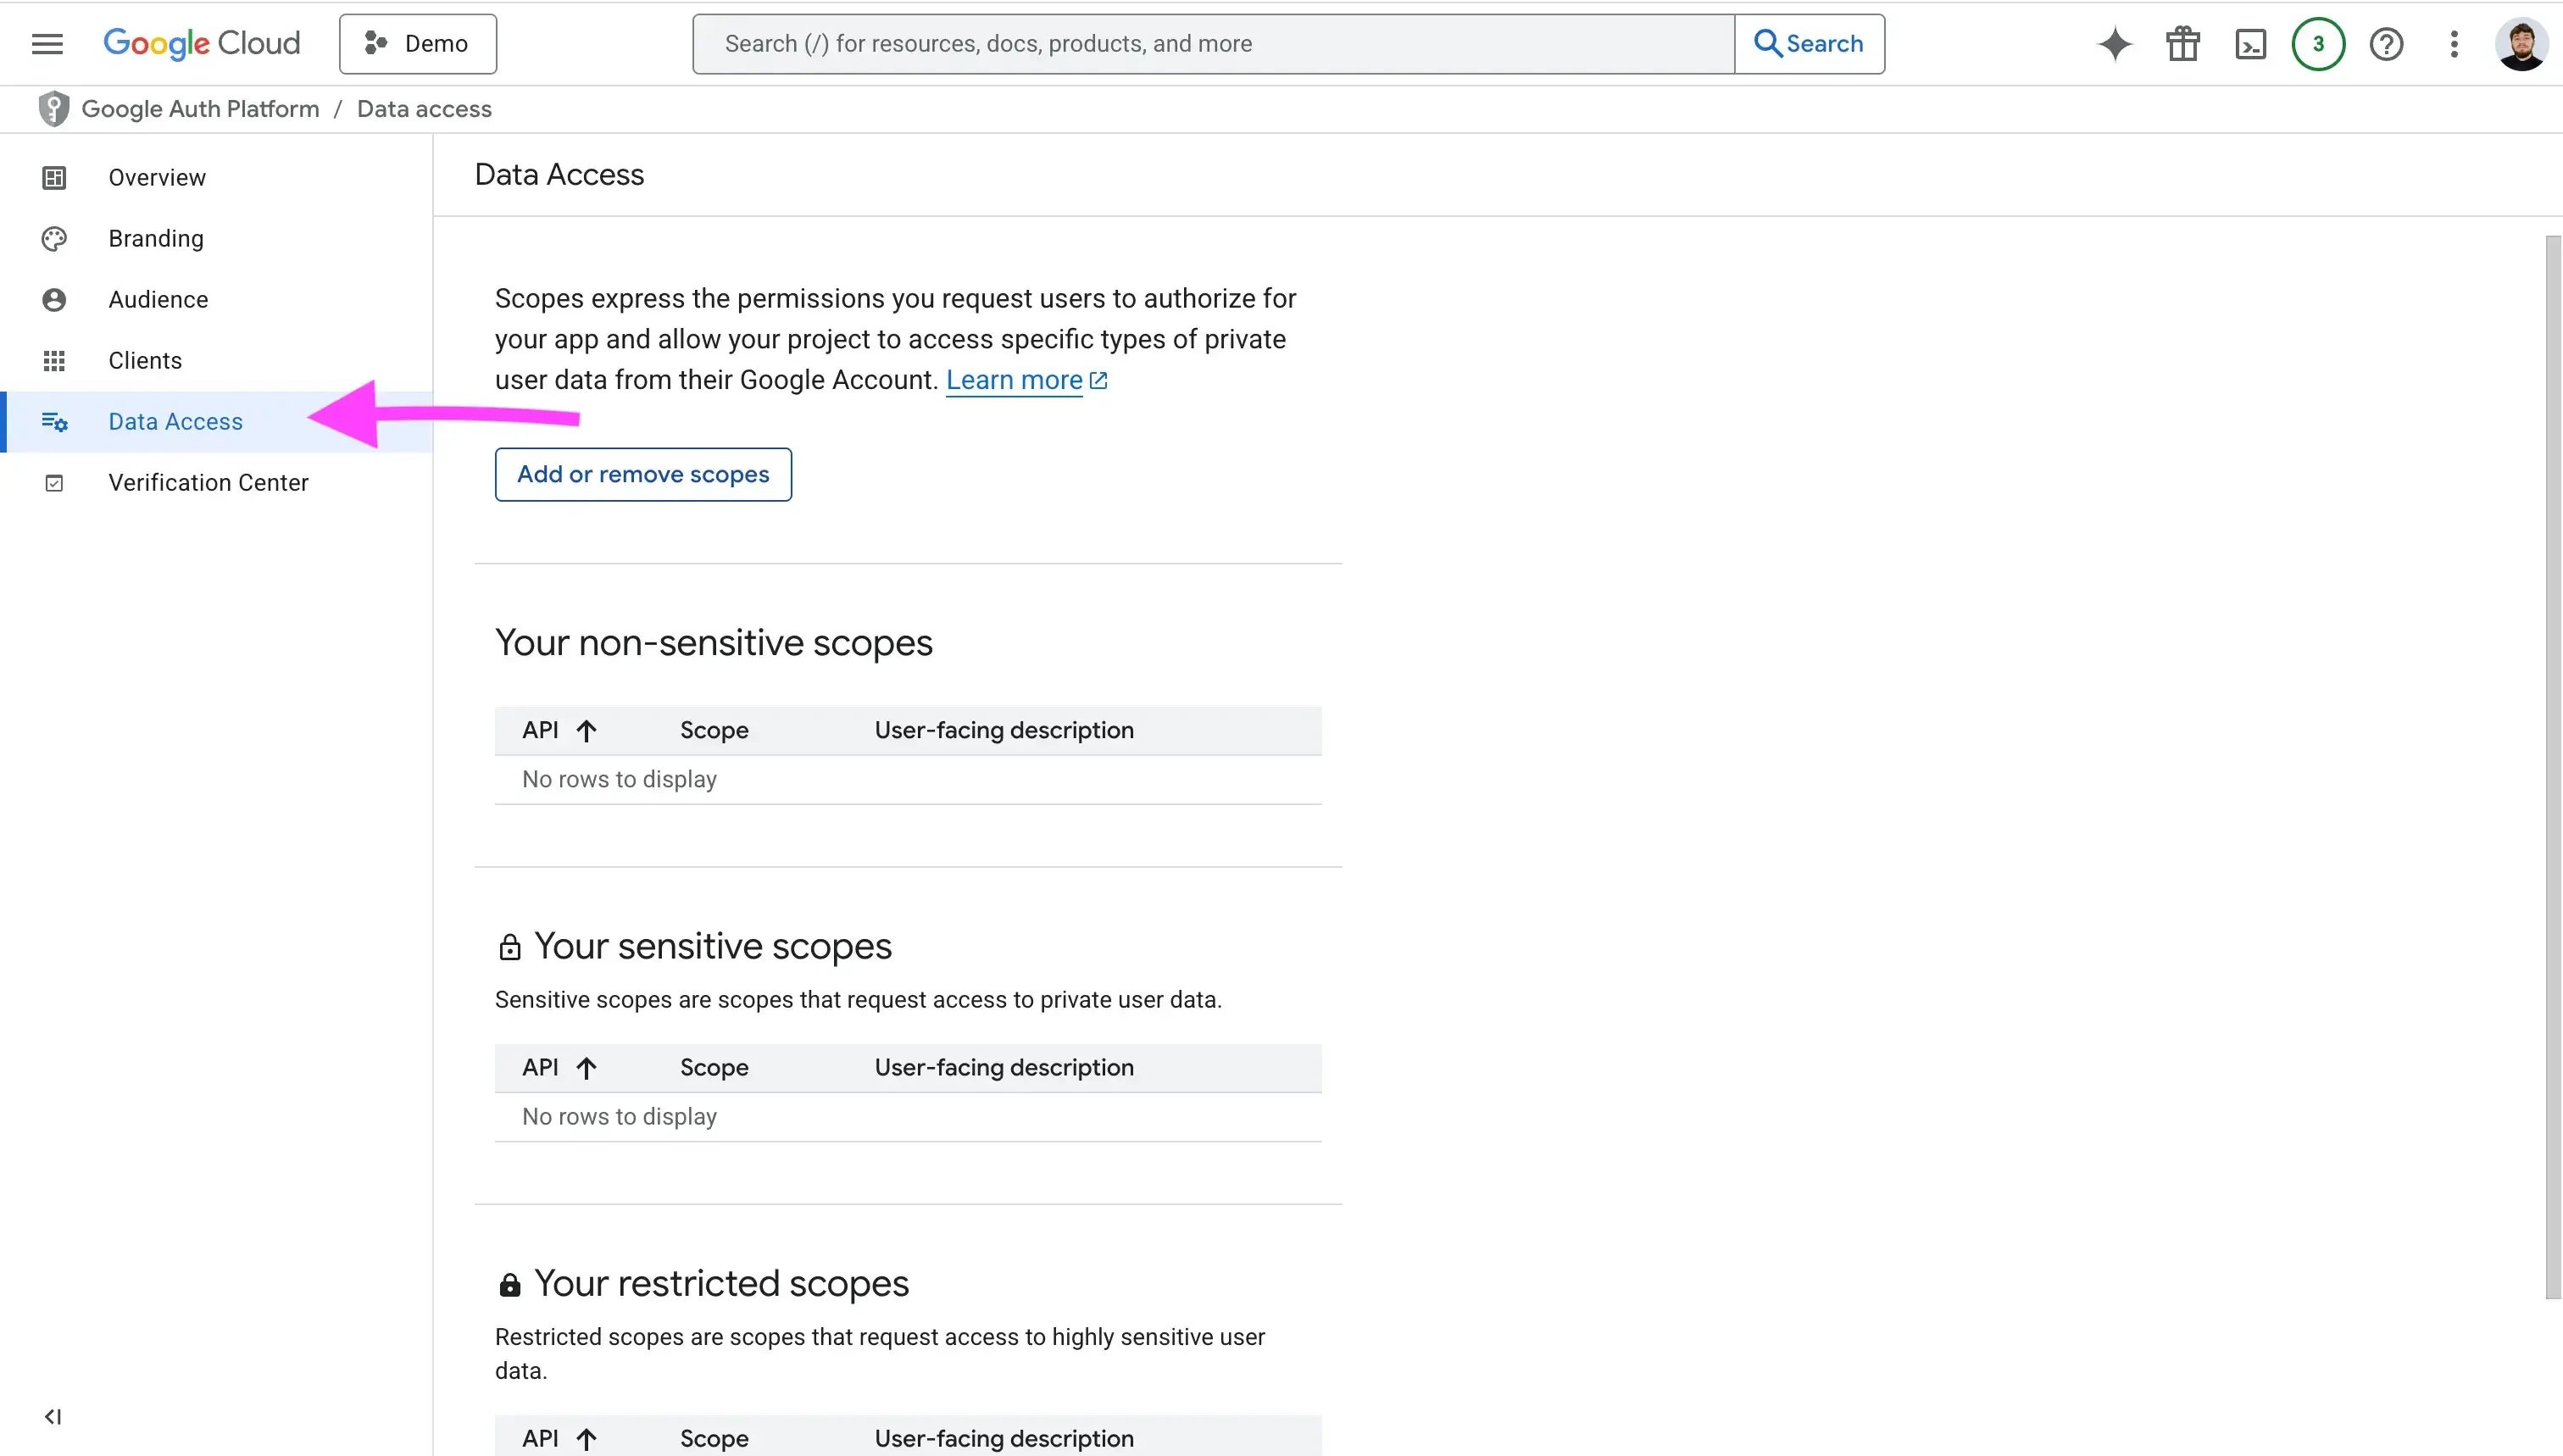
- 「Add or remove scopes」をクリック
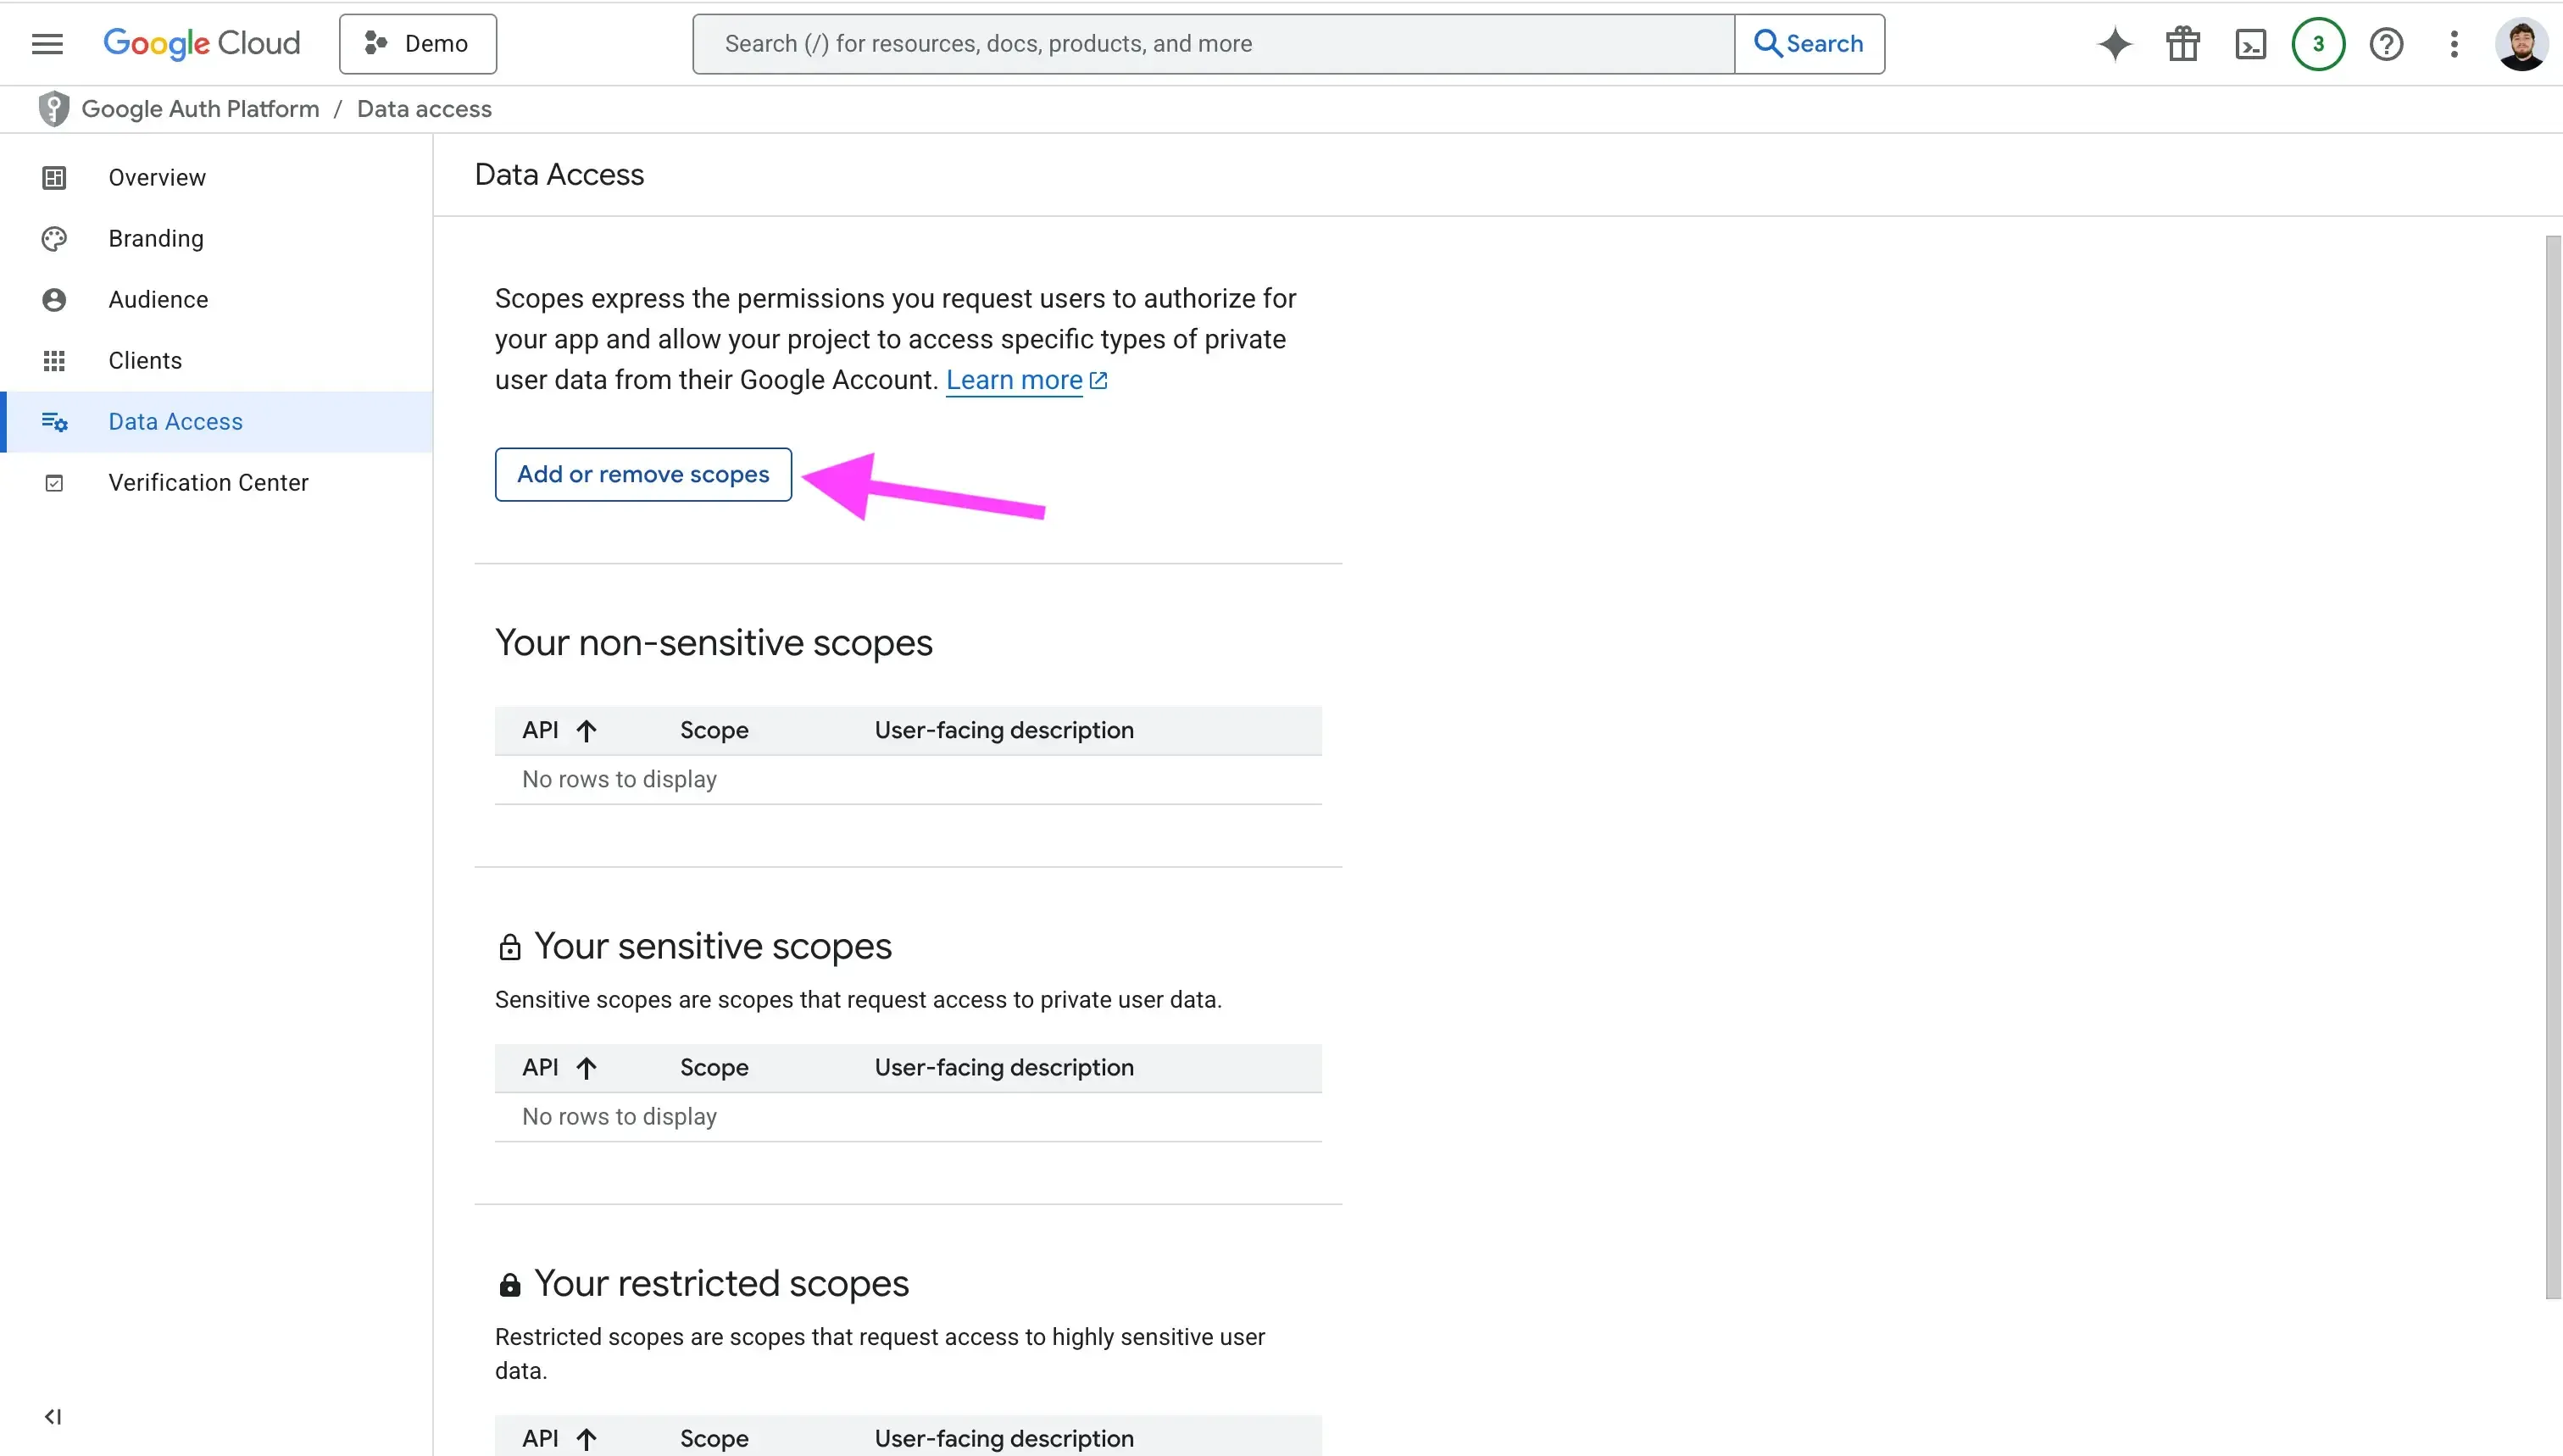
- 名前または値でスコープを検索し、追加

8. Google Calendar API に慣れる
Google クライアントアプリを設定したら、Google Calendar API 概要ページ を読み、Events や Calendar エンドポイントなどの主要エンドポイントを把握しましょう。
9. 複数プロバイダーを 1 つの API で扱える Unified Calendar API の利用
Google Calendar のみを統合する場合は本ステップをスキップして構いません。将来的に Outlook なども統合する場合は、Unified Calendar API の利用を検討してください。
Unified Calendar API を使えば、全カレンダープロバイダーを 1 つの統合で扱え、将来 Outlook を追加してもコードを書く必要がありません。
Google Calendar 認可フローの例
以下のフローチャートは、Google Calendar OAuth フローの簡単な例です。
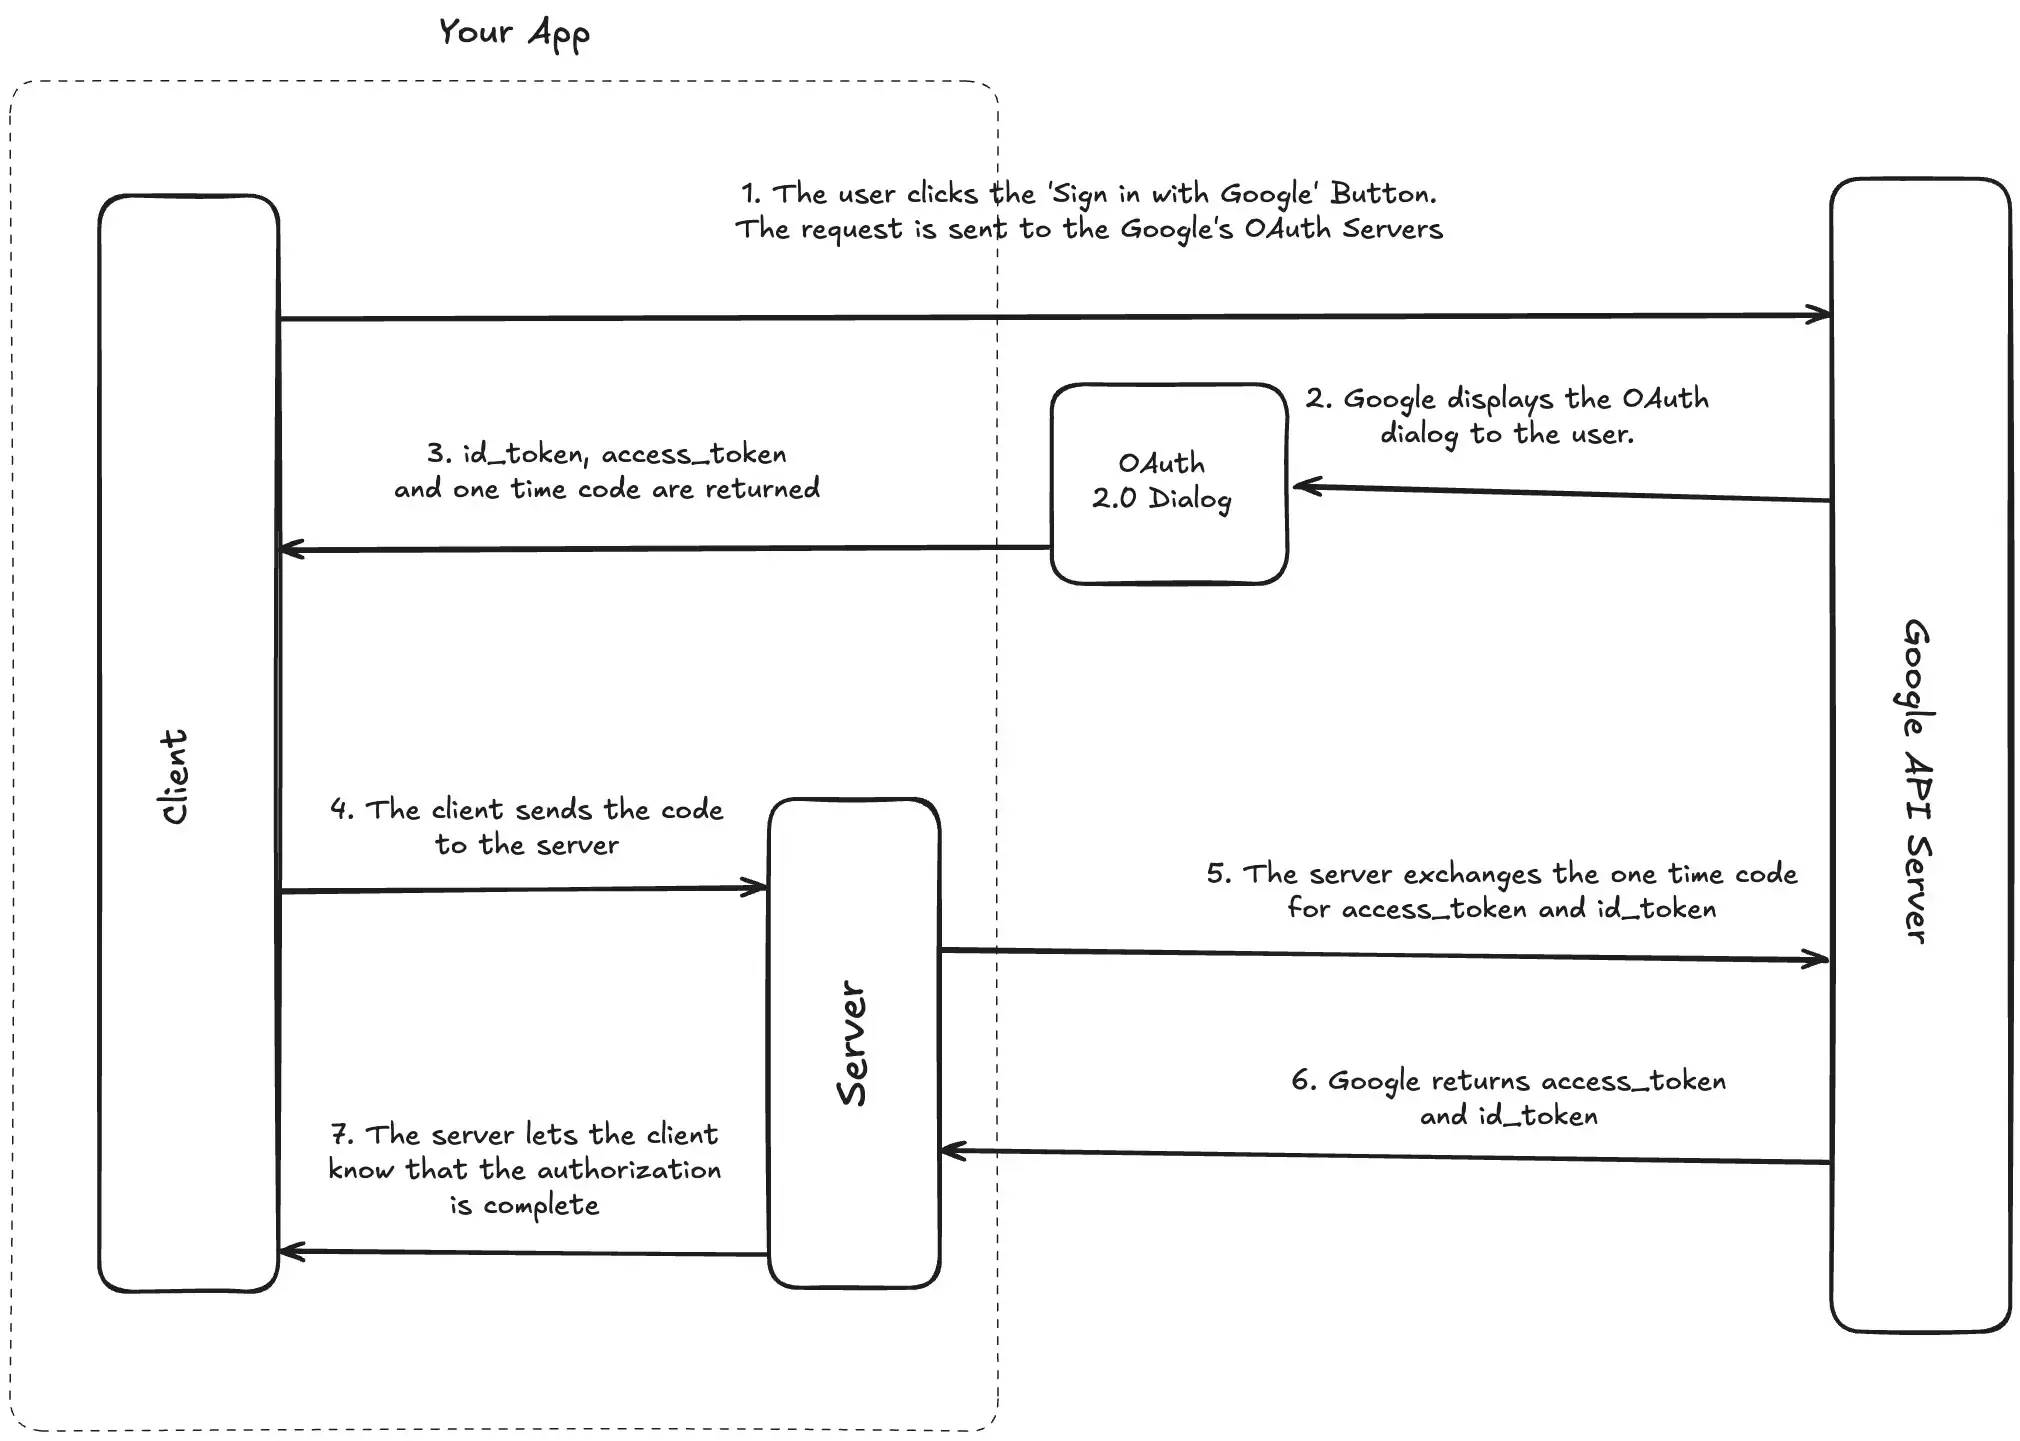
Google は Node.js や Python 用クライアントを提供していますが、ここでは HTTP と TypeScript のみで説明します。
クライアント側 (UI)
「Google Calendar を接続」ボタンを表示します。
const googleOauthUrl = getGoogleOAuthUrl()
<button href="googleOauthUrl" rel="noopener noreferrer"> Connect Google Calendar </button>
読みやすさとパラメータ管理のために、Google OAuth URL を返すユーティリティ関数を推奨します。
const SCOPES = [
  "openid",
  "email",
  "https://www.googleapis.com/auth/calendar.calendarlist",
  "https://www.googleapis.com/auth/calendar.events",
  "https://www.googleapis.com/auth/calendar.readonly",
  // add more scopes as needed
];

export interface ClientState {
  session: Session;
  returnUrl?: string;
}

export function stateToB64(session: ClientState): string {
  return encode(JSON.stringify(session));
}

export function getGoogleOAuthUrl(
  state: ClientState,
) {
  const params = new URLSearchParams({
    client_id: process.env.GOOGLE_CLIENT_ID || "",
    redirect_uri: `${getHostName()}/api/connect/google`, // change the redirect URL as needed response_type: "code",
    scope: SCOPES.join(" "),
    prompt: "consent",
    access_type: "offline",
    state: stateToB64(state),
  });
  return `https://accounts.google.com/o/oauth2/v2/auth?${params}`;
}
prompt パラメータは none、consent、select_account のいずれかを指定できます。
API 側 (バックエンド)
次に、Google サーバーからコードとスコープを受け取り、トークンと交換する API ハンドラーを作成します。例では zod を使用しています。
import { z } from "zod";
const successSchema = z.object({
  code: z.string(),
  scope: z.string(),
  state: z.string(),
});

const errorSchema = z.object({
  error: z.string(),
});
type ErrorParams = z.infer<typeof errorSchema>;

const querySchema = z.union([successSchema, errorSchema]);

// Handler
const googleHanlder: NextApiHandler = async (req, res) => {
  try {
    const result = querySchema.parse(req.query);
    if (isError(result)) {
      const q = new URLSearchParams({
        error: "ACCESS_DENIED",
      });
      return res.redirect(`/?${q}`);
    }

    const { session, returnUr } = stateFromB64(
      result.state
    );

    if (!hasRequiredScopes(result.scope)) {
      const q = new URLSearchParams({
        error: "MISSING_REQUIRED_PERMISSIONS",
      });
      return res.redirect(`/?${q}`);
    }

    const { access_token, refresh_token, id_token, expires_in } =
      await exchangeCodeForTokens(result.code);
    const { email } = decodeIdToken(id_token);

		// Update or insert the calendar connection, depending on your use case
    const connection = await upsertConnection(
      {
        email,
        accessToken: access_token,
        refreshToken: refresh_token,
        expiresInSeconds: expires_in,
        status: ConnectionStatus.ACTIVE,
        provider: CalendarProvider.GOOGLE,
        scopes: result.scope,
        reminderCount: 0,
        lastRemindedAt: null,
      },
      session.user
    );

    const q = new URLSearchParams({
      cid: connection.id,
    });
    if (returnUrl) q.append("returnUrl", returnUrl);

		// The API redirects back to the client side, returning the connection, or errors if any
    res.redirect returnUrl ? returnUrl : `/calendars/google?${q}`
    );
  } catch (e: any) {
    let error = JSON.stringify(e);

      const querystr =
        typeof req.query === "string" ? req.query : JSON.stringify(req.query);
      console.error("Error in googleHandler", querystr);
      console.error("Failed to connect Google account", e);

    const q = new URLSearchParams({
      error,
    });
    return res.redirect(`/?${q}`);
  }
};
export async function exchangeCodeForTokens(code: string) {
const data = new FormData();
data.append("code", code);
data.append("client_id", process.env.GOOGLE_CLIENT_ID || "");
data.append("client_secret", process.env.GOOGLE_CLIENT_SECRET || "");
data.append("redirect_uri", `${getHostName()}/api/connect/google`); // your URL
data.append("grant_type", "authorization_code");
try {
const result = await fetch("<https://oauth2.googleapis.com/token>", {
method: "POST",
body: data,
});
const json = await result.json();
if (json.error) throw json;
const parsed = responseSchema.parse(json);
return parsed;
} catch (e) {
console.error("Exchange failed");
throw e;
}
}
export function decodeIdToken(idToken: string) {
const data = jwt.decode(idToken);
if (typeof data === "string" || !data?.email) {
throw new Error(`Could not parse id_token: ${idToken}`);
}
return data;
}
function isError(query: Record<string, any>): query is ErrorParams {
return Boolean(query.error);
}
export function stateFromB64(encoded: string): ClientState {
const str = decode(encoded);
return JSON.parse(str) as ClientState;
}process.env.GOOGLE_CLIENT_ID と process.env.GOOGLE_CLIENT_SECRET は手順 5 で取得した Client ID と Client Secret です。モーダルを閉じる前に必ずコピーしてください。
Google Calendar API 統合時の注意点
- 審査には数週間かかる場合がある – リリース前にスケジュールに余裕をもたせましょう。
- Webhook は約 24 時間で失効するため必ず更新する – Cron で期限切れ 20 分前に更新すると安全です。
- 必要なスコープのみを要求する – 不要なスコープは審査で拒否されたり、ユーザーが承認をためらいます。
- クォータとレート制限に注意 – 429 や 403 が返ったら指数バックオフなどを実装してください。
- 個人データのログ出力に注意 – 説明や参加者メールなどはマスクしてください。
OneCal Unified Calendar API で複数プロバイダーを統合
OneCal では Google Calendar、Outlook、iCloud 間で数百万件のイベントを同期してきました。その経験を基に、主要プロバイダーを単一 API で扱える Unified Calendar API を開発中です。
無料で開始し、Unified Calendar API をテストして機能を確認したうえで、後からアップグレードするかを決めることができます。
よくある質問
テストユーザーを追加する必要があるのはなぜですか?
未確認の外部アプリは、開発中および Google の承認前はホワイトリストに登録したテストアカウントでしか利用できません。
Google カレンダーの Webhook はどのくらい有効ですか?
プッシュ通知サブスクリプションは約 24 時間で期限切れになるため、バックエンドで期限切れ前に更新する必要があります。
後で Outlook や iCloud のカレンダーを簡単に追加する方法はありますか?
はい。OneCal Unified Calendar API のような統合 API を使えば、Google、Outlook、iCloud を 1 つの API で扱え、個別統合や保守の手間を省けます。
バックグラウンドジョブには “offline_access” が必要ですか?
はい。同意 URL に access_type=offline を付けるとリフレッシュトークンが返され、ユーザーが離席中でもサーバーが API を呼び出せます。